Sony DSR-PD170P Manual
Sony
Videokamera
DSR-PD170P
Læs nedenfor 📖 manual på dansk for Sony DSR-PD170P (176 sider) i kategorien Videokamera. Denne guide var nyttig for 25 personer og blev bedømt med 4.5 stjerner i gennemsnit af 2 brugere
Side 1/176

3-087-464-15 (1)
Digital
Camcorder
Operating Instructions
Before operating the unit, please read this manual thoroughly,
and retain it for future reference.
DSR-PD170P
©2003 Sony Corporation
DSR-PD170P

2
Welcome!
Congratulations on your purchase of this Sony Digital camcorder.
With your Digital camcorder, you can capture life’s precious moments with superior picture and
sound quality. Your Digital camcorder is loaded with advanced features, but at the same time it is
very easy to use. You will soon be producing home video that you can enjoy for years to come.
WARNING
To prevent fire or shock hazard, do
not expose the unit to rain or
moisture.
To avoid electrical shock, do not
open the cabinet. Refer servicing to
qualified personnel only.
This symbol is intended to alert
the user to the presence of
uninsulated “dangerous voltage”
within the product’s enclosure
that may be of sufficient
magnitude to constitute a risk of
electric shock to persons.
This symbol is intended to alert
the user to the presence of
important operating and
maintenance (servicing)
instructions in the literature
accompanying the appliance.
NOTICE ON THE SUPPLIED AC
POWER ADAPTOR FOR
CUSTOMERS IN THE UNITED
KINGDOM
A moulded plug complying with BS1363 is
fitted to this equipment for your safety and
convenience.
Should the fuse in the plug supplied need to
be replaced, a fuse of the same rating as the
supplied one and approved by ASTA or BSI
to BS 1362 (i.e., marked with or mark)
must be used.
If the plug supplied with this equipment has
a detachable fuse cover, be sure to attach the
fuse cover after you change the fuse. Never
use the plug without the fuse cover. If you
should lose the fuse cover, please contact
your nearest Sony service station.
For the Customers in Europe
This product with the CE marking complies
with both the EMC directive and the Low
Voltage Directive issued by the Commission of
the European Community.
Compliance with these directives implies
conformity to the following European
standards:
•EN60065:Product Safety (supplied AC
Adaptor only)
•EN55103-1:Electromagnetic Interference
(Emission)
•EN55103-2:Electromagnetic Susceptibility
(Immunity)
This product is intended for use in the
following Electromagnetic Environment(s):
E1 (residential), E2 (commercial and light
industrial), E3 (urban outdoors) and E4
(controlled EMC environment ex. TV studio)
ATTENTION
The electromagnetic fields at the specific
frequencies may influence the picture and
sound of this digital camcorder.
Applicable only to ports interfacing with
cables whose total length according to the
manufacturer’s functional specification may
exceed 1 m.
Voor de klanten in Nederland
Gooi de batterij niet weg maar lever deze in als
klein chemisch afval (KCA).
Notice
If static electricity or electromagnetism causes
data transfer to discontinue midway (fail),
restart the application or disconnect and
connect the i.LINK cable again.

3
For customers in the U.S.A
and CANADA
RECYCLING LITHIUM-ION BATTERIES
Lithium-Ion batteries are recyclable.
You can help preserve our
environment by returning your
used rechargeable batteries to the
collection and recycling location
nearest you.
For more information regarding recycling of
rechargeable batteries, call toll free 1-800-822-8837, or
visit http://www.rbrc.org/.
Caution: Do not handle damaged or leaking Lithium-
Ion batteries.
For customers in the U.S.A.
If you have any questions about this product,
you may call:
Sony Customer Information Center 1-800-686-
SONY (7669).
The number below is for the FCC related
matters only.
Regulatory Information
Declaration of Conformity
Trade Name: SONY
Model No.: DSR-PD170P
Responsible Party: Sony Electronics Inc.
Address: 16530 Via Esprillo, San
Diego, CA 92127
U.S.A
Telephone No.: 858-942-2230
This device complies with Part 15 of the
FCC Rules.
Operation is subject to the following two
conditions:
(1) This device may not cause harmful
interference, and (2)this device must accept
any interference received, including
interference that may cause undesired
operation.
CAUTION
You are cautioned that any changes or
modifications not expressly approved in this
manual could void your authority to operate
this equipment.
Notes:
•This equipment has been tested and found to
comply with the limits for a Class B digital
device, pursuant to Part 15 of the FCC Rules.
These limits are designed to provide
reasonable protection against harmful
interference in a residential installation. This
equipment generates, uses, and can radiate
radio frequency energy and, if not installed
and used in accordance with the instructions,
may cause harmful interference to radio
communications. However, there is no
guarantee that interference will not occur in a
particular installation. If this equipment does
cause harmful interference to radio or
television reception, which can be
determined by turning the equipment off and
on, the user is encouraged to try to correct
the interference by one or more of the
following measures:
— Reorient or relocate the receiving antenna.
— Increase the separation between the
equipment and receiver.
— Connect the equipment into an outlet on a
circuit different from that to which the
receiver is connected.
— Consult the dealer or an experienced
radio/TV technician for help.
The supplied interface cable must be used
with the equipment in order to comply with
the limits for a digital device pursuant to
Subpart B of Part 15 of FCC Rules.
•Lamp in this product contains mercury.
Disposal of these materials may be regulated
due to environmental considerations. For
disposal or recycling information, please
contact your local authorities or the
Electronic Industries Alliance (http://
www.eiae.org).

4
Table of contents
Quick Start Guide ............................................... 5
Getting Started
Using this manual ............................................... 7
Checking supplied accessories ......................... 9
Step 1 Installing the microphone................... 10
Step 2 Preparing the power supply .............. 11
Step 3 Setting the date and time .................... 16
Step 4 Inserting a cassette ............................... 17
Recording – Basics
Recording a picture .......................................... 18
Shooting backlit subjects (BACK
LIGHT) .......................................... 25
Spot light .............................................. 26
Checking the recording – END SEARCH /
EDITSEARCH / Rec Review ....................... 27
Playback – Basics
Playing back a tape ........................................... 28
Viewing the recording on TV ......................... 33
Advanced Recording Operations
Recording a still image on a tape
– Tape Photo recording ................................. 34
Shooting with all the pixels
– PROG. SCAN ............................................... 35
Using the guide frame ..................................... 36
Using the wide mode ....................................... 37
Using the fader function .................................. 38
Using special effects – Digital effect .............. 40
Shooting with manual adjustment ................. 43
Adjusting the white balance ........................... 51
Adjusting the recording level manually
– Sound recording level ................................ 53
Connecting an optional external
microphone ..................................................... 55
Presetting the adjustment for picture quality
– Custom preset ............................................. 57
Focusing manually ........................................... 59
Interval recording ............................................. 60
Frame by frame recording – Cut recording .. 62
Superimposing the date and time on a
picture ............................................................. 63
Marking an Index ............................................. 64
Advanced Playback Operations
Searching for a recording by index – Index
search ............................................................... 65
Searching the boundaries of recorded tape by
title – Title search ........................................... 67
Searching a recording by date
– Date search ................................................... 68
Searching for a photo – Photo search/Photo
scan .................................................................. 70
Playing back a tape with digital effects ......... 72
Editing
Dubbing a tape .................................................. 73
Dubbing only desired scenes
– Digital program editing ............................. 75
Using with an analog video unit and a PC
– Signal convert function .............................. 81
Recording video or TV programs .................. 82
Audio dubbing .................................................. 86
Setting time values ........................................... 90
Superimposing a title ....................................... 95
Making your own titles.................................... 99
Labeling a cassette .......................................... 101
Erasing the cassette memory data ................ 103
Customizing Your Camcorder
Changing the menu settings ......................... 105
“Memory Stick” Operations
Using a “Memory Stick” – introduction...... 113
Recording still images on a “Memory Stick”
– Memory Photo recording ........................ 118
Superimposing a still image in a “Memory
Stick” on a moving picture
– MEMORY MIX .......................................... 121
Recording an image from a tape as a still
image ............................................................. 124
Copying still images from a tape
– Photo save .................................................. 127
Viewing a still picture
– Memory Photo playback .......................... 129
Copying an image recorded on a “Memory
Stick” to tapes ............................................... 132
Playing back images continuously
– SLIDE SHOW ............................................ 134
Preventing accidental erasure
– Image protection ....................................... 135
Deleting images .............................................. 136
Writing a print mark – Print mark ............... 139
Additional Information
Compatibility of DVCAM and DV
formats........................................................... 140
Usable cassettes ............................................... 142
About i.LINK................................................... 144
Troubleshooting .............................................. 146
Self-diagnosis display .................................... 152
Warning indicators and messages ............... 153
Using your camcorder abroad ...................... 155
Maintenance information and precautions .. 156
Specifications ................................................... 161
Quick Reference
Identifying the parts and controls ................ 162
Quick Function Guide.................................... 173
Index ................................................................. 174

5
Quick Start Guide
Quick Start Guide
This guide introduces you to the basic way of recording/playback. See the pages in parentheses
“( )” for more information.
Connecting the mains lead (p. 15)
Use the battery pack when using your camcorder outdoors (p. 11).
AC Adaptor (supplied)
Connect the plug with its v mark
facing toward the LCD panel side.
Open the DC IN jack
cover.
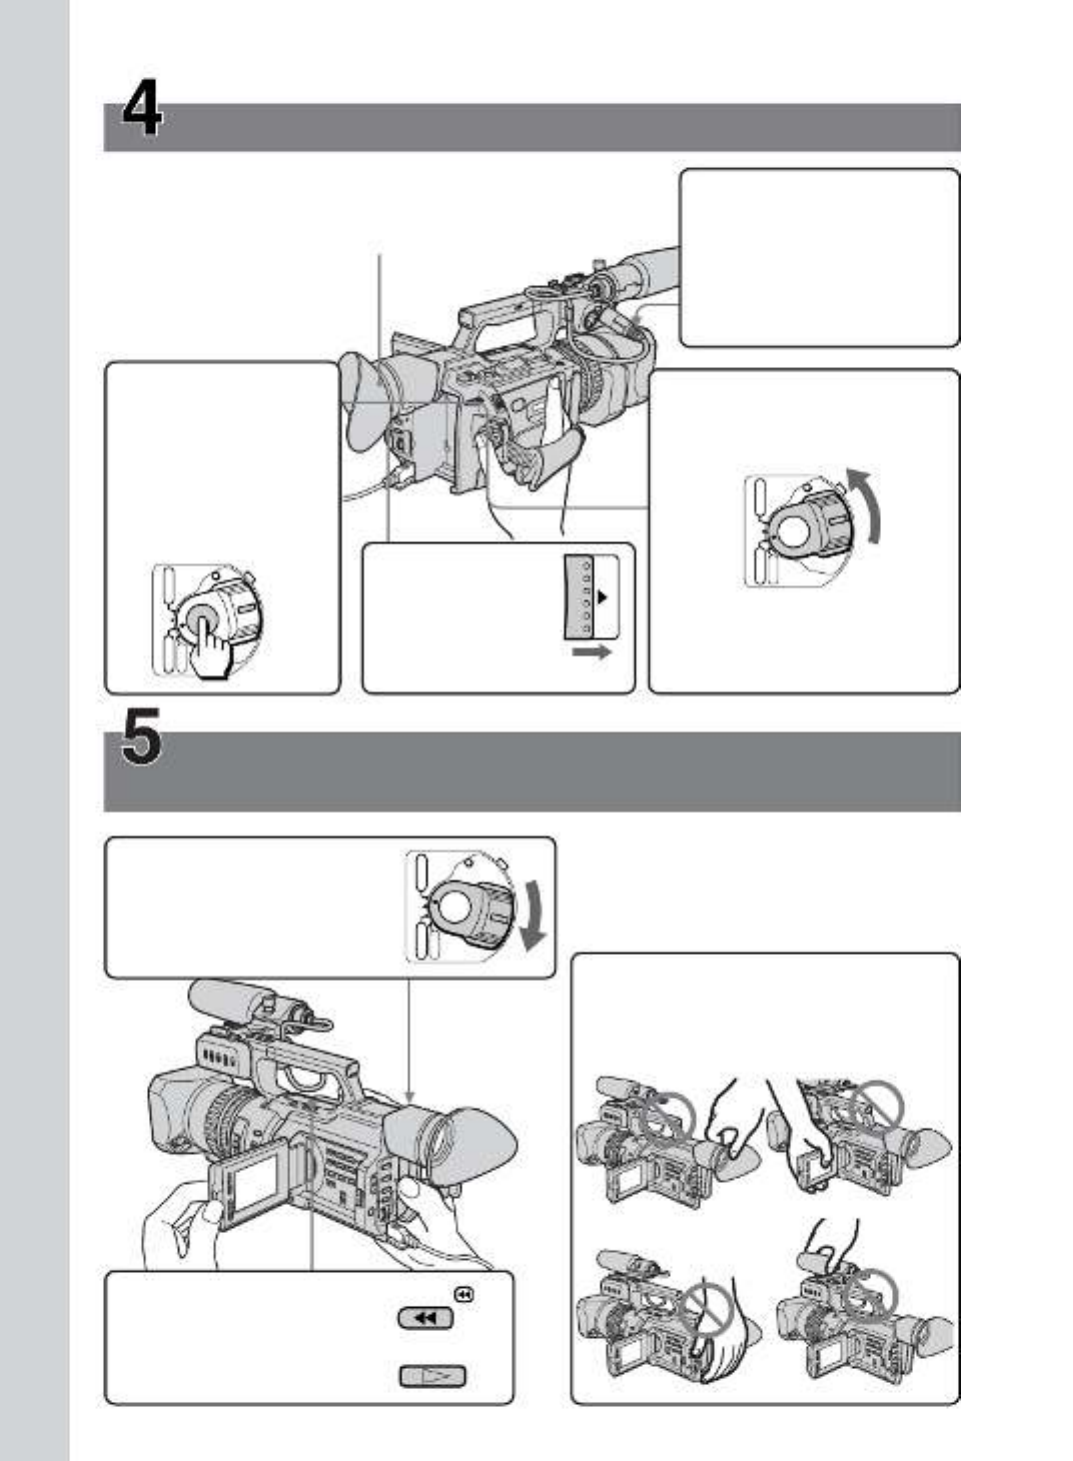
Inserting a cassette (p. 17)
1While pressing
the small blue
button on the
EJECT switch,
slide it in the direction
of the arrow.
2
Push the middle
portion of the back of
the cassette to insert it.
Insert the cassette into
the cassette
compartment with the
window facing out
and the write-protect
tab facing upward.
3Close the cassette
compartment by
pressing the PUSH
mark on it.
PUSH
Window
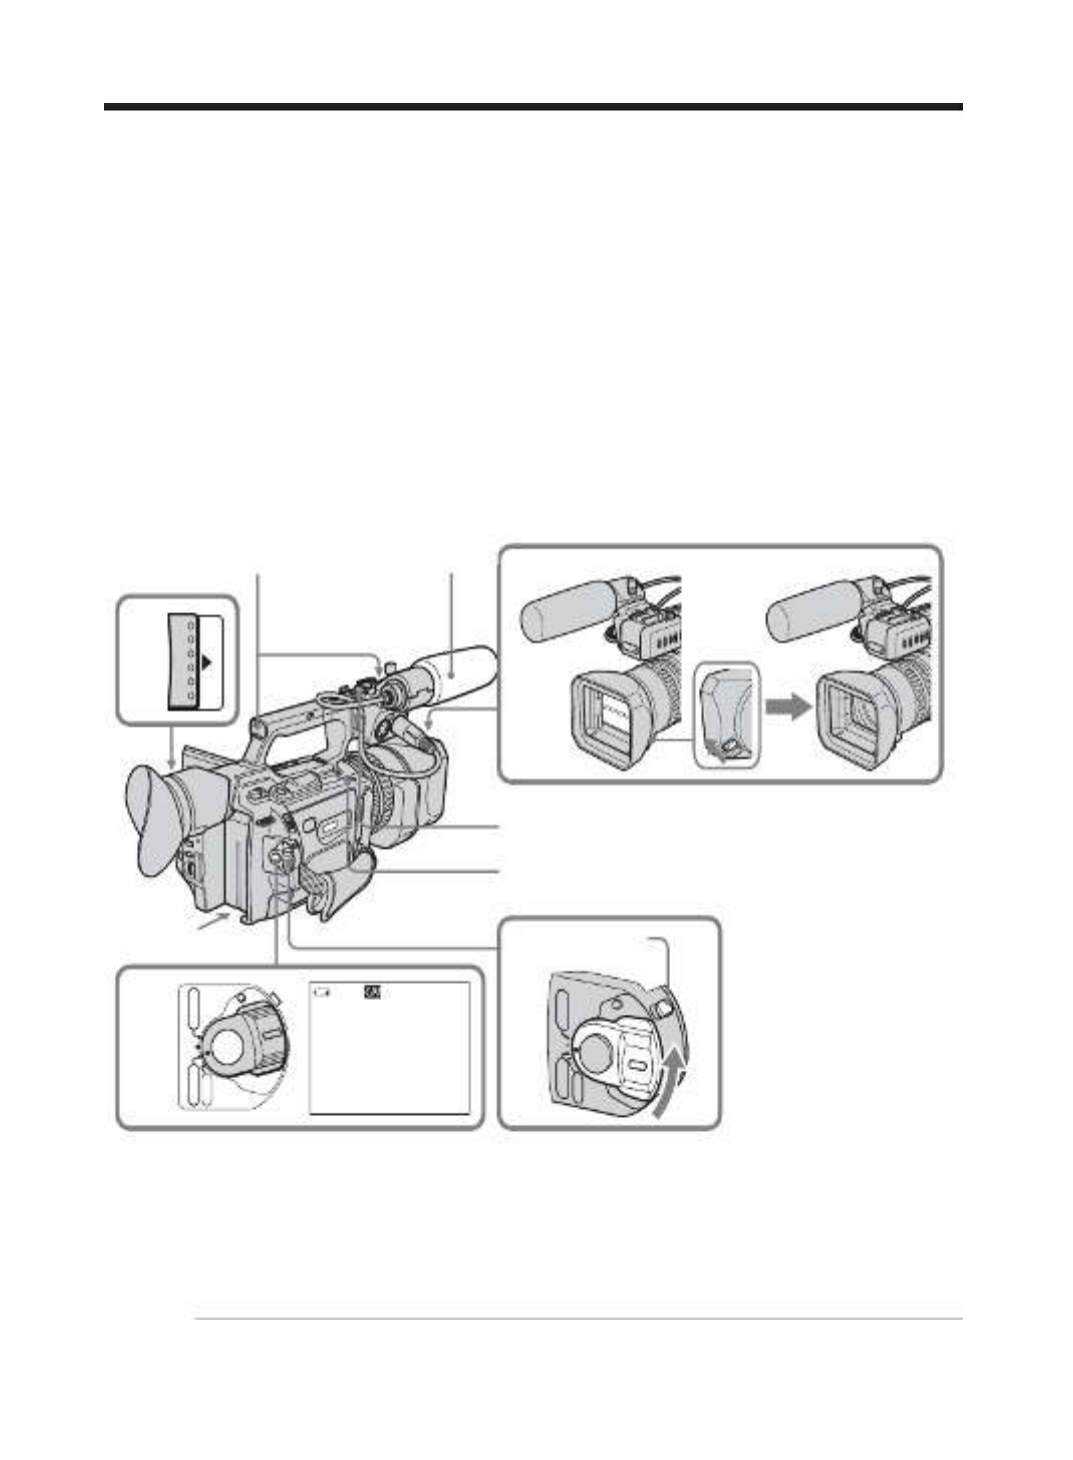
Installing the microphone (p. 10)
Install the supplied microphone with the model name (ECM-NV1) facing upward. Be sure
to connect the microphone plug to the INPUT1 connector.
4Close the cassette lid
by pressing the
PUSH button on the
cassette lid.
Write-protect tab
to INPUT1
6
Quick Start Guide
Recording a picture (p. 18)
Viewfinder
When the LCD panel is closed, use the
viewfinder placing your eye against its eyecup.
2Set the POWER switch to
CAMERA while pressing
the small green button.
If the ND1 or ND2
indicator flashes, see page
47.
Monitoring the playback picture on the LCD
screen (p. 28)
1Set the POWER switch to
VCR while pressing the
small green button.
2Press m to rewind
the tape.
3Press N to start
playback.
NOTE
Do not pick up your camcorder by
holding the viewfinder, the LCD panel,
the battery pack, or the microphone.
POWER
OFF
(CHG) CAMERA
MEMORY
VCR
4Press START/
STOP. Your
camcorder starts
recording. To stop
recording, press
START/STOP
again.
POWER
OFF
(CHG)
CAMERA
MEMORY
VCR
REW
PLAY
POWER
OFF
(CHG)
CAMERA
MEMORY
VCR
3Slide OPEN
back in the B
mark direction
to open the
LCD panel.
OPEN
1Open the shutter of the
hood with a lens cap.
For more information
about attaching the
hood with a lens cap,
see page 165.

7
Getting Started
— Getting Started —
Using this manual
As you read through this manual, buttons and settings on your camcorder are shown in
capital letters.
e.g. Set the POWER switch to CAMERA.
When you carry out an operation, you can hear a beep or a melody sound to indicate
that the operation is being carried out.
Note on cassette memory
Your camcorder is based on the DVCAM/DV format. We recommend that you use a
tape with cassette memory .
The functions which require different operations depending on whether or not the tape
has cassette memory are:
•Searching the end point of the recording – end search (p. 27, 31)
•Searching a recording by index – index search (p. 65)
•Searching a recording by date – date search (p. 68)
•Searching for a photo – photo search (p. 70)
The functions you can operate only with cassette memory are:
•Searching the boundaries of recorded tape by title – title search (p. 67)
•Superimposing a title (p. 95)
•Making your own titles (p. 99)
•Labeling a cassette (p. 101)
For details, see page 142.
You see this mark in the introduction of the features that are operated only with
cassette memory.
Tapes with cassette memory are marked with (Cassette Memory).

8
Using this manual
Note on TV colour systems
TV colour systems differ by country or region.
To view your recordings on a TV, you need a PAL system-based TV.
Copyright precautions
Television programs, films, video tapes, and other materials may be copyrighted.
Unauthorized recording of such materials may be contrary to the provision of the
copyright laws.
Precautions on camcorder care
Lens and LCD screen/finder
• The LCD screen and the finder are manufactured using extremely high-precision
technology, so over 99.99% of the pixels are operational for effective use.
However, there may be some tiny black points and/or bright points (white, red,
blue or green in colour) that constantly appear on the LCD screen and the finder.
These points are normal in the manufacturing process and do not affect the
recording in any way.
•Do not directly shoot the sun. Doing so might cause your camcorder to malfunction.
Take pictures of the sun in low light conditions such as dusk.
•Do not let your camcorder get wet. Keep your camcorder away from rain and sea
water. Letting your camcorder get wet may cause your camcorder to malfunction.
Sometimes this malfunction cannot be repaired [ ]a.
•Never leave your camcorder exposed to temperatures above 60 °C (140 °F), such as in
a car parked in the sun or under direct sunlight [ ]b.
•Be careful when placing the camera near a window or outdoors. Exposing the LCD
screen, the finder or the lens to direct sunlight for long periods may cause
malfunctions .[ ]c
Contents of the recording cannot be compensated if recording or playback is not made due to a
malfunction of the camcorder, video tape, etc.
[ ]a[b] [c]

9
Getting Started
Checking supplied accessories
Make sure that the following accessories are supplied with your camcorder.
1 2 3
4 5 7
8 9
6
0
qa
1Wireless Remote Commander (1)
(p. 170)
2AC-L15A/L15B AC Adaptor (1), Mains
lead (1) (p. 12)
3NP-F570 rechargeable battery pack (1)
(p. 11, 12)
4R6 (size AA) battery for Remote
Commander (2) (p. 171)
5A/V connecting cable (1) (p. 33, 73)
6Shoulder strap (1) (p. 166)
7Hood with a lens cap (1) (p. 165)
8LSF-S58 lens hood (1) (p. 168)
9Hood cap (1) (p. 169)
0VCL-HG0758 wide conversion lens (1)
(p. 168), Carrying pouch (1)
qa Microphone (1) (p. 10), Wind screen (1)
(p. 10)

10
Step 1 Installing the microphone
Install the supplied microphone. Be sure to connect the microphone plug to the INPUT1
connector.
( )1 Attach the wind screen to the microphone.
( )2 Loosen the microphone holder screw and open the cover.
( )3 Place the microphone into the holder with the model name (ECM-NV1) facing
upward, close the cover, and tighten the screw.
( )4 Connect the plug of the microphone to the INPUT 1 connector.
( )5 Set the INPUT LEVEL selector to MIC or MIC ATT. When set to MIC ATT, you
can reduce the volume by about 20 dB. And set the +48 V switch to ON.
( )6 Select the channel to be used, using the REC CH SELECT switch. When you
record a sound (signal), which comes from the microphone connected to the
INPUT 1 connector, only on the channel 1, set it to CH1. When you record both
on the channels 1 and 2, set it to CH1•CH2.
When the wind is blowing hard
Set CH1 or CH2 of WIND to ON in the menu settings according to the input (p. 105).
When you unplug the microphone plug
Unplug it while holding the PUSH button down.
12 3
4 5 6
CH1•CH2
REC CH
SELECT
INPUT
LEVEL +48V
INPUT
LEVEL +48V
CH1
LINE
MIC
ON
OFF
LINE
MIC
ATT
MIC
ATT
MIC
ON
OFF
INPUT1 INPUT2
REC CH
SELECT
INPUT
LEVEL +48V
INPUT2
CH1•CH2
REC CH
SELECT
INPUT
LEVEL +48V
INPUT
LEVEL +48V
CH1
LINE
MIC
ON
OFF
LINE
MIC
ATT
MIC
ATT
MIC
ON
OFF
INPUT1 INPUT2
REC CH
SELECT
INPUT
LEVEL +48V
INPUT2
11
Getting Started
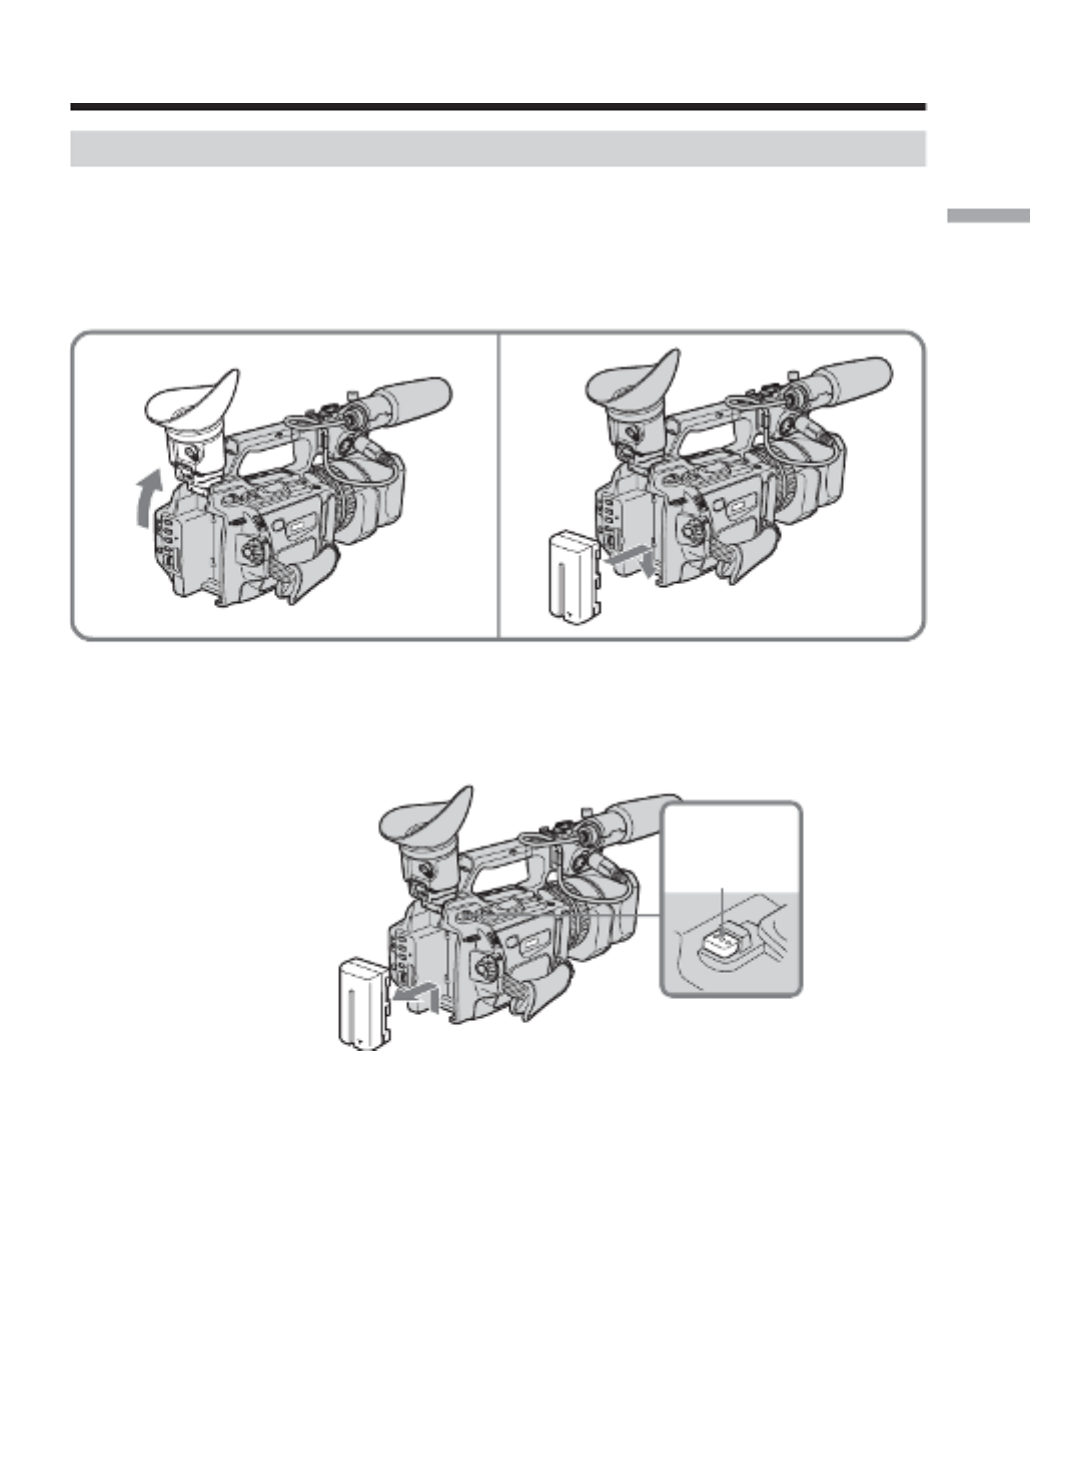
Step 2 Preparing the power supply
Installing the battery pack
Install the battery pack to use your camcorder outdoors.
( )1 Lift up the viewfinder.
( )2 Insert the battery pack in the direction of the V mark on the battery pack. Slide
the battery pack until it clicks.
To remove the battery pack
Lift up the viewfinder.
Slide the battery pack out in the direction of the arrow while pressing BATT RELEASE
down.
12
BATT
RELEASE

12
Step 2 Preparing the power supply
Charging the battery pack
Use the battery pack after charging it.
Your camcorder operates only with the “InfoLITHIUM” battery pack (L series).
( )1 Open the DC IN jack cover and connect the AC Adaptor supplied with your
camcorder to the DC IN jack with the plug‘s mark facing toward the LCDv
panel side.
( )2 Connect the mains lead to the AC Adaptor.
( )3 Connect the mains lead to a wall socket.
( )4 Set the POWER switch to OFF (CHG). Charging begins.
The remaining battery time is indicated in minutes on the display window.
When the remaining battery indicator changes to , is completed. Tounormal charge
fully charge the battery , leave the battery pack attached for about one hour(full charge)
after normal charge is completed until FULL appears on the display window. Fully
charging the battery allows you to use the battery longer than usual.
After charging the battery pack
Disconnect the AC Adaptor from the DC IN jack on your camcorder.
Note on the remaining battery time indicator
The remaining battery time indicator on the LCD screen/display window or in the
viewfinder indicates the recording time using the viewfinder. The indicator may not be
correct, depending on the conditions in which you are recording. When you close the
LCD panel and open it again, it takes about one minute for the correct remaining
battery time to be displayed.
POWER
OFF
(CHG)
CAMERA
MEMORY
VCR
4
1

13
Getting Started
Step 2 Preparing the power supply
Notes
•
Prevent metallic objects from coming into contact with the metal parts of the DC plug of
the AC Adaptor. This may cause a short-circuit, damaging the AC Adaptor.
•Keep the battery pack dry.
•
When the battery pack is not to be used for a long time, charge the battery pack once
fully, and then use it until it fully discharges again. Keep the battery pack in a cool place.
Until your camcorder calculates the actual remaining battery time
“- - - - min” appears in the display window.
While charging the battery pack, no indicator appears or the indicator flashes in
the display window in the following cases:
– The battery pack is not installed correctly.
– The AC Adaptor is disconnected.
– Something is wrong with the battery pack.
When using the AC Adaptor
Be sure to use it near the wall socket. If a malfunction occurs, disconnect the plug from
a wall socket.
Charging time
Battery pack Full charge (Normal charge)
NP-F550 210 (150)
NP-F570 (supplied) 260 (200)
NP-F730/F750 300 (240)
NP-F770 370 (310)
NP-F960 420 (360)
NP-F970 485 (425)
Approximate minutes to charge an empty battery pack
Recording time
Recording with Recording with
Battery pack the viewfinder the LCD screen
Continuous Typical* Continuous Typical*
NP-F550 130 (115) 70 (60) 110 (100) 60 (55)
NP-F570 (supplied) 195 (175) 105 (60) 165 (145) 90 (50)
NP-F730 230 (205) 125 (110) 190 (170) 105 (95)
NP-F750 265 (235) 145 (130) 230 (200) 125 (110)
NP-F770 400 (360) 215 (190) 345 (310) 185 (165)
NP-F960 480 (430) 265 (240) 420 (375) 235 (210)
NP-F970 600 (540) 330 (300) 515 (460) 285 (255)
Approximate minutes of recording time when you use a fully charged battery
Numbers in parentheses “( )” indicate the time using a normally charged battery.
You cannot use the NP-500/510/710 battery pack on your camcorder.
* Approximate minutes when recording while you repeat recording start/stop,
zooming and turning the power on/off. The actual battery life may be shorter.

15
Getting Started
Step 2 Preparing the power supply
Connecting to a wall socket
When you use your camcorder for a long time, we recommend that you power it from a
wall socket using the AC Adaptor.
( )1Open the DC IN jack cover and connect the AC Adaptor to the DC IN jack on
your camcorder with the plug‘s mark facing toward the LCD panel side.v
( )2Connect the mains lead to the AC Adaptor.
( )3Connect the mains lead to a wall socket.
Precaution
The set is not disconnected from the AC power source (wall socket) as long as it is
connected to the wall socket, even if the set itself has been turned off.
Notes
•The mains lead must only be changed at an authorized service shop.
•AC Adaptor can supply power even if the battery pack is attached to your camcorder.
•Do not use the AC Adaptor placed in a narrow space, such as between a wall and
furniture.
•The DC IN jack has source priority. This means that the battery pack cannot supply
any power if the mains lead is connected to the DC IN jack, even when the mains lead
is not plugged into a wall socket.
Using a car battery
Use the Sony DC Adaptor/Charger (optional).
1 2,3

16
Step 3 Setting the date and time
Set the date and time when you use your camcorder for the first time. "CLOCK SET"
will be displayed each time that you set the POWER switch to CAMERA or MEMORY
unless you set the date and time settings.
If you do not use your camcorder for , the date and time may beabout four months
cleared from memory (bars may appear) because the built-in rechargeable battery
installed in your camcorder will have been discharged (p.158).
First, set the year, then the month, the day, the hour and then the minute.
( )1Press MENU to display the menu in the standby mode.
( )2Turn the SEL/PUSH EXEC dial to select , then press the dial.
( )3Turn the SEL/PUSH EXEC dial to select CLOCK SET, then press the dial.
( )4
Turn the SEL/PUSH EXEC dial to adjust to the desired year, then press the dial.
( )5Set the month, day and hour by turning the SEL/PUSH EXEC dial and
pressing the dial.
(6) Set the minute by turning the SEL/PUSH EXEC dial and pressing the dial by
the time signal. The clock starts to move.
( )7Press MENU to make the menu settings disappear.
The year changes as follows:
If you do not set the date and time
“- -:- -:- -” as time, and “-- -- ----” as date will be recorded.
Note on the time indicator
The internal clock of this camcorder operates on a 24-hour cycle.
SE T UP MEN U
CLOCK SET
LTR S I ZE
RETURN
2
4
1,7 3
SE T UP MEN U
CLOCK SET
LTR S I ZE
RETURN
6
SE T UP MEN U
CLOCK SET
LTR S I ZE
RETURN
SE T UP MEN U
CLOCK SET
LTR S I ZE
RETURN
–– :–– :– –
2003
1
1
12 00
4
7 200 5
17 :30 :0 0
2005
7
4
17 30
20 05 1 1
12 00
[ MENU] : END [ MENU] : END
[ MENU] : END [ MENU] : END
MENU
TC/UB SET
TC PRESET
UB PRESET
TC RUN
TC MAKE
UB T
I
ME
[ MENU] : END
20 05 1 1
12 00
1995 1996 20792003

17
Getting Started
Step 4 Inserting a cassette
( )1Install the power source (p. 11).
( )2While pressing the small blue button on the EJECT switch, slide it in the
direction of the arrow. After the cassette lid is opened, the cassette
compartment automatically opens.
( )3Push the middle portion of the back of the cassette to insert it.
Insert the cassette in a straight line deeply into the cassette compartment with
the window facing out and the write-protect tab facing upward.
( )4Close the cassette compartment by pressing the PUSH mark on it.
( )5Close the cassette lid until it clicks by pressing the PUSH button on the lid.
To eject a cassette
Follow the procedure above, and take out the cassette in step 3.
Note
The cassette lid will not be closed when you press any part of the lid other than the
PUSH button.
When you use cassettes with cassette memory
Read the instruction about cassette memory to use this function properly (p. 142).
To prevent accidental erasure
Slide the write-protect tab on the cassette to SAVE.
If the grip strap prevents the cassette lid from opening fully
Adjust the length of the grip strap (p. 166).
If flashes even if the cassette has been inserted
Press the PUSH button again to close the cover firmly.
23,4 5
PUSH
Write-protect tab
Window
PUSH
18
40min
REC 00:00:00:01
DVCAM
32K
4
OPEN
1
3
MEMORY
CAMERA
VCR
OFF
(CHG)
POWER
5
2
POWER
OFF
(CHG)
CAMERA
MEMORY
VCR
LOCK
Camera recording lamps Microphone
— Recording – Basics —
Recording a picture
Your camcorder automatically focuses for you.
( )1Open the shutter of the hood with a lens cap. For more information about
attaching the hood with a lens cap, see page 165.
( )2Install the power source and insert a cassette. See “Step 2” to “Step 4” (p.11 to
17) for more information.
( )3Set the POWER switch to CAMERA while pressing the small green button.
Your camcorder is set to the standby mode.
( )4Slide OPEN in the direction of the B mark to open the LCD panel.
The picture now being shot is displayed on the LCD screen, and it disappears
from the viewfinder screen.
( )5Press START/STOP. Your camcorder starts recording. The “REC” indicator
appears. The camera recording lamps located on the front and rear of your
camcorder light up. To stop recording, press START/STOP again.
You can use REC START/STOP located on the handle or front instead of
START/STOP on the rear.
If the ND1 or ND2 indicator flashes on the LCD screen or in the viewfinder
The ND filter is necessary. Set the ND FILTER selector to 1 or 2. However, if you change
the position during recording, the brightness of the picture may change or audio noise
may occur. This is not a malfunction. We recommend that you check the position of the
ND FILTER selector before shooting. See “Using the ND filter” on page 47.
Note
Fasten the grip strap firmly.
REC START/STOP
Handle REC START/STOP

Recording – Basics
19
Recording a picture
Note on the recording format
Your camcorder records and plays back both in the DVCAM format and in the DV
format SP mode. Select the format in the menu settings.
Note on the LOCK switch
When you slide the LOCK switch to the left, the POWER switch can no longer be set to
MEMORY accidentally. The LOCK switch is set to the right as a default setting. We
recommend that you set the LOCK switch to the left when you record on a cassette.
Note on the progressive recording mode
If you intend to use the images on your PC or play the images back as still images, we
recommend that you set PROG. SCAN to ON in the menu settings before shooting (p.
105). The picture quality may improve in this mode, but if you shoot a moving subject,
the image may shake when it is played back.
To enable smooth transition
Transition between the last scene you recorded and the next scene is smooth as long as
you do not eject the cassette even if you turn off your camcorder. When you use a tape
with cassette memory, however, you can make the transition smooth even after ejecting
the cassette if you use the end search function (p. 27).
However, check the following:
•When you change the battery pack, set the POWER switch to OFF (CHG).
•Do not mix recordings in the DVCAM format and the DV format on one tape.
The playback picture may be distorted or the time code may not be written properly
between scenes when you change the recording format.
If you leave your camcorder in standby mode for five minutes
The head drum of the camcorder automatically stops rotating. This is to prevent the
tape wear and save the battery power. To re-start recording, press the START/STOP
button. It may take more time to start recording. This is not a malfunction.
Usable cassettes
You can record both on mini DVCAM cassettes and on mini DV cassettes using your
camcorder. When you use a mini DV cassette, set REC MODE to DV SP in the menu
settings. You can record on a tape 1.5 times longer than the DVCAM format. When you
want to record in the DV format or to make longer recording, use the mini DV cassette.
Notes
•If you record in the DV format, the transition of a tape may not be smooth. We
recommend that you use mini DVCAM cassettes and set REC MODE to DVCAM in
the menu settings to obtain reliable clear pictures.
•You cannot record on a tape in LP mode in the DV format.
If you use a mini DV cassette without setting REC MODE to DV SP
The recordable time is 2/3 time that indicated on the cassette.
Cassettes that can be played back with your camcorder
You can play back both cassettes recorded in the DVCAM format or in the DV format,
however, you cannot play back cassettes that recorded in LP mode in the DV format.

20
180
180
180
180
180
°
°
°
°°
90°
180°
OPEN
Adjusting the LCD screen
The LCD panel is opened up to 90 degrees and it rotates about 90 degrees to the
viewfinder side and about 180 degrees to the lens side.
If you turn the LCD panel over so that it faces the other way in standby or recording
mode, the indicator appears on the LCD screen and in the viewfinder (Mirror
mode).
To close the LCD panel, set it vertically and swing it into the camcorder body until it
clicks.
Note
When the LCD panel is open, no picture will be displayed on the viewfinder. (Default
setting)
However, this does not hold true for the following cases:
•When shooting in the mirror mode
•When LCD panel is closed with the screen surface facing out
•When VF POWER is set to ON in the menu settings
When you adjust the angle of the LCD panel
Make sure that the LCD panel is opened up to 90 degrees.
When using both the LCD screen and the viewfinder during shooting
The usable time of the battery pack when using both the LCD screen and the viewfinder
will be shorter a little than when using the viewfinder only.
Pictures in the mirror mode
The picture on the LCD screen is a mirror-image. However, the recording picture will
be normal.
Indicators in the mirror mode
The STBY indicator appears as and REC as . Some of the other indicators appearzX z
mirror-reversed and others are not displayed. However, if you close the LCD panel
with the LCD screen turned over, indicators appear normally.
Recording a picture

Recording – Basics
21
Recording a picture
Adjusting the brightness of the LCD screen
To adjust the brightness of the LCD screen, press LCD BRIGHT + or –.
The battery life is longer when the LCD panel is closed. Use the viewfinder instead of
the LCD screen to save the battery power.
On the LCD screen backlight
You can change the brightness of the backlight. Select LCD B.L. in the menu settings
(p. 105).
Even if you do the LCD screen adjustment using the LCD BRIGHT +/– buttons, or
using LCD B.L. and LCD COLOUR items in the menu settings
The recorded picture will not be affected.
Recording in a low position
You can record in a low position to get an interesting recording angle. Lift up the
viewfinder or rotate the LCD panel with the screen facing up to record from a low
position. In this case, it is useful to use the REC START/STOP located on the handle or
front of the camcorder.
LCD BRIGHT
To brighten
To darken
REC
START/
STOP
START/
STOP
REC

22
After recording
( )1Set the POWER switch to OFF (CHG).
( )2Close the LCD panel.
( )3Eject the cassette.
( )4Remove the battery pack.
Adjusting the viewfinder
If you record pictures with the LCD panel closed, check the picture with the viewfinder.
Adjust the viewfinder lens to your eyesight so that the images in the viewfinder come
into sharp focus.
Lift up the viewfinder and move the viewfinder lens adjustment lever.
To adjust the brightness of the viewfinder screen, use the VF B.L. item in the menu
settings (p. 105).
Even if you adjust the viewfinder screen backlight
The recorded picture will not be affected.
The eyecup
You can attach the eyecup with the large part of it located on both left and right.
See page 164 for details.
Recording a picture
Viewfinder adjustment lever

Recording – Basics
23
W
T
TW
TW
Recording a picture
Using the zoom feature
To zoom using the zoom lever/handle zoom lever
Press the power zoom lever a little for a slower zoom. Press it deeper for a faster zoom.
Using the zoom function sparingly results in better-looking recordings.
“T” side: for telephoto (subject appears closer)
“W” side: for wide-angle (subject appears farther away)
When using the handle zoom lever, you can change the zooming speed using the
handle zoom switch.
H: Fast
L: Slow
Notes
• When the handle zoom switch is set to OFF, you cannot operate the handle zoom
lever.
• The handle zoom switch does not interlock with the zoom lever of the camcorder.
When you shoot close to a subject
If you cannot get a sharp focus, press the “W” side of the power zoom lever until the
focus is sharp. You can shoot a subject that is at least about 80 cm (about 2 feet 5/8 inch)
away from the lens surface in the telephoto position, or about 1 cm (about 1/2 inch)
away in the wide-angle position.
To zoom with the zoom ring
Using the zoom ring, you can control the zoom by your desired speed and you can
make fine adjustments.
During recording, turn the zoom ring to the desired speed.
Note
If you turn the zoom ring quickly, the zoom may not respond to the zoom ring
adjustment. Rotate the zoom ring with appropriate speed.
Zoom ring
For telephoto
For wide-angle
Handle zoom switch

24
Recording a picture
Using the digital zoom – Zoom greater than 12×
Zoom greater than is performed digitally, if you set D ZOOM to in the12× 24× 48×or
menu settings. The digital zoom function is set to OFF as a default setting (p. 105). If
you use the digital zoom function, the picture quality deteriorates.
You cannot use the digital zoom:
– When you set PROG. SCAN to ON in the menu settings (p. 105).
– When the POWER switch is set to MEMORY.
Indicators displayed during recording
The indicators are not recorded on the tapes.
[ ]aRemaining battery time
This appears after you turn on the power and wait for a while.
[ ]bCassette memory
This appears when using a tape with cassette memory.
[ ] STBY/RECc
[ ]dTime code/User bits
[ ]eRemaining tape
This appears after you insert a cassette.
[ ] fGuide frame
[ ]gDVCAM format/DV format in SP mode
[ ]hAudio mode
[ ]iTime
[ ] ND filterj
The most suitable mode will flash regardless of the current mode.
When you have selected it, the ND filter mode displayed on the LCD screen or in the
viewfinder will disappear.
[ ]kDate
00:00:00:01
12:05:56
32K
DVCAM
45min
40
min
REC
ND1
[a] [b] [c]
[k] [j] [i]
[g]
[h]
[e]
[f]
[d]
4 7 2003
T
W
The right-ended portion of the bar shows the
digital zooming zone.
The digital zooming zone appears when you
set D ZOOM to 24× or 48×.

Recording – Basics
25
Recording a picture
Time code
The time code indicates the recording or playback time, “00:00:00:00” (hours : minutes :
seconds : frames). You cannot rewrite only the time code. You can preset the time code.
The time code can be preset or be reset during recording (p. 90).
On user bits display
You can display the user bits, pressing TC/U-BIT (p. 94).
Remaining tape indicator
The indicator may not be displayed accurately depending on the tape.
Note on date/time
Recording date/time is not displayed during shooting, however, it is automatically
recorded on the tape. You can check the recording date/time during playback by
pressing DATA CODE. When you want to display the date and time during shooting,
set DATE REC to ON in the menu settings. However, once you record with the date and
time, you cannot erase them.
Shooting backlit subjects (BACK LIGHT)
When you shoot a subject with the light source behind the subject or a subject with a
light background, use the backlight function.
Press BACK LIGHT in standby, recording, or memory mode.
The . indicator appears on the LCD screen or in the viewfinder.
To cancel, press BACK LIGHT again.
If you press SPOT LIGHT when using the backlight function
The backlight function will be canceled and the spot light function will be enabled.
When you manually adjust more than two of the following functions: iris, gain,
and shutter speed
You cannot use the backlight function.
FADER
BACK LIGHT SPOT LIGHT
BACK LIGHT

26
Recording a picture
Spot light
This function prevents people’s faces, for example, from appearing excessively white
when shooting subjects lit by strong light, such as in the theater.
Press SPOT LIGHT in standby, recording, or memory mode.
The indicator appears on the LCD screen or in the viewfinder.
To cancel, press SPOT LIGHT again.
If you press BACK LIGHT when using the spot light function
The spot light function will be canceled and the backlight function will be enabled.
You cannot use the spotlight mode while in the following settings:
– Old movie
– Shutter speed value of 1/25 or smaller
– When you manually adjust more than two of the following functions: iris, gain, and
shutter speed
FADER
BACK LIGHT SPOT LIGHT
SPOT LIGHT

Recording – Basics
27
END SEARCH
EDITSEARCH
Checking the recording
– END SEARCH / EDITSEARCH / Rec Review
You can use these buttons to check recorded pictures or shoot so that the transition
between the last recorded scene and the next scene you record is smooth.
Searching the end point of the recording — END SEARCH
You can easily go to the end of the last recorded portion.
Press END SEARCH in standby mode.
The camcorder rewinds or fast-forwards the tape and the last five-second recorded
picture is played back. After playback the camcorder turns to standby mode. You can
monitor the sound from the speaker or headphones.
Changing the next recording start point — EDITSEARCH
You can change the next recording start point in standby mode.
Hold down the +/– side of EDITSEARCH in standby mode. The recorded picture is
played back.
+: to go forward
– : to go backward
Release EDITSEARCH to stop playback. If you press START/STOP, re-recording begins
from the point you released EDITSEARCH. You cannot monitor the sound.
Checking the last recorded picture — Rec Review
You can check the last recorded portion.
Press the – side of EDITSEARCH momentarily in standby mode.7
The last few-seconds of picture is played back and the camcorder returns to standby.
You can monitor the sound from the speaker or headphones.
End search function
When you use a tape without cassette memory, the end search function does not work
once you eject the cassette after you have recorded on the tape. If you use a tape with
cassette memory, the end search function works even once you eject the cassette.
If there is a blank portion at the beginning or between the recorded portions, the end
search function may not work correctly (p. 142).

28
— Playback – Basics —
Playing back a tape
You can monitor the playback picture on the LCD screen. If you close the LCD panel,
you can monitor the playback picture in the viewfinder. You can also control playback
using the Remote Commander supplied with your camcorder.
( )1Install the power source and insert the recorded tape.
( )2Set the POWER switch to VCR while pressing the small green button. The
video control buttons light up.
( )3Slide OPEN in the direction of the B mark to open the LCD panel.
( )4Press m to rewind the tape.
( )5Press N to start playback.
( )6To adjust the volume, press either of the VOLUME +/– buttons .
To stop playback
Press .x
4
2
6
13
VOLUME
5
POWER
OFF
(CHG)
CAMERA
MEMORY
VCR
PLAYREW

29
Playback – Basics
Playing back a tape
When monitoring on the LCD screen
You can turn the LCD panel over and move it back to the camcorder body with the LCD
screen facing out.
When you close the LCD panel
You cannot monitor the sound from the speaker. However, when the LCD panel is
turned over to view on the LCD screen, you can monitor the sound from the speaker.
To control the display of the screen indicators
Press DISPLAY on the camcorder or on the Remote Commander supplied with your
camcorder.
The indicators appear on the LCD screen or in the viewfinder.
To make the indicators disappear, press DISPLAY again.
DATA CODE
DISPLAY
DATA CODE
DISPLAY

30
Playing back a tape
Using the data code function
Your camcorder automatically records not only images on the tape but also the
recording data (date/time or various settings when recorded) (Data code).
Press DATA CODE on the camcorder or on the Remote Commander supplied with
your camcorder in playback mode.
The display changes as follows:
date/time t various settings (SteadyShot, white balance, gain, shutter speed, aperture
value, exposure mode) no indicatort
[ ]aSteadyShot OFF
[ ]bExposure mode
[ ]cWhite balance
[ ]dGain
[ ]eShutter speed
[ ]fAperture value
To not display the various settings
Set DATA CODE to DATE in the menu settings (p. 105).
The display changes as follows:
date/time y no indicator
Recording data
Recording data is your camcorder’s information when you have recorded something. In
CAMERA mode, the recording data will not be displayed.
When you use the data code function, “-- -- ----” (date) or “-- : -- : --” (time) appears if:
– A blank portion of the tape is being played back.
– The tape is unreadable due to tape damage or noise.
– The tape was recorded by the camcorder without the date and time set.
Data code
When you connect your camcorder to the TV, the data code also appears on the TV
screen (p. 33).
Note on the date/time indicator
Recording date/time is not displayed during shooting, however, it is automatically
recorded on the tape. You can check the recording date/time during playback by
pressing DATA CODE. When you want to display the date and time during shooting,
set DATE REC to ON in the menu settings. However, once you record with the date and
time, you cannot erase them.
If the aperture adjustment is set to minimum
“CLOSE” is displayed at the location of the aperture value.
Date/time Various settings
4 7 2003
12:05:56
50 ATW
F1.6 0dB
AUTO
[a]
[b]
[c]
[d]
[e]
[f]

31
Playback – Basics
Playing back a tape
Various playback modes
To operate video control buttons, set the POWER switch to VCR.
To view a still picture (playback pause)
Press .X during playback. To resume normal playback, press N or X
To advance the tape
Press .M in stop mode. To resume normal playback, press N
To rewind the tape
Press .m in stop mode. To resume normal playback, press N
To change the playback direction
Press on the Remote Commander during playback to reverse the playback direction.
To resume normal playback, press N.
To locate a scene monitoring the picture (picture search)
Keep pressing m or M during playback. To resume normal playback, release the button.
To monitor the picture at high-speed while advancing or
rewinding the tape (skip scan)
Keep pressing while rewinding or while advancing the tape. To resumem M
rewinding or advancing, release the button.
To view the picture at slow speed (slow playback)
Press y during playback. For slow playback in the reverse direction, press on the
Remote Commander, then press . To resume normal playback, press y N.
To view the picture at double speed
Press ×2 on the Remote Commander during playback. For double speed playback in the
reverse direction, press , then press 2 on the Remote Commander. To resume×
normal playback, press N.
To view the picture frame-by-frame
Press C on the Remote Commander in playback pause mode. For frame-by-frame
playback in the reverse direction, press . To resume normal playback, press c N.
To search the last scene recorded (END SEARCH)
Press END SEARCH in stop mode. The last five seconds of the recorded portion plays
back and stops.
In various playback modes
•Sound is muted.
•The previous picture may remain as a mosaic image during playback.
When the playback pause mode lasts for five minutes
Your camcorder automatically enters the stop mode. To resume playback, press N.
Slow playback
Slow playback can be performed smoothly on your camcorder, however, this function
does not work for a signal output through the DV Interface.
When you play back a tape in reverse
Horizontal noise may appear at the center, or the top and bottom of the screen. This is
not a malfunction.

32
Note on DV-formatted tapes
You can play back DV-formatted tapes on this camcorder if the tape is recorded in SP
mode. “DV ” appears on the LCD screen or in the viewfinder during playback.SP
You cannot play back DV-formatted tapes recorded in LP mode.
Playing back a tape

33
Playback – Basics
S VIDEO
VIDEO
AUDIO
IN
AUDIO
CH1/CH2
S VIDEO
VIDEO
AUDIO CH1/CH2
Viewing the recording on TV
Connect your camcorder to your TV or VCR with the A/V connecting cable supplied
with your camcorder to watch the playback picture on the TV screen. You can operate
the video control buttons in the same way as when you monitor playback pictures on
the LCD screen. When monitoring the playback picture on the TV screen, we
recommend that you power your camcorder from a wall socket using the AC Adaptor
(p.15). Refer to the operating instructions of your TV or VCR.
Open the jack cover. Connect your camcorder to the TV using the A/V connecting cable
supplied with your camcorder. Then, set the TV/VCR selector on the TV to VCR.
If your TV is connected to a VCR
Connect your camcorder to the line input on the VCR by using the A/V connecting
cable supplied with your camcorder. Set the input selector on the VCR to LINE.
If your TV or VCR is a monaural type
Connect with the TV or VCR using the audio cable (monaural stereo) (optional).y
If your TV or VCR has an S video jack
Connect using an S video cable (optional) to obtain high-quality pictures. With this
connection, you do not need to connect the yellow (video) plug of the A/V connecting
cable.
Connect the S video cable (optional) to the S video jacks on both your camcorder and
the TV or the VCR.
This connection produces higher quality DVCAM/DV format pictures.
When you adjust the TV screen
If you monitor the shooting picture, not the playback picture, set COLOUR BAR to ON
in the menu settings (p. 105). The colour bar is displayed on the TV screen.
: Signal flow
White
Red
Yellow
(optional)

34
— Advanced Recording Operations —
Recording a still image on a tape – Tape Photo recording
You can record still images on tapes with all the pixels in the progressive recording
mode. See page 35 for details. This mode is useful when you print images using a video
printer (optional).
Besides the operation described here, your camcorder can record still images on a
“Memory Stick” (p. 118).
( )1 In standby mode, keep pressing PHOTO lightly until a picture freezes. The
CAPTURE indicator appears. Recording does not start yet.
To change the image, release PHOTO, select an image again, and then press
and hold PHOTO lightly.
( )2 Press PHOTO deeper.
The still image on the LCD screen or in the viewfinder is recorded for about
seven seconds. The sound during those seven seconds is also recorded.
The still image is displayed on the LCD screen or in the viewfinder until
recording is completed.
The number of still images recordable on a cassette
You can record about 340 images in the DVCAM format on a 40-minute DVCAM
cassette and about 510 images in the DV format on a 60-minute DV cassette.
Notes
•During tape photo recording, you cannot change the mode or setting.
•The PHOTO button does not work:
– While the fader function is set or in use.
– While the digital effect function is set or in use.
•Do not shake the camcorder during tape photo recording, the recorded image may be
blurred.
To do tape photo recording using the Remote Commander
Press PHOTO on the Remote Commander. Your camcorder immediately records an
image on the LCD screen or in the viewfinder.
When you do tape photo recording during normal CAMERA recording
You cannot check an image on the LCD screen or in the viewfinder by pressing PHOTO
lightly. Press PHOTO deeper. The still image is then recorded for about seven seconds
and your camcorder returns to standby mode.
When shooting a moving object in Tape Photo recording
When playing back the image by another unit, the image may be blurred. This is not a
malfunction.
1
•••••••
2
CAPTURE
PHOTO
PHOTO
35
Advanced Recording Operations
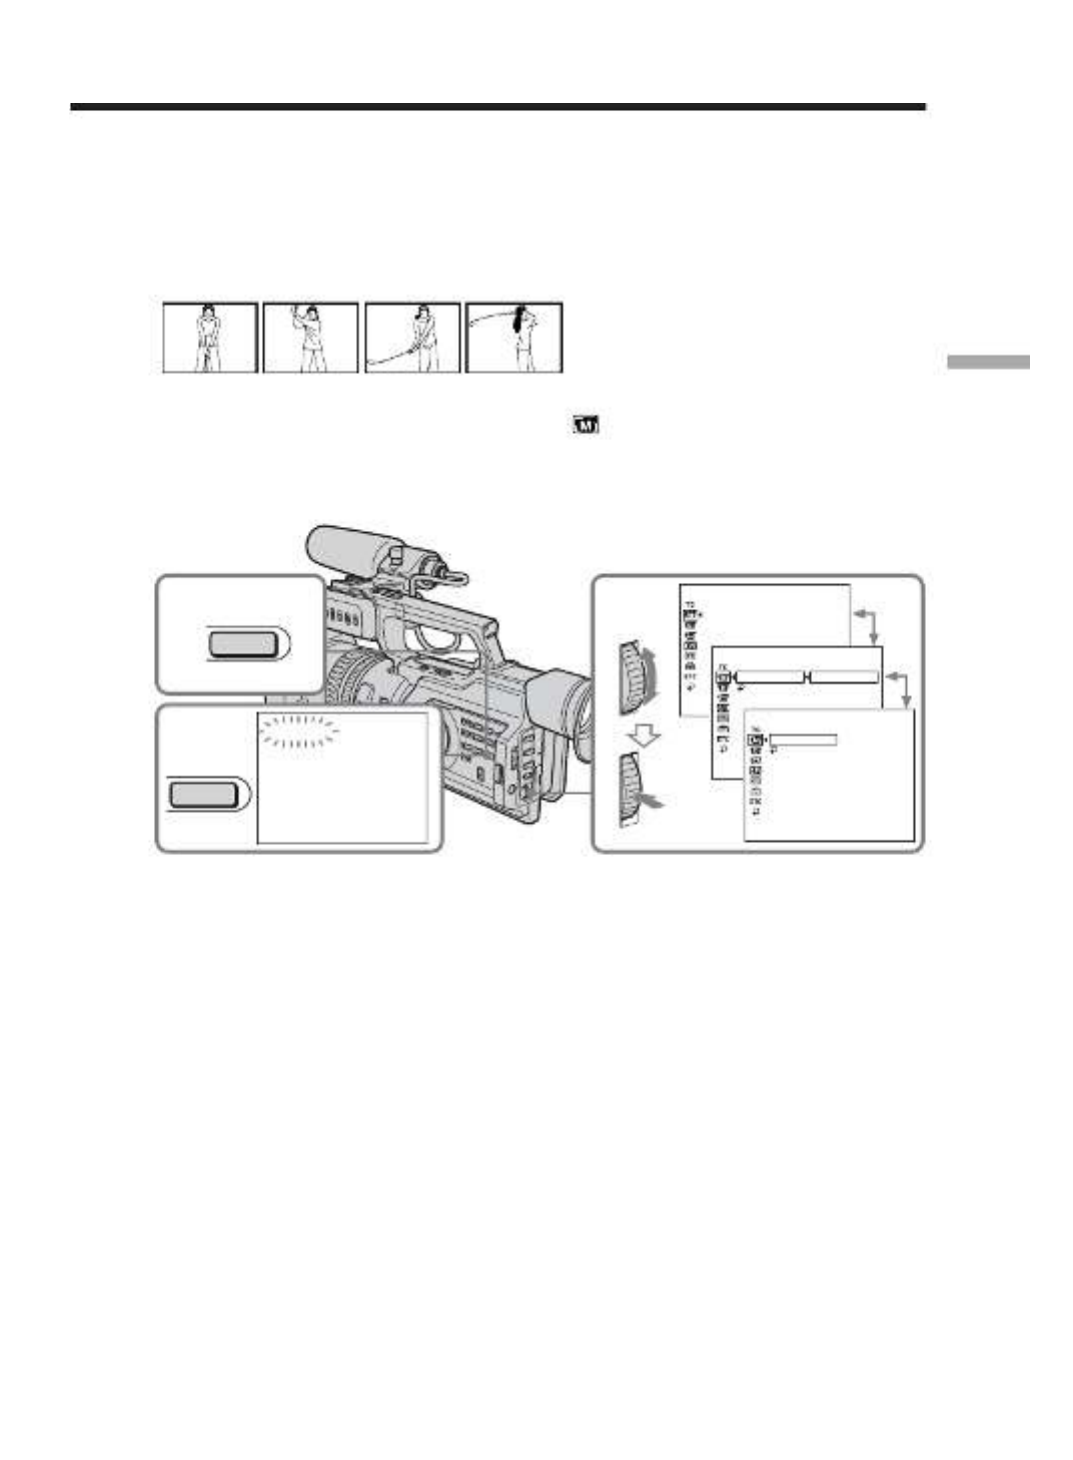
Shooting with all the pixels – PROG. SCAN
To import moving images to your PC to view still images, we recommend you record in
progressive recording mode. To use progressive recording mode, follow the procedure
below. Still images produced this way are more stable than those recorded on tapes in
normal mode, and thus are more suitable for analysing high-speed action such as sports
scenes. (Since this camcorder takes in an image every 1/15 of a second in progressive
recording mode, moving images recorded in this mode may be subject to too much
jitter. To view moving images, we recommend recording in normal mode.)
( )1 Press MENU to display the menu in standby mode.
( )2 Turn the SEL/PUSH EXEC dial to select , then press the dial.
( )3 Turn the SEL/PUSH EXEC dial to select PROG. SCAN, then press the dial.
( )4 Turn the SEL/PUSH EXEC dial to select ON, then press the dial.
( )5 Press MENU to erase the menu display. The PROG. SCAN indicator lights up.
To return to normal mode
Select OFF in step 4, then press the SEL/PUSH EXEC dial.
Note on the progressive recording mode
A normal TV broadcast divides the screen into two finer fields and displays them in
turns every 1/50 of a second. Thus, the actual image displayed in an instant covers only
half of the apparent image area. Displaying the whole image simultaneously on a full
screen is called displaying with all the pixels. In this mode, the resolution of the still
picture is clearer than in the normal mode. This camcorder takes in an image every 2/25
of a second, which may cause the image of a moving object to go out of focus. This
camcorder is originally programed to record in the normal TV format.
When shooting under fluorescent light
When shooting in progressive recording mode under fluorescent light or light bulbs, a
rare phenomenon may happen in which the screen lights up brightly (Flicker
phenomenon). This is not a malfunction. If you want to stop this phenomenon, set
PROG. SCAN to OFF in the menu settings.
In the progressive recording mode
You cannot use the following operations:
– Digital zooming
– Wide mode
When the auto logo insert function is activated
You cannot use the progressive mode.
2-4 AUTO SHTR
PROG. SCAN
[MENU] : END
MANUAL SET
MANUAL SET
AUTO SHTR
PROG. SCAN
RETURN
OFF
ON
[MENU] : END
MANUAL SET
AUTO SHTR
PROG. SCAN
RETURN
ON
[MENU] : END
1
5PROG. SCAN
MENU
MENU

36
Using the guide frame
You can easily make the picture be on a horizontal line using the guide frame. The
guide frame is not recorded.
( )1 Press MENU to display the menu in standby, recording, or memory mode.
( )2 Turn the SEL/PUSH EXEC dial to select , then press the dial.
( )3 Turn the SEL/PUSH EXEC dial to select GUIDEFRAME, then press the dial.
( )4 Turn the SEL/PUSH EXEC dial to select ON, then press the dial.
( )5 Press MENU to erase the menu display. The guide frame is displayed on the
LCD screen or in the viewfinder.
To clear the guide frame
Select OFF in step 4, then press the SEL/PUSH EXEC dial or simply press DISPLAY.
Note
The guide frame indicates only a rough level. The size and position of the guide frame
do not affect the setting of the camcorder.
If you set GUIDEFRAME to ON
The other screen indicators are also displayed on the LCD screen or in the viewfinder.
2-4
LCD / VF SET
LCD B. L.
LCD COLOUR
VF B. L.
GU I DEFRAME
[MENU
] : END
LCD / VF SET
LCD B. L.
LCD COLOUR
VF B. L.
GU IDEFRAME
RETURN
[MENU ] : END
OFF
ON
LCD / VF SET
LCD B. L.
LCD COLOUR
VF B. L.
GU IDEFRAME
RETURN
[MENU] : END
ON
1
5
MENU
MENU
37
Advanced Recording Operations
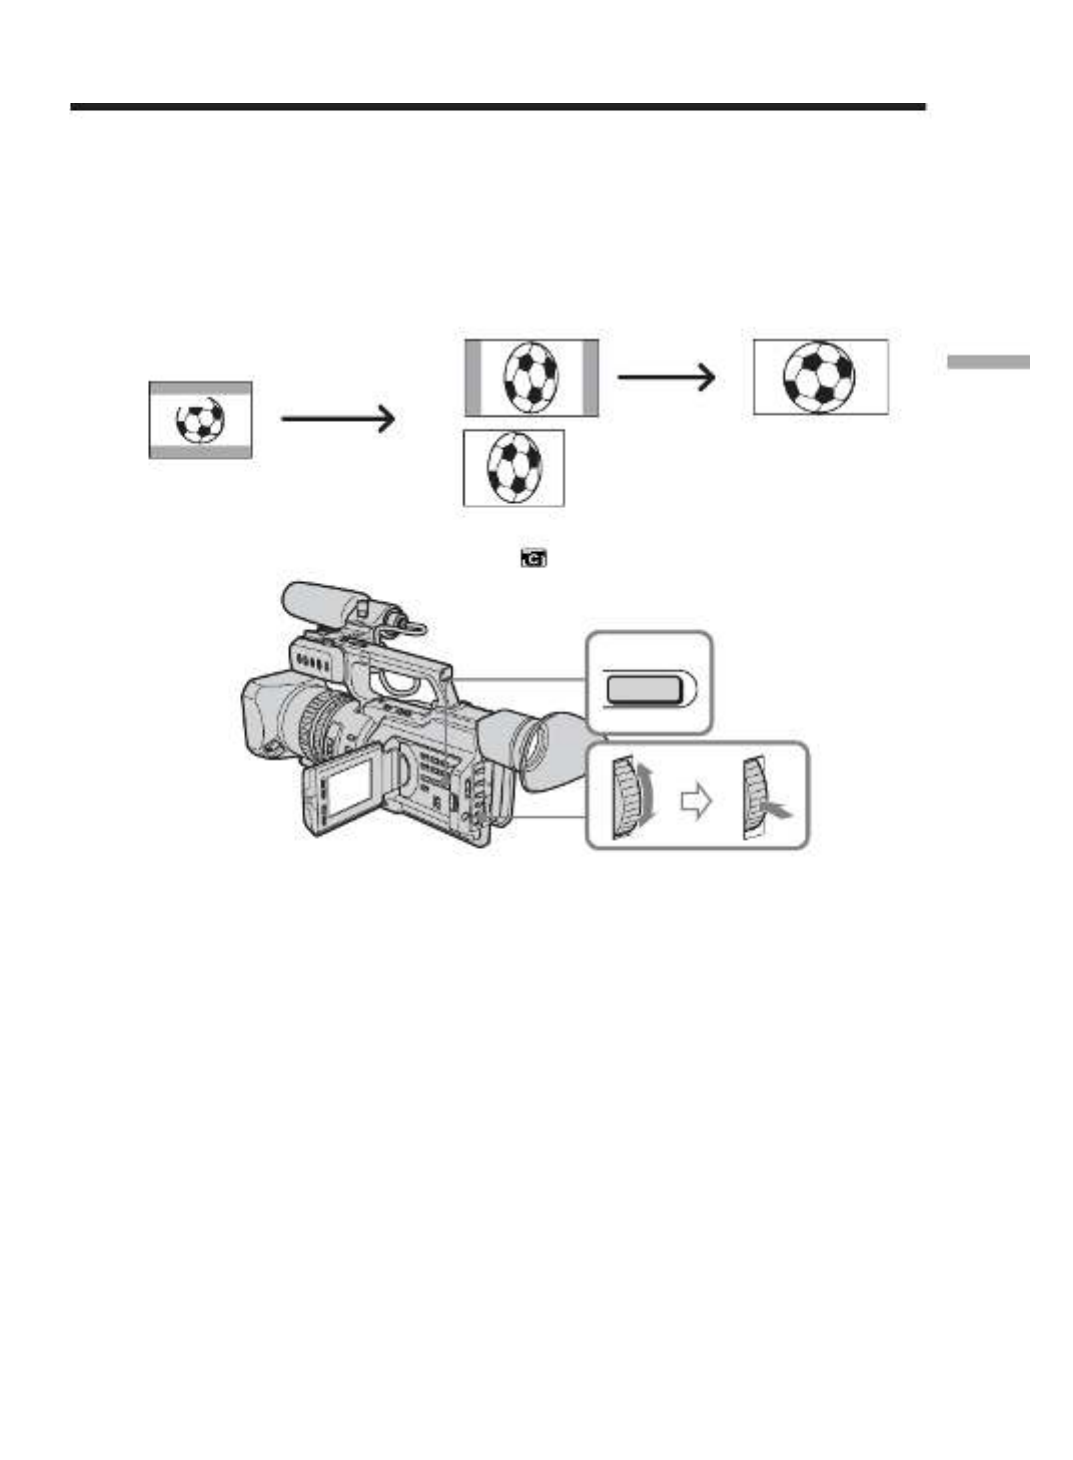
Using the wide mode
You can record a 16:9 wide picture to watch on a 16:9 wide-screen TV (16:9WIDE).
Black bands appear on the screen during recording in the 16:9WIDE mode . The[ ]a
picture during playing back in the 4:3 mode on a wide-screen TV or a normal TV b[ ]
[ ] c * is compressed in the widthwise direction. If you set the screen mode of the wide-
screen TV to the full mode, you can watch pictures of normal images [ ]d .
* Played in 4:3 mode. When you play a picture in the wide mode, it appears as you have
seen on the LCD screen or in the viewfinder [ ]a .
In standby mode, set 16:9WIDE to ON in in the menu settings (p. 105).
To cancel the wide mode
Set 16:9WIDE to OFF in the menu settings (p. 105).
In wide mode, you cannot select the following modes:
– Old movie
– Progressive recording mode
During recording
You cannot operate the wide mode function. When you cancel the wide mode, set your
camcorder to the standby mode and then set 16:9WIDE to OFF in the menu settings.
[a]
16:9
WIDE
[c]
[b] [d]
MENU

38
Using the fader function
You can fade the picture in or out to give your recording a professional appearance.
MONOTONE
When fading in, the picture gradually changes from black-and-white to colour.
When fading out the picture gradually changes from colour to black-and-white.
[a] RECSTBY
RECSTBY
[b]
FADER
OVERLAP*
WIPE*
DOT*
(Random)
* Fade in only

39
Advanced Recording Operations
Using the fader function
( ) ]1 When fading in [a
In standby mode, press FADER until the desired fader indicator flashes.
When fading out [b]
In recording mode, press FADER until the desired fader indicator flashes.
The indicator changes as follows:
FADER WIPE DOT t MONOTONE t OVERLAP t t t no indicator
The last selected fader mode is indicated first.
( )2 Press START/STOP. After the fade in/out is carried out, your camcorder
automatically returns to the normal mode.
To cancel the fader function
Press FADER until the indicator disappears.
Note
You cannot use the following functions while using the fader function, and vice versa:
– Digital effect
– Tape Photo recording
– Interval recording
– Cut recording
When the OVERLAP, WIPE, or DOT indicator appears
Your camcorder automatically stores the image recorded on a tape. As the image is
being stored, the fader indicator flashes fast, and the playback picture appears.
1
FADER
FADER
POWER
OFF
(CHG)
CAMERA
MEMORY
VCR
2

40
Using special effects – Digital effect
You can add special effects to recorded pictures using the various digital functions. The
sound is recorded normally.
STILL
You can record a still image so that it is superimposed on a moving picture.
FLASH (FLASH MOTION)
You can record still images successively at constant intervals.
LUMI. (LUMINANCEKEY)
You can swap a brighter area in a still image with a moving picture.
TRAIL
You can record the picture so that an incidental image like a trail is left.
OLD MOVIE
You can add an old movie type atmosphere to pictures. The black bands appear on the
upper and lower of the screen to change the virtual screen size to the cinemascope size,
and the picture effect is set to SEPIA.
STILL
LUMI.
Still image Moving picture
Still image Moving picture

41
Advanced Recording Operations
Using special effects – Digital effect
( )1 In standby or recording mode, press DIGITAL EFFECT. The digital effect
indicator appears.
( )2 Turn the SEL/PUSH EXEC dial to select the desired digital effect mode.
The digital effect indicator changes as follows:
STILL y FLASH y LUMI. y TRAIL y OLD MOVIE
( )3 Press the SEL/PUSH EXEC dial. The indicator lights up and the bar appears.
In STILL and LUMI. modes, the still image is stored in memory.
( )4 Turn the SEL/PUSH EXEC dial to adjust the effect.
Items to be adjusted
STILL The rate of the still image you want to superimpose on the
moving picture
FLASH The interval of flash motion
LUMI. The colour scheme of the area in the still image which is to be
swapped with a moving picture
TRAIL The time until the incidental image vanishes
OLD MOVIE No adjustment necessary
The longer the bar on the screen, the stronger the digital effect. The bar appears in the
following modes: STILL, FLASH, LUMI. and TRAIL.
To cancel the digital effect
Press DIGITAL EFFECT. The digital effect indicator disappears.
3
4
LUMI.
1
2
LUMI.
DIGITAL
EFFECT

42
Using special effects – Digital effect
Notes
•The following functions do not work in digital effect mode:
– Fader
– Tape Photo recording
– Shutter speed (1/25 or smaller) adjustment
•The following functions do not work in old movie mode:
– Wide mode
– Spot light mode
– Shutter speed adjustment
When you turn the power off
The digital effect will be automatically canceled.

43
Advanced Recording Operations
Shooting with manual adjustment
Under normal conditions, this unit automatically makes various adjustments as it
shoots. However, you can adjust the following functions manually to suit your
preference.
Functions you can adjust by setting the AUTO LOCK selector to the center (auto
lock release) position
Iris, gain, shutter speed, and white balance
Functions you can adjust in menu settings
Deactivating the SteadyShot
Functions you can adjust by using other selectors/rings
ND filter, zebra pattern, focus, AE shift, and zoom
The following describes how to adjust all the functions mentioned above except white
balance (p. 51), focus (p. 59), and zoom (p. 23).
AUTO LOCK selector
Set the selector as shown below to maintain or release the settings of the functions.
AUTO LOCK [a]
Select this position to let the unit adjust all the functions automatically.
HOLD [b]
Select this position after setting the functions manually to maintain the settings.
Manual position (AUTO LOCK release) [c]
Select this position to adjust the functions listed above manually.
If you use the video flash light (optional)
We recommend that you set the AUTO LOCK selector to AUTO LOCK.
Notes
•When you manually adjust more than two of the following functions during backlight
or spot light mode: iris, gain, and shutter speed, the backlight or spot light function
will be automatically canceled.
•The functions (iris, gain, and shutter speed) that are not adjusted manually will be
automatically adjusted according to shooting conditions.
AUTO
LOCK
HOLD
[a]
[b] [c]

44
Shooting with manual adjustment
Adjusting the iris
Adjust the iris manually depending on the depth of field.
( )1Set the AUTO LOCK selector to the center (auto lock release) position while
the camcorder is in standby, recording, or memory mode.
( )2Press IRIS. The iris indicator appears on the LCD screen or in the viewfinder.
( )3Turn the IRIS dial to adjust the iris.
As you turn the dial, the F value changes as follows:
F1.6 CLOSEy ... y F11 y
For a smaller aperture, select a higher value.
To return to automatic iris mode
Set the AUTO LOCK selector to AUTO LOCK or press IRIS. The iris indicator
disappears from the LCD or viewfinder screen.
About the depth of field
The depth of field is the in-focus range, measured from the distance behind a subject to
the distance in front. The depth of field can vary with the iris (F value) and the focal
length. Lowering the F value (large iris) reduces the depth of field. Raising the F value
(small iris) provides a larger depth of field. Zooming in telephoto position offers a
smaller depth of field while the depth of field in the wide-angle position is greater.
The depth of field Shallow Deep
Iris Near open (Low F value) Near close (High F value)
Zoom Telephoto (T) Wide (W)
22
F2.8
1
3
AUTO
LOCK
HOLD
•
IRIS

45
Advanced Recording Operations
Adjusting the gain
( )1 Set the AUTO LOCK selector to the center (auto lock release) position while
the camcorder is in standby, recording, or memory mode.
( )2 Press GAIN. The gain indicator appears on the LCD screen or in the
viewfinder.
( )3 Turn the SEL/PUSH EXEC dial to adjust the gain.
As you turn the dial the gain value changes between 0 dB and 18 dB.
To return to automatic gain mode
Set the AUTO LOCK selector to AUTO LOCK or press GAIN. The gain indicator
disappears from the LCD or viewfinder screen.
Shooting with manual adjustment
22
0dB
1
3
AUTO
LOCK
HOLD
GAIN

46
Adjusting the shutter speed
( )1 Set the AUTO LOCK selector to the center (auto lock release) position while
the camcorder is in standby, recording, or memory mode.
( )2 Press SHUTTER SPEED. The shutter speed indicator appears on the LCD
screen or in the viewfinder.
( )3 Turn the SEL/PUSH EXEC dial to select the desired speed. As you turn the
dial, the shutter speed changes as follows:
1/3 y 1/6 y 1/12 y ... y 1/3500 y 1/6000 y 1/10000
To increase the shutter speed, select a smaller setting (large value indicator on
the LCD screen or in the viewfinder).
To return to automatic shutter speed mode
Set the AUTO LOCK selector to AUTO LOCK or press SHUTTER SPEED. The shutter
speed indicator disappears from the LCD or viewfinder screen.
When shooting at slow shutter speed
At slow shutter speed, automatic focus may be lost. Adjust the focus manually using a
tripod.
When shooting under fluorescent light or light bulbs
When shooting under fluorescent light or light bulbs, a rare phenomenon may happen
in which the screen lights up brightly depending on the shutter speed (Flicker
phenomenon).
If you set the shutter speed value to 1/25 or smaller
You cannot use the spot light (p. 26) and digital effect (p. 40) functions.
Shooting with manual adjustment
22
1
3
AUTO
LOCK
HOLD
SHUTTER
SPEED
50

47
Advanced Recording Operations
Using the ND filter
Using the ND filter (the ND filter 1 setting corresponds to 1/4 of the quantity of light
and the ND filter 2 setting corresponds to 1/32 of the quantity of light), you can record
a picture clearly by adjusting light amounts, even if you shoot under too bright
conditions.
When the ND1 or ND2 indicator flashes on the LCD screen or in
the viewfinder
The ND filter is necessary.
When ND 1 flashes, set the ND FILTER selector to 1 so that the ND 1 indicator
disappears from the LCD or viewfinder screen.
When ND 2 flashes, set the ND FILTER selector to 2 so that the ND 2 indicator
disappears from the LCD or viewfinder screen.
When ND OFF flashes on the LCD screen or in the viewfinder
The ND filter is not necessary. Set the ND FILTER selector to OFF so that the indicator
disappears from the LCD or viewfinder screen.
The ND filter is now deactivated.
Notes
•If you set the ND FILTER selector to another positions during recording, the picture
may be blurred or audio noise may occur. We recommend that you check the position
of the ND FILTER selector before shooting.
•When shooting a too bright object, diffraction off the small aperture may cause slight
off set in focusing. This phenomenon is quite common with a use of a video camera
recorder. Using the ND filter will reduce influence of such phenomenon, and you can
attain a better shooting condition.
If you use the video flash light (optional)
Set the ND FILTER selector to OFF when you use the flash.
Shooting with manual adjustment
ND FILTER
1
2
OFF

48
Shooting with the zebra pattern
You can set the camcorder to display a zebra pattern (diagonal stripes) in the portion of
the picture on the LCD screen or in the viewfinder with a subject whose brightness
exceeds a certain level. When the ZEBRA selector is set to 100, the portion of the picture
where zebra pattern appears is an area of high brightness and overexposure. You can
check the picture level of a subject by displaying the zebra pattern. Use the zebra
pattern as a guide for adjusting the exposure and shutter speed so that you can get the
desired picture.
Set the ZEBRA selector to 70 or 100 in standby or memory mode.
Setting
70
100
OFF
To erase the zebra pattern
Set the ZEBRA selector to OFF.
Note on shooting with the zebra pattern
Even though you see the zebra pattern on the LCD screen or in the viewfinder, the
zebra pattern is not recorded.
Shooting with manual adjustment
Meaning
The zebra pattern appears in the portion of the picture on the LCD screen
or in the viewfinder with a subject whose brightness is about 70 %.
The zebra pattern appears in the portion of the picture on the LCD screen
or in the viewfinder with a subject whose brightness exceeds more than
100 %.
The zebra pattern does not appear on the LCD screen or in the viewfinder.
ZEBRA
OFF
70
100

49
Advanced Recording Operations
Releasing the SteadyShot function
When the SteadyShot function is working, the camcorder compensates for camera-
shake.
You can release the SteadyShot function when you do not need to use it. The
indicator appears on the LCD screen or in the viewfinder. Do not use the SteadyShot
function when shooting a stationary object with a tripod.
( )1 Press MENU to display the menu in standby or memory mode.
( )2 Turn the SEL/PUSH EXEC dial to select , then press the dial.
( )3 Turn the SEL/PUSH EXEC dial to select STEADYSHOT, then press the dial.
( )4 Turn the SEL/PUSH EXEC dial to select OFF, then press the dial.
( )5 Press MENU to erase the menu display.
To activate the SteadyShot function again
Select ON in step 4, then press the SEL/PUSH EXEC dial.
Notes on the SteadyShot function
•The SteadyShot function will not correct excessive camera-shake.
•If you use a tele conversion lens (optional) or a wide conversion lens (supplied), these
lens may influence the SteadyShot function.
Shooting with manual adjustment
CAMERA SET
D ZOOM
16 : 9W
I
DE
STEADYSHOT
FRAME REC
I
NT. REC
W
I
ND
[MENU
] :
END
2-4
1,5
CAMERA SET
D ZOOM
16 : 9W
I
DE
STEADYSHOT
FRAME REC
I
NT. REC
W
I
ND
RETURN
ON
OFF
[MENU ] :
END
MENU
CAMERA SET
D ZOOM
16 : 9W
I
DE
STEADYSHOT
FRAME REC
I
NT. REC
W
I
ND
RETURN
OFF
[MENU] :
END

50
Adjusting the AE shift
You can adjust the AE shift in accordance with shooting conditions and a subject.
( )1 Press AE SHIFT in standby, recording, or memory mode. The AE shift
indicator appears on the LCD screen or in the viewfinder.
( )2 Turn the SEL/PUSH EXEC dial to adjust the brightness.
To deactivate AE shift
Set the AE shift value to 0, or press AE SHIFT.
When you adjust AE shift
The –4 to +4 indicator is displayed on the LCD screen or in the viewfinder. The
number varies corresponding to the AE shift level.
Shooting with manual adjustment
2
1
0
AE SHIFT

51
Advanced Recording Operations
Adjusting the white balance
White balance adjustment makes white subjects look white and allows more natural
colour balance for camera recording. Normally, white balance is automatically adjusted.
You can obtain better results by adjusting the white balance manually when lighting
conditions change quickly or when recording outdoors: e.g., neon signs, fireworks.
( )1 Set the AUTO LOCK selector to the center (auto lock release) position while
the camcorder is in standby, recording, or memory mode.
( )2 Press WHT BAL. The white balance indicator appears on the LCD screen or in
the viewfinder.
( )3 Turn the SEL/PUSH EXEC dial to select the appropriate white balance mode
under the following conditions. As you turn the dial, the display changes as
follows:
(One-push white balance) (Outdoor) (Indoor)y y n
Indicator
(Outdoor)
n (Indoor)
Shooting conditions
• Adjusting the white balance according to the light source.
This operation is not available during recording. Follow the
procedure described on the next page to adjust the setting again.
• Recording a sunset/sunrise, just after sunset, just before sunrise, neon
signs, or fireworks
• Under a colour matching fluorescent lamp
• Lighting condition changes quickly
• Too bright a place such as a photography studio
• Under sodium lamps or mercury lamps
12
3
AUTO
LOCK
HOLD
WHT BAL

52
If you have selected in step 3
When you set the white balance to one-push white balance mode, the setting is locked
and maintained even if lighting conditions change. You can achieve recording with
natural colours without the image being affected by ambient light.
(With the indicator on the screen)
( )1 Aim a white object such as paper fully.
( )2 Press the SEL/PUSH EXEC dial.
The indicator flashes quickly. When the white balance has been adjusted and stored
in the memory, the indicator stops flashing. The setting will be maintained even if the
battery is detached.
To return to automatic adjustment
Set the AUTO LOCK selector to AUTO LOCK or press WHT BAL. The white balance
indicator disappears from the LCD or viewfinder screen.
Notes on white balance
•When you shoot with studio lighting or video lighting, use the n (indoor) mode.
•When you shoot with fluorescent lighting, readjust the white balance using the
(one-push white balance) mode , or use the automatic white balance mode. If you use
the n (indoor) mode, white balance may not be adjusted appropriately.
Shooting when lighting conditions have changed
•When lighting conditions have changed, readjust the white balance while the
camcorder is in standby mode.
•In automatic white balance mode, point your camcorder at a white subject for about
10 seconds after setting the POWER switch to CAMERA to get a better adjustment
when:
– You detach the battery for replacement.
– You bring your camcorder outdoors from the interior of a house, or vice versa.
If the indicator does not stop flashing after you press the SEL/PUSH EXEC dial
The white balance cannot be set. Use the automatic white balance mode.
Adjusting the white balance
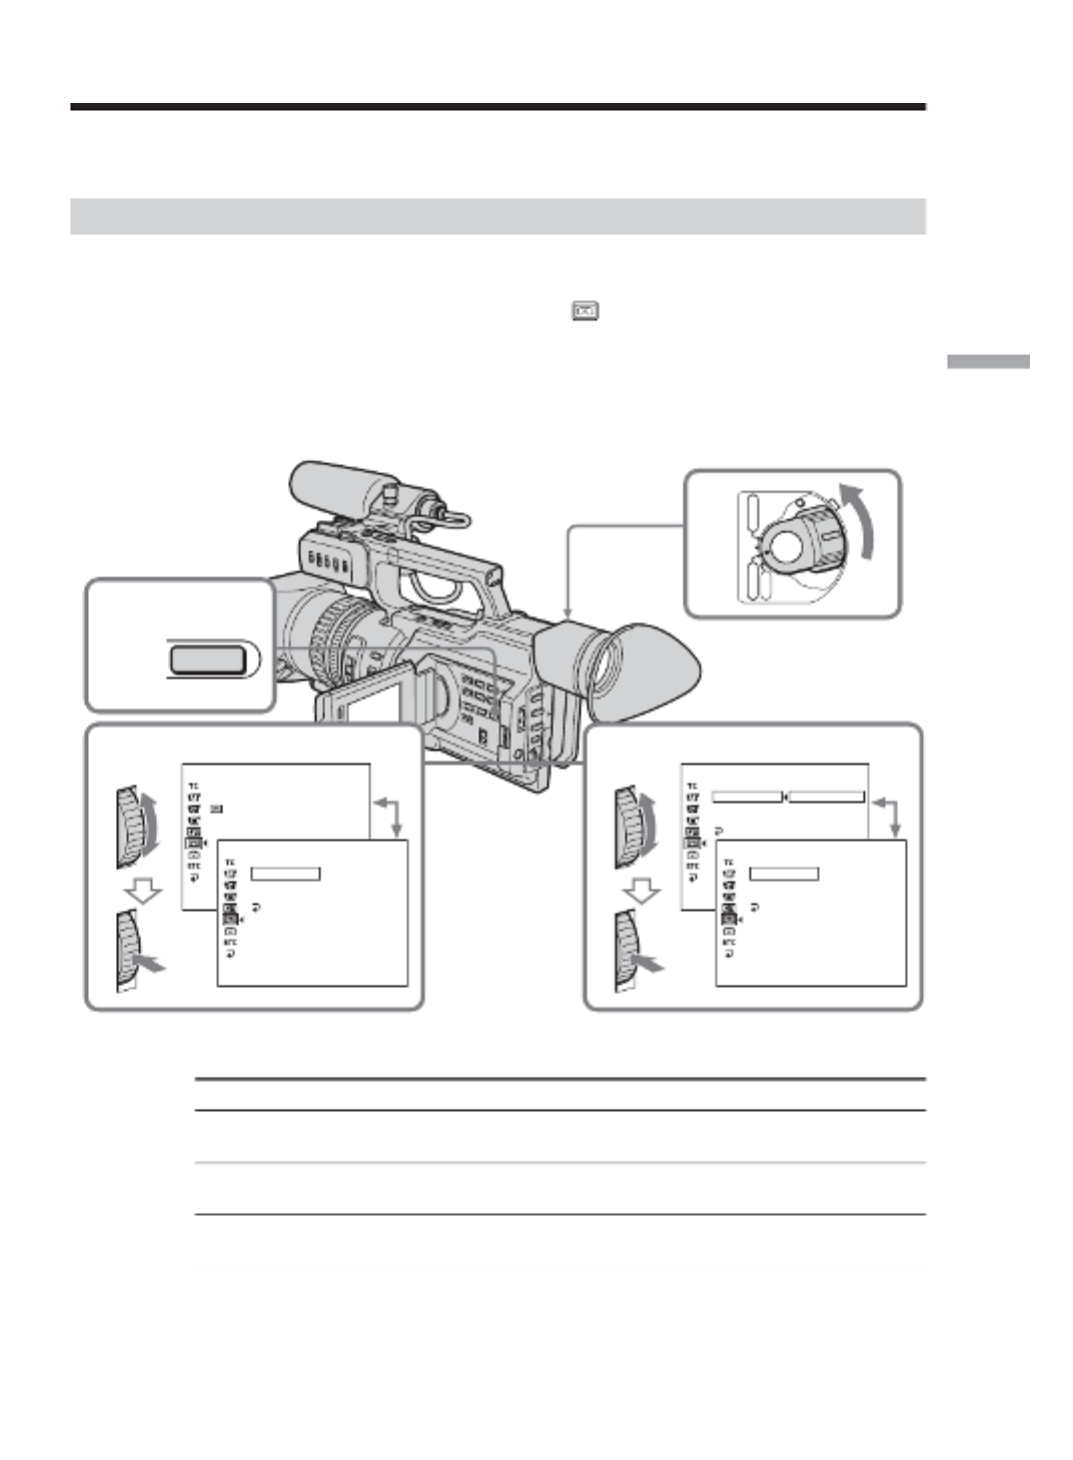
53
Advanced Recording Operations
Adjusting the recording level manually
– Sound recording level
You can adjust the recording sound level. Use headphones to monitor the sound when
you adjust it. You can adjust the channel 1 and channel 2 separately.
Selecting the channel to be adjusted manually
( )1 Set the POWER switch to CAMERA or VCR.
( )2 Press MENU to display the menu.
( )3 Turn the SEL/PUSH EXEC dial to select , then press the dial.
( )4 Turn the SEL/PUSH EXEC dial to select AUDIO SET, then press the dial.
( )5 Turn the SEL/PUSH EXEC dial to select the desired item, then press the dial.
( )6 Turn the SEL/PUSH EXEC dial to select the setting of the item, then press the
dial.
( )7 Press MENU to erase the menu display.
Items to be adjusted
Item
AGC CH1
AGC CH2 a)
MAN GAIN
a)b)
a) This is only available when connecting the external microphone to the INPUT2
connector.
b) LINKED is only available when both AGC CH1 and AGC CH2 are set to OFF.
Meaning
Switches the recording level adjustment of the
channel 1 from automatic (ON) and manual (OFF).
Switches the recording level adjustment of the
channel 2 from automatic (ON) and manual (OFF).
Sets the recording levels of channel 1 and channel 2
linked (LINKED) or separated (SEPARATED).
Setting
ON
OFF
ON
OFF
SEPARATED
LINKED
5,6
TAPE SET
AUD
I
O SET
AGC CH1
AGC CH2
MAN GA
I
N
RETURN
ON
OFF
[MENU
] : END
[MENU] : END
TAPE SET
AUD
I
O SET
AGC CH1
AGC CH2
MAN GA
I
N
RETURN
OFF
[MENU] : END
1
2,7
3,4
POWER
OFF
(CHG) CAMERA
MEMORY
VCR
TAPE SET
REC MODE
AUD
I
O MODE
REMA
I
N
M
I
C NR
AUD
I
O SET
[MENU
] : END
[MENU] : END
TAPE SET
AUD
I
O SET
AGC CH1
AGC CH2
MAN GA
I
N
RETURN
ON
[MENU] : END
MENU

54
Adjusting the recording level manually– Sound recording level
To adjust the recording level automatically
Set AGC CH1 to ON when you automatically adjust the recording level of the channel 1. And
set AGC CH2 to ON when you automatically adjust the recording level of the channel 2.
When the recording level is adjusted manually
The recording level indicator appears at the lower-right on the LCD screen or in the
viewfinder.
The sound input through the AUDIO CH1/CH2 jacks or DV Interface
You cannot adjust the recording level.
Adjusting the recording level
( )1 Press AUDIO LEVEL to display the recording level adjustment display in
standby or recording mode.
( )2 Turn the SEL/PUSH EXEC dial to adjust the recording level of the channel 1,
then press the dial. The cursor moves to “CH2,” and you can adjust the
recording level of the channel 2.
( )3 Turn the SEL/PUSH EXEC dial to adjust the recording level of the channel 2.
[a] Recording level meter
[b] Decreases the recording level
[c] Increases the recording level
To clear the recording level adjustment display
Press AUDIO LEVEL again.
When AGC CH1 or AGC CH2 is set to ON
You can see the recording level adjustment display, however, you cannot adjust the
recording level of the channel that the item above is set to ON.
When MAN GAIN is set to LINKED
The recording level adjustment display is changed as follows.
3
1,2
[a]
[b] [c]
AUDIO
LEVEL
30 20 12 0 dB
CH1
CH2
CH1
CH2
30 20 12 0 dB
CH1
CH2
CH1
CH2
30 20 12 0 dB
CH1
CH2
CH1,2
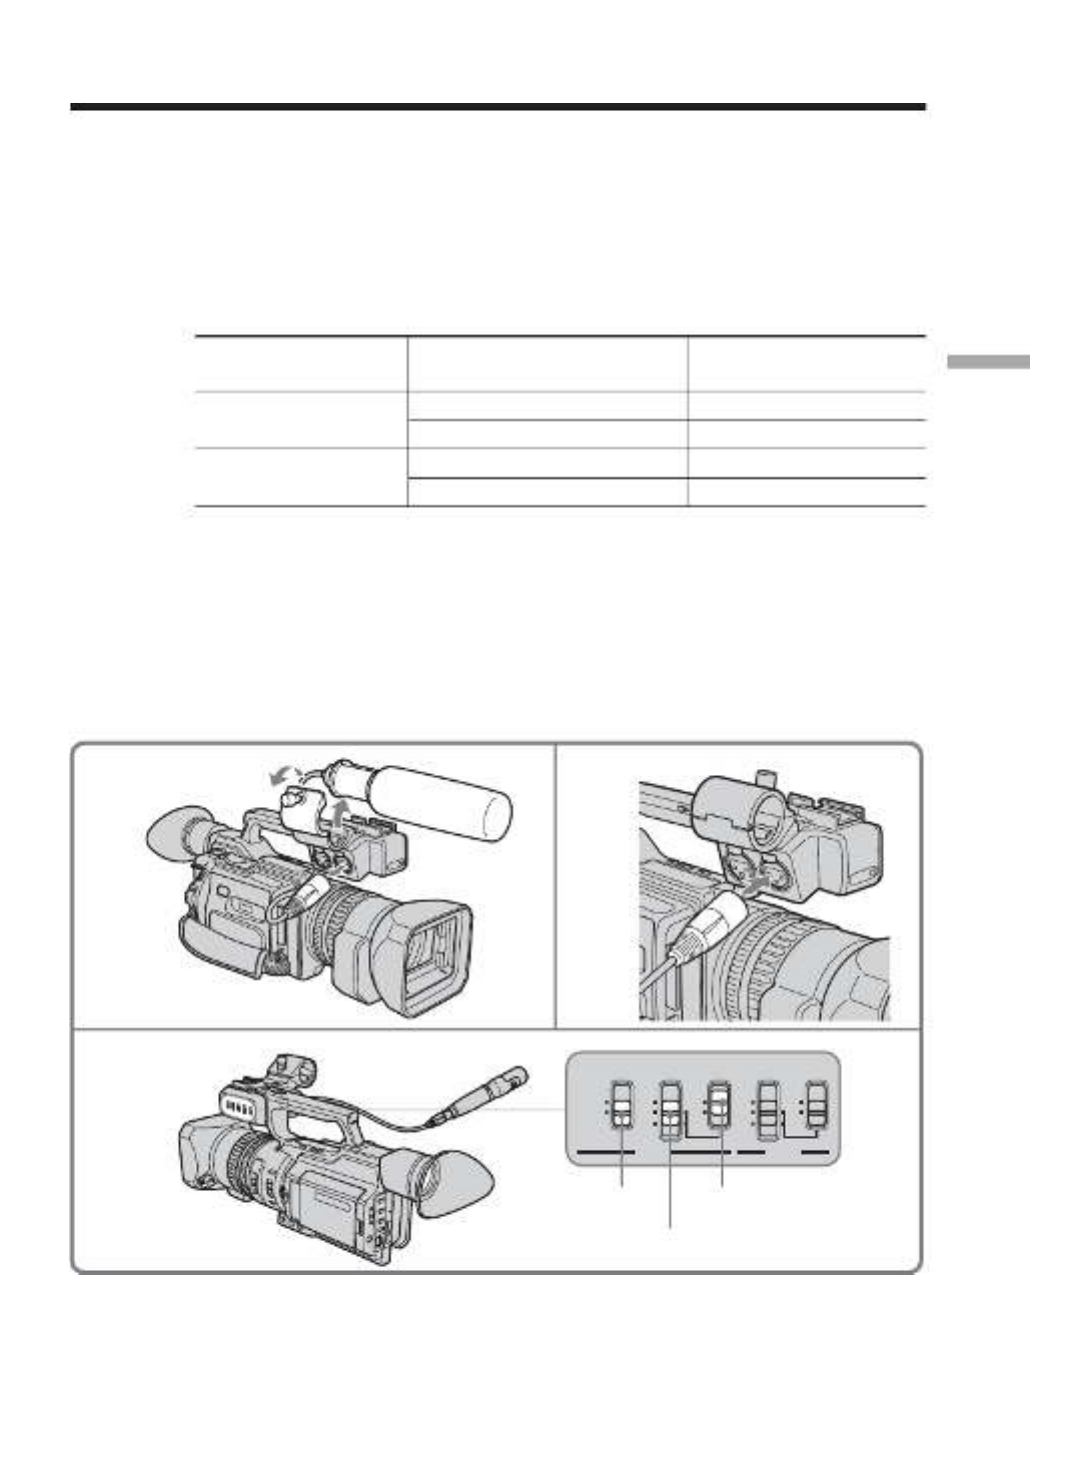
55
Advanced Recording Operations
Connecting an optional external
microphone
You can get your desired audio quality, connecting multiple microphones or an
optional microphone to your camcorder.
( )1 Loosen the microphone holder screw and open the cover.
( )2 Detach the supplied microphone and unplug the cable from the camcorder.
( )3 Connect the microphone (optional) to the INPUT1 or INPUT2 connector.
( )4 Select the channel to be used, using the REC CH SELECT switch. Used
channels according to the position of the REC CH SELECT switch are as
follows:
Audio input through The position of the REC CH The audio is recorded on
SELECT switch
INPUT1 CH1 Channel 1
CH1•CH2 Channels 1/2
INPUT2 CH1 Channel 2
CH1•CH2 —
( )5 Set the following settings.
When connecting a microphone
Set the INPUT LEVEL selector to MIC or MIC ATT. When set to MIC ATT, you
can reduce the volume by about +20 dB. And set the +48V switch to ON if the
microphone is powered through its cable.
When connecting audio equipment
Set the +48 V switch to OFF and set the INPUT LEVEL selector to LINE.
1,2
4,5
3
CH1•CH2
REC CH
SELECT
INPUT
LEVEL +48V
INPUT
LEVEL +48V
CH1
LINE
MIC
ON
OFF
LINE
MIC
ATT
MIC
ATT
MIC
ON
OFF
INPUT1 INPUT2
REC CH
SELECT
INPUT
LEVEL +48V
INPUT2
REC CH SELECT +48 V
INPUT LEVEL

56
When the wind is blowing hard
Set CH1 or CH2 of WIND to ON in the menu settings according to the input (p. 105).
We recommend that you set MIC NR to OFF in the menu settings in the following
cases:
•When you use the external microphone at a distance from the camcorder.
•When the REC CH SELECT switch is set to CH1 and you will not record any audio via
the INPUT2 connector.
•When you set the INPUT LEVEL selector to LINE.
When you unplug the microphone plug
Unplug it while holding the PUSH button down.
Notes
•When you use an external microphone, make sure that the wind screen does not
appear on the screen, using an underscan monitor.
•If you use equipment other than a 48-V microphone with the +48V switch set to ON, a
malfunction of the equipment may occur. When you connect equipment other than a
48-V microphone, set it to OFF.
Connecting an optional external microphone

57
Advanced Recording Operations
Presetting the adjustment for picture
quality – Custom preset
You can preset the camcorder to record the picture with the desired picture quality.
When presetting, adjust the picture by shooting a subject and checking the picture
displayed on a TV using the menu settings.
( )1 Press CUSTOM PRESET to display the CUSTOM PRESET menu in standby or
memory mode.
( )2 Press the SEL/PUSH EXEC dial.
( )3 Turn the SEL/PUSH EXEC dial to select SET, then press the dial.
( )4 Turn the SEL/PUSH EXEC dial to select ON, then press the dial.
( )5 Turn the SEL/PUSH EXEC dial to select the desired item, then press the dial.
( )6 Turn the SEL/PUSH EXEC dial to adjust the selected item, then press the dial.
( )7 Press CUSTOM PRESET.
The CUSTOM PRESET menu disappears and the indicator appears on the
LCD screen or in the viewfinder.
CUSTOM PRESET
[CP ] : END
CUSTOM PRESET STBY
[CP ] : END
SET
COLOUR LVL
SHARPNESS
WB SH
I
FT
AGC LIMIT
RESET
OFF
OFF
2-4
5,6
CUSTOM PRESET STBY
SET
COLOUR LVL
SHARPNESS
WB SH
I
FT
AGC LIMIT
RESET
RETURN
OFF
[CP] : END
CUSTOM PRESET STBY
SET
COLOUR LVL
SHARPNESS
WB SH
I
FT
AGC LIMIT
RESET
RETURN
OFF
ON
[CP] : END
CUSTOM PRESET STBY
SET
COLOUR LVL
SHARPNESS
WB SH
I
FT
AGC LIMIT
RESET
RETURN
ON
[CP] : END
CUSTOM PRESET STBY
SET
COLOUR LVL
SHARPNESS
WB SH
I
FT
AGC LIMIT
RESET
RETURN
[CP] : END
CUSTOM PRESET STBY
COLOUR LVL
[CP] : END
1
CUSTOM PRESET
7
CUSTOM PRESET

58
Presetting the adjustment for picture quality
Items to be adjusted
Item
COLOUR LVL
SHARPNESS
WB SHIFT
AGC LIMIT
RESET
To cancel using the custom preset
Select OFF in step 4, then press the SEL/PUSH EXEC dial.
To return to the standard setting
Select OK from the RESET item in step 5, then press the SEL/PUSH EXEC dial. To
cancel, select RETURN, then press the SEL/PUSH EXEC dial.
To check the custom preset setting
Press CUSTOM PRESET while the camcorder is in standby, recording or memory
mode.
The custom preset setting appears on the LCD screen or in the viewfinder.
About the AGC limit
When adjusting the gain manually, the level of the gain is up to 18 dB (OFF).
When you preset the desired picture quality in CAMERA or memory mode
The preset is only available in each mode you preset. If you want to use a preset both in
CAMERA and memory modes, you have to preset in each mode.
Meaning
Colour intensity
Sharpness
White balance
Auto Gain-limit
Sets items above to the default
settings.
Adjustment value
Decreases colour intensity y
Increases colour intensity
Softer y Sharper
Bluish y Reddish
6 dB/12 dB/OFF

59
Advanced Recording Operations
Focusing manually
You can gain better results by manually adjusting the focus in the following cases:
•The autofocus mode is not effective when shooting
– subjects through glass coated with water droplets
– horizontal stripes
– subjects with little contrast with backgrounds such as walls and sky
•When you want to change the focus from a subject in the foreground to a subject in the
background
•Shooting a stationary subject when using a tripod
( )1 Slide FOCUS down to MANUAL. The 9 indicator appears on the LCD screen
or in the viewfinder in recording, standby, or memory mode.
( )2 Turn the focus ring to sharpen the focus.
To return to the autofocus mode
Slide FOCUS up to AUTO to turn off the 9 or indicator.
To focus in infinity
Slide FOCUS to INFINITY. The indicator appears on the LCD screen or in the
viewfinder. This function is useful when the nearer subject is focused automatically,
even though you want to focus on a faraway subject.
To shoot with auto focusing momentarily
Press PUSH AUTO.
The auto focus functions while you are pressing PUSH AUTO.
Use this button to focus on one subject and then another with smooth focusing.
When you release PUSH AUTO, manual focusing resumes.
To obtain the correct focus
First, focus on a subject manually with the zoom set toward the “T” (telephoto) side, then
adjust the zoom by pressing the “W” side of the lever gradually.
When you shoot close to the subject
Focus at the end of the “W” (wide-angle) position.
9 changes as follows:
when recording a distant subject.
when the subject is too close to focus on.
2
PUSH AUTO
FOCUS
MAN
AUTO
INFINITY
1

60
Interval recording
You can make a time-lapse recording by
setting the camcorder to automatically record
and standby sequentially. You can achieve an
excellent recording for flowering, emergence,
etc., with this function.
[ ]a Recording time
[ ]b Waiting time
( )1 Press MENU to display the menu in standby mode.
( )2 Turn the SEL/PUSH EXEC dial to select , then press the dial.
( )3 Turn the SEL/PUSH EXEC dial to select INT. REC, then press the dial.
( )4 Turn the SEL/PUSH EXEC dial to select SET, then press the dial.
( )5 Set INTERVAL and REC TIME.
1 Turn the SEL/PUSH EXEC dial to select INTERVAL, then press the dial.
2 Turn the SEL/PUSH EXEC dial to select the desired interval time, then
press the dial.
The time: 30SEC y 1MIN y 5MIN y 10MIN
3 Turn the SEL/PUSH EXEC dial to select REC TIME, then press the dial.
4 Turn the SEL/PUSH EXEC dial to select the desired recording time, then
press the dial.
The time: 0.5SEC 1SEC 1.5SEC 2SECy y y
5 Turn the SEL/PUSH EXEC dial to select RETURN, then press the dial.
1
5
2-4
1 2
3 4
CAMERA SET
D ZOOM
16 : 9W
I
DE
STEADYSHOT
FRAME REC
I
NT. REC
W
I
ND
[MENU
] :
END
CAMERA SET
D ZOOM
16 : 9W
I
DE
STEADYSHOT
FRAME REC
I
NT. REC
W
I
ND
RETURN
OFF
[MENU]
: END
CAMERA SET
I
NT. REC
I
NTERVAL
REC T
I
ME
RETURN
30SEC
[ MENU] : END
CAMERA SET
I
NT. REC
I
NTERVAL
REC T
I
ME
RETURN
30SEC
1M
I
N
5M
I
N
10M
I
N
[ MENU] : END
CAMERA SET
I
NT. REC
I
NTERVAL
REC T
I
ME
RETURN
0
.
5SEC
[MENU
] : END
CAMERA SET
I
NT. REC
I
NTERVAL
REC T
I
ME
RETURN
0
.
5SEC
1SEC
1
.
5SEC
2SEC
[MENU
] : END
CAMERA SET
D ZOOM
16 : 9W
I
DE
STEADYSHOT
FRAME REC
I
NT. REC
W
I
ND
RETURN
ON
OFF
SET
[MENU] : END
MENU
10 min10 min
1 s 1 s
9 min 59 s 9 min 59 s
[a] [a]
[b] [b]
Example

61
Advanced Recording Operations
Interval recording
( )6 Turn the SEL/PUSH EXEC dial to select ON, then press the dial.
( )7 Press MENU to erase the menu display. The interval recording indicator
flashes.
( )8 Press START/STOP to start interval recording. The interval recording
indicator lights up.
To cancel the interval recording
•Set INT. REC to OFF in the menu settings.
•Set the POWER switch to OFF (CHG), VCR or MEMORY.
To stop the interval recording momentarily and perform
normal recording
Press START/STOP. You can perform normal recording only once. To cancel the
normal recording, press START/STOP again.
Note on interval recording
You cannot do interval recording in memory mode.
On recording time
There may be a discrepancy in recording time of up to +/– 6 frames from the selected
time.
Even if you press INDEX MARK during interval recording
You cannot mark an index.
7
6
8
POWER
OFF
(CHG)
CAMERA
MEMORY
VCR
I
NTERVAL
MENU
CAMERA SET
D ZOOM
16 : 9W
I
DE
STEADYSHOT
FRAME REC
I
NT. REC
W
I
ND
RETURN
ON
[ MENU] : END

62
Frame by frame recording – Cut recording
You can make a recording with a stop-motion animated effect using cut recording. To
create this effect, alternately move the subject a little and make a cut recording. We
recommend that you use a tripod, and operate the camcorder using the Remote
Commander after step 6.
( )1 Press MENU to display the menu in standby mode.
( )2 Turn the SEL/PUSH EXEC dial to select , then press the dial.
( )3 Turn the SEL/PUSH EXEC dial to select FRAME REC, then press the dial.
( )4 Turn the SEL/PUSH EXEC dial to select ON, then press the dial.
( )5 Press MENU to erase the menu display.
The FRAME REC indicator lights up.
( )6 Press START/STOP to start cut recording. The camcorder makes a recording
for about six frames, and returns to recording standby.
( )7 Move the subject, and repeat step 6.
To cancel the cut recording
•Set FRAME REC to OFF in the menu settings.
•Set the POWER switch to OFF (CHG), VCR, or MEMORY.
Notes on cut recording
•The last recorded cut is longer than other cuts.
•The proper remaining tape time is not indicated if you use this function continuously.
•You cannot mark an index during cut recording.
16,7
5
POWER
OFF
(CHG)
CAMERA
MEMORY
VCR
FRAME REC
CAMERA SET
D ZOOM
16 : 9W
I
DE
STEADYSHOT
FRAME REC
I
NT. REC
W
I
ND
[ MENU] : END
CAMERA SET
D ZOOM
16 : 9W
I
DE
STEADYSHOT
FRAME REC
I
NT. REC
W
I
ND
RETURN
OFF
ON
[MENU] : END
CAMERA SET
D ZOOM
16 : 9W
I
DE
STEADYSHOT
FRAME REC
I
NT. REC
W
I
ND
RETURN
ON
[MENU] :
END
2-4
MENU
MENU

63
Advanced Recording Operations
Superimposing the date and time on a
picture
You can superimpose the date/time indication directly on the picture, besides the date/
time display as data code.
( )1 Press MENU to display the menu in standby mode.
( )2 Turn the SEL/PUSH EXEC dial to select , then press the dial.
( )3 Turn the SEL/PUSH EXEC dial to select DATE REC, then press the dial.
( )4 Turn the SEL/PUSH EXEC dial to select ON, then press the dial.
( )5 Press MENU to erase the menu display.
The date/time indicator displayed on the LCD screen or in the viewfinder.
To cancel superimposing the date/time indication
Select OFF in step 4, then press the SEL/PUSH EXEC dial.
Note
You cannot erase the recorded date/time data on the picture. Before using this function,
make sure that you set the date and time correctly.
1,5
OTHERS
WORLD T
I
ME
BEEP
COMMANDER
D
I
SPLAY
DATE REC
REC LAMP
COLOUR BAR
HRS METER
[ MENU] : END
OTHERS
WORLD T
I
ME
BEEP
COMMANDER
D
I
SPLAY
DATE REC
REC LAMP
COLOUR BAR
HRS METER
RETURN
OFF
ON
[MENU ] : END
OTHERS
WORLD T
I
ME
BEEP
COMMANDER
D
I
SPLAY
DATE REC
REC LAMP
COLOUR BAR
HRS METER
RETURN
ON
[MENU] : END
2-4
MENU
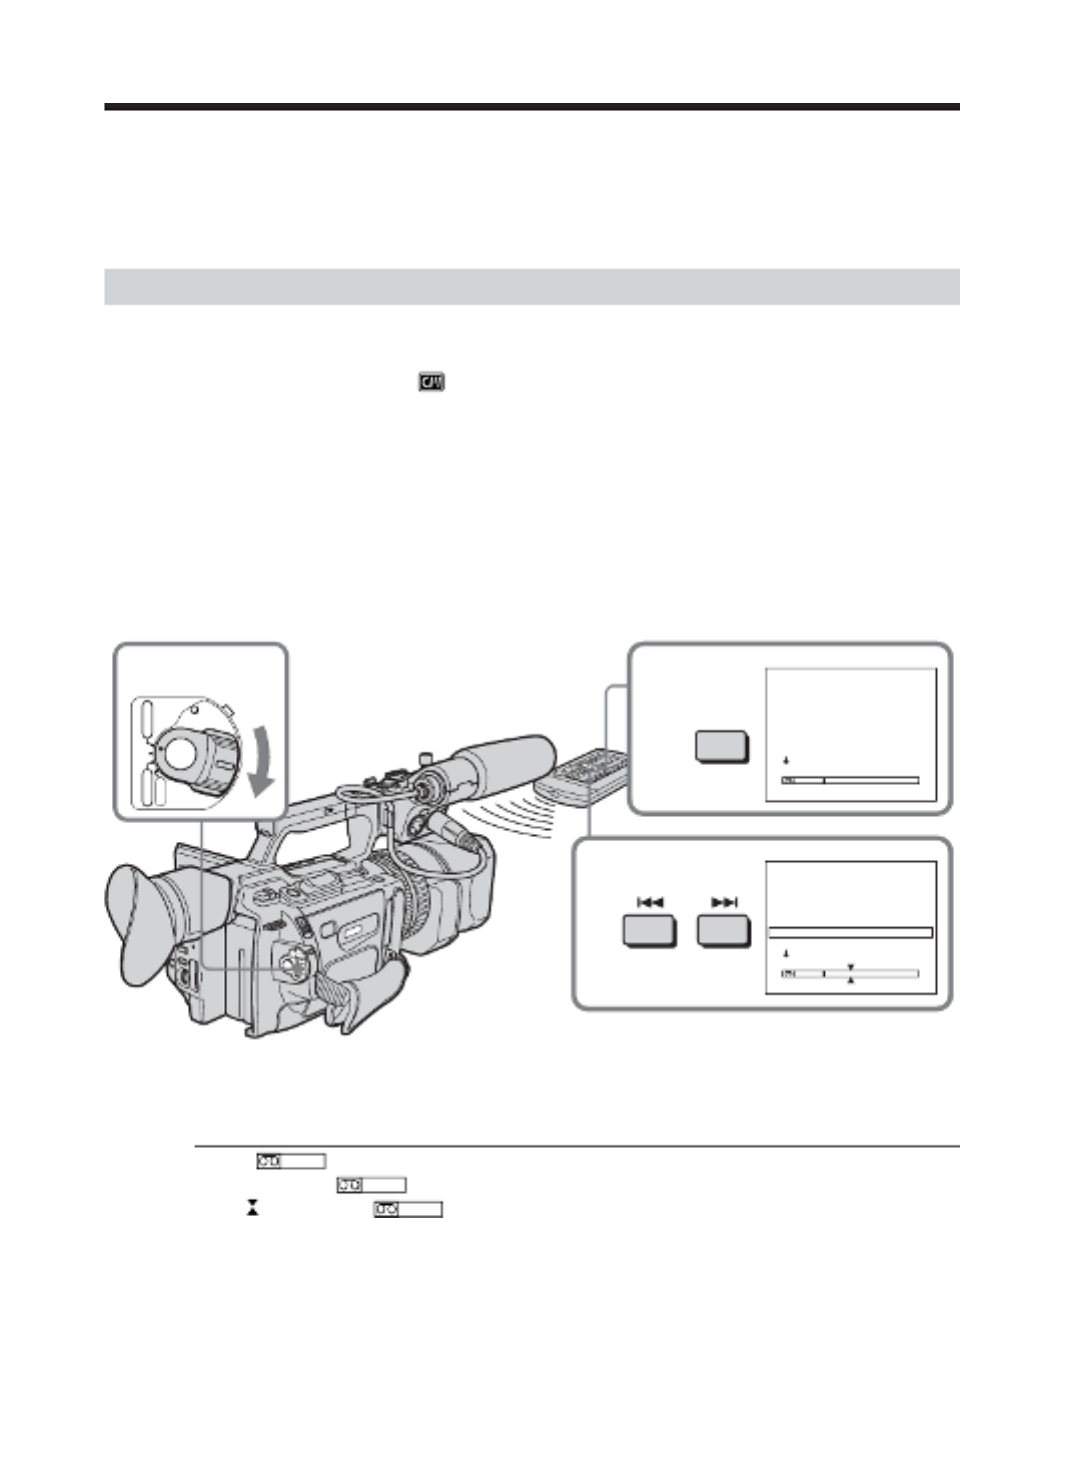
70
Searching for a photo – Photo search/
Photo scan
You can search for a still picture you have recorded on a tape .(photo search)
You can also search for still pictures one after another and display each picture for five
seconds automatically regardless of cassette memory . Use the Remote(photo scan)
Commander for these operations.
Use this function to check or edit still pictures.
Searching for a photo using cassette memory
You can use this function only when playing back a tape with cassette memory (p. 142).
( )1 Set the POWER switch to VCR.
( )2 Set CM SEARCH in to ON in the menu settings (p. 105). Default setting is
ON.
( )3 Press SEARCH MODE on the Remote Commander repeatedly, until the photo
search indicator appears.
The indicator changes as follows:
INDEX SEARCH t TITLE SEARCH DATE SEARCH PHOTO SEARCHt t
t t PHOTO SCAN no indicator
( )4 Press . or > on the Remote Commander to select the date for playback.
Your camcorder automatically starts playback of the photo having the date
that you selected.
To stop searching
Press . x
In the mark
•The bar in the mark indicates the present point on the tape.
•The mark in the indicates the actual point you are trying to search for.
If a tape has a blank portion between recorded portions
The photo search function may not work correctly.
3
4
1
POWER
OFF
(CHG)
CAMERA
MEMORY
VCR
PHOTO SEARCH
1 5 / 9 / 03
2 6 / 9 / 03
3 24 / 12 / 03
4 1 / 1 / 04
5 11 / 2 / 04
6 29 / 4 / 04
PHOTO SEARCH
1 5 / 9 / 03
2 6 / 9 / 03
3 24 / 12 / 03
4 1 / 1 / 04
5 11 / 2 / 04
6 29 / 4 / 04
SEARCH
MODE
17 :30
8: 50
10: 30
23:25
16 :11
13 :45
17 :30
8: 50
10: 30
23:25
16 :11
13 :45

Editing
75
Dubbing only desired scenes – Digital
program editing
You can duplicate selected scenes (programs) for editing onto a tape without operating
the VCR. Scenes can be selected by frame.
To use this function, an i.LINK cable (optional) will be required.
[ ]a Undesired frame
[ ]b Moves the scene
Before operating the digital program editing
Preparation 1 Connecting the VCR (p. 73, 74).
Preparation 2 Adjusting the synchronization of the VCR (p. 76).
When you dub using the same VCR again, you can skip Preparation 2.
Using the digital program editing function
Operation 1 Making programs (p. 78).
Operation 2 Performing a digital program editing (Dubbing a tape) (p. 80).
Notes
•You cannot dub the titles, display indicators, or the contents of cassette memory.
•If you start recording from the very beginning of the tape, the first few seconds of the
tape may not record properly. Be sure to allow about 10 seconds’ lead before starting
the recording.
Preparation 1: Connecting the VCR
Connect your camcorder and the VCR as shown on page 73 and 74.
[a] [a]
[ ]b
Produkt Specifikationer
| Mærke: | Sony |
| Kategori: | Videokamera |
| Model: | DSR-PD170P |
Har du brug for hjælp?
Hvis du har brug for hjælp til Sony DSR-PD170P stil et spørgsmål nedenfor, og andre brugere vil svare dig
Videokamera Sony Manualer

15 Januar 2025
28 December 2024
16 November 2024
12 Oktober 2024
12 Oktober 2024
6 September 2024
6 September 2024
6 September 2024
6 September 2024
2 September 2024
Videokamera Manualer
- Videokamera Nilox
- Videokamera SilverCrest
- Videokamera Denver
- Videokamera Sencor
- Videokamera Canon
- Videokamera Samsung
- Videokamera Panasonic
- Videokamera Extech
- Videokamera Philips
- Videokamera Lenco
- Videokamera OK
- Videokamera Braun
- Videokamera Sharp
- Videokamera Logitech
- Videokamera Kenwood
- Videokamera HP
- Videokamera Garmin
- Videokamera Sanyo
- Videokamera Thinkware
- Videokamera Easypix
- Videokamera Nikkei
- Videokamera Bushnell
- Videokamera Toshiba
- Videokamera Pyle
- Videokamera Fujifilm
- Videokamera Nikon
- Videokamera Kodak
- Videokamera Tracer
- Videokamera Olympus
- Videokamera Nedis
- Videokamera Zorki
- Videokamera Hama
- Videokamera Creative
- Videokamera Hyundai
- Videokamera Milwaukee
- Videokamera DataVideo
- Videokamera Trevi
- Videokamera Trust
- Videokamera Laserliner
- Videokamera Mio
- Videokamera Trotec
- Videokamera JVC
- Videokamera Leica
- Videokamera Uniden
- Videokamera Hitachi
- Videokamera T'nB
- Videokamera Medion
- Videokamera Linksys
- Videokamera Cisco
- Videokamera EZVIZ
- Videokamera König
- Videokamera Gembird
- Videokamera EnVivo
- Videokamera Maginon
- Videokamera Vtech
- Videokamera BenQ
- Videokamera Contour
- Videokamera Bresser
- Videokamera National Geographic
- Videokamera Voigtländer
- Videokamera Rollei
- Videokamera Xiaomi
- Videokamera Moultrie
- Videokamera Aiptek
- Videokamera Viewsonic
- Videokamera DJI
- Videokamera Voltcraft
- Videokamera Polaroid
- Videokamera Ricoh
- Videokamera TomTom
- Videokamera Soundmaster
- Videokamera Aida
- Videokamera Konica-Minolta
- Videokamera Kyocera
- Videokamera GoPro
- Videokamera Ikan
- Videokamera Cobra
- Videokamera Xblitz
- Videokamera Velleman
- Videokamera Marshall
- Videokamera FLIR
- Videokamera Energy Sistem
- Videokamera Swann
- Videokamera Zoom
- Videokamera Salora
- Videokamera Lamax
- Videokamera Overmax
- Videokamera SBS
- Videokamera Veho
- Videokamera Midland
- Videokamera Samson
- Videokamera ION
- Videokamera RCA
- Videokamera Prixton
- Videokamera Renkforce
- Videokamera Navitel
- Videokamera Hazet
- Videokamera Transcend
- Videokamera GoClever
- Videokamera Intenso
- Videokamera ARRI
- Videokamera Evolveo
- Videokamera Genius
- Videokamera Zagg
- Videokamera Airis
- Videokamera Steinberg
- Videokamera Spypoint
- Videokamera Vivitar
- Videokamera Contour Design
- Videokamera Dragon Touch
- Videokamera Vimar
- Videokamera Klein Tools
- Videokamera Oregon Scientific
- Videokamera Magellan
- Videokamera Lexibook
- Videokamera SJCAM
- Videokamera Speco Technologies
- Videokamera Prestigio
- Videokamera Blackmagic Design
- Videokamera Kogan
- Videokamera Drift
- Videokamera Insignia
- Videokamera Minox
- Videokamera Elmo
- Videokamera Agfa
- Videokamera AgfaPhoto
- Videokamera Quintezz
- Videokamera AEE
- Videokamera ATN
- Videokamera Activeon
- Videokamera Coby
- Videokamera TacTic
- Videokamera Macally
- Videokamera Naxa
- Videokamera Mamiya
- Videokamera Tronje
- Videokamera Mpman
- Videokamera Ematic
- Videokamera Minolta
- Videokamera Iget
- Videokamera RunCam
- Videokamera SeaLife
- Videokamera Sakar
- Videokamera Jobo
- Videokamera Mediacom
- Videokamera Kreator
- Videokamera Contax
- Videokamera EE
- Videokamera Traveler
- Videokamera Kaiser Baas
- Videokamera Bluetech
- Videokamera Braun Phototechnik
- Videokamera IOPLEE
- Videokamera Vupoint Solutions
- Videokamera Kitvision
- Videokamera Praktica
- Videokamera MMTC
- Videokamera Flip
- Videokamera Jay-tech
- Videokamera Brinno
- Videokamera BlackVue
- Videokamera Storex
- Videokamera Insta360
- Videokamera DXG
- Videokamera MD 80
- Videokamera Berger & Schröter
- Videokamera Whistler
- Videokamera Curve
- Videokamera PCE Instruments
- Videokamera DOD
- Videokamera CamOne
- Videokamera Mobius
- Videokamera ISAW
- Videokamera Beaulieu
- Videokamera Revier Manager
- Videokamera Kobian
- Videokamera FHD 1080P
- Videokamera RSC
- Videokamera Stealth Cam
- Videokamera Aqua-Vu
- Videokamera Hamlet
- Videokamera Qoltec
- Videokamera Leotec
- Videokamera Replay
- Videokamera Akaso
- Videokamera Hamilton Buhl
- Videokamera FeiyuTech
- Videokamera Best Buy
- Videokamera Rexing
- Videokamera Bolex
- Videokamera Microtek
- Videokamera Teslong
- Videokamera Izzo
- Videokamera Aquapix
- Videokamera Tactacam
Nyeste Videokamera Manualer

3 April 2025

14 Marts 2025
14 Marts 2025
14 Marts 2025
13 Marts 2025
12 Marts 2025
12 Marts 2025
12 Marts 2025
27 Februar 2025
25 Februar 2025