Sony HVR-Z7E Manual
Sony
Videokamera
HVR-Z7E
Læs nedenfor 📖 manual på dansk for Sony HVR-Z7E (148 sider) i kategorien Videokamera. Denne guide var nyttig for 19 personer og blev bedømt med 4.5 stjerner i gennemsnit af 2 brugere
Side 1/148

3-280-848-14(1)
© 2008 Sony Corporation
Printed in Japan
GBDigital HD Video Camera Recorder
http://www.sony.net/
Digital HD Video
Camera Recorder
Operating Guide
Before operating the unit, please read this manual thoroughly,
and retain it for future reference
HVR-Z7E/Z7P
3
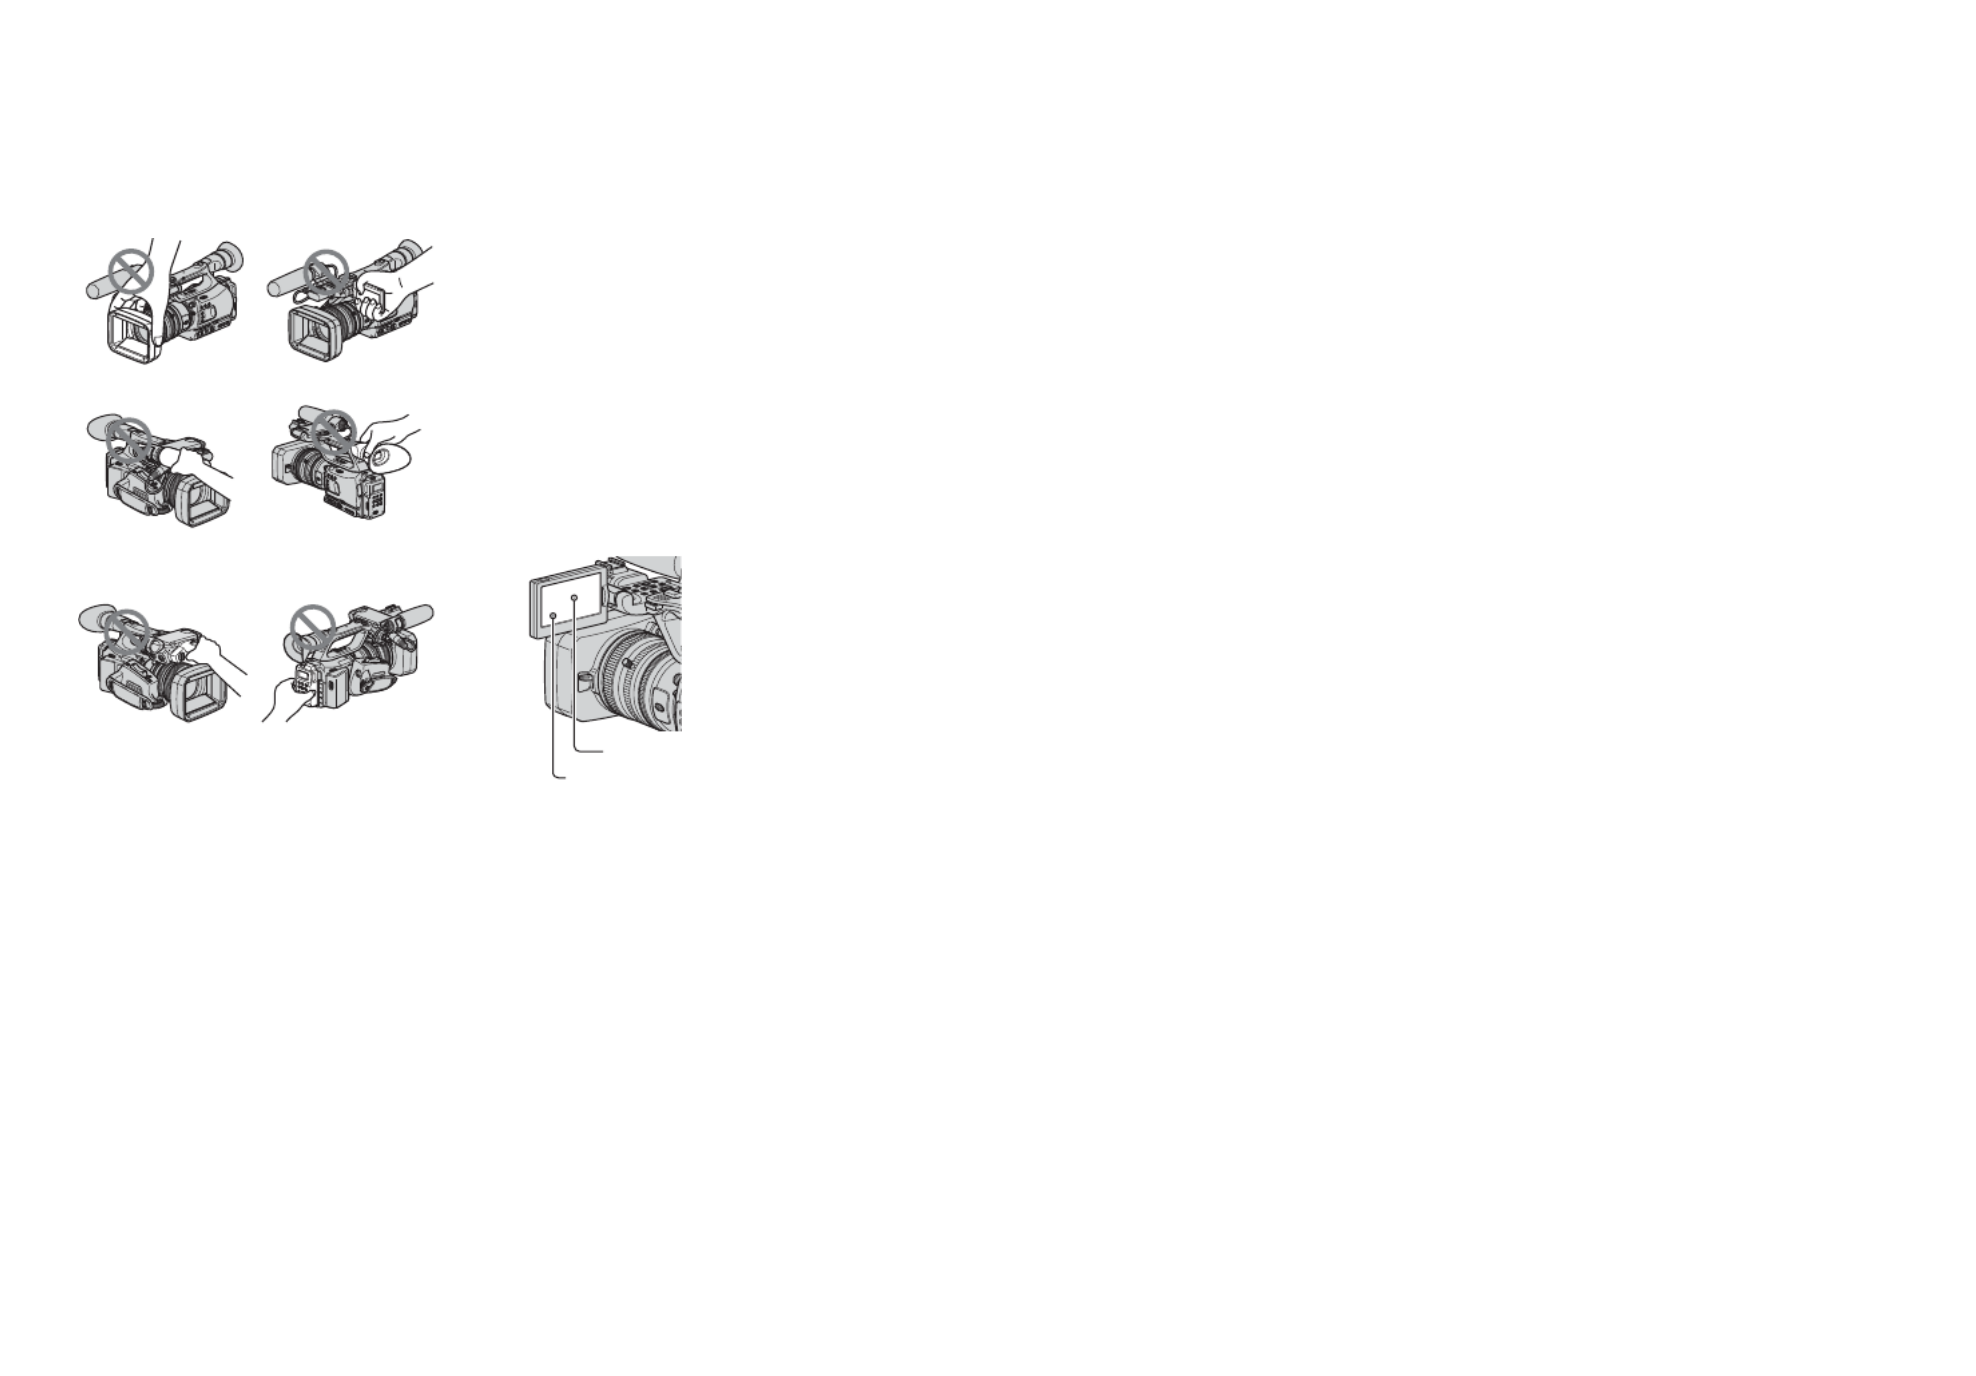
Using the camcorder
• Do not hold the camcorder by the
following part.
bNotes
• The camcorder is not dustproof, dripproof
or waterproof.
See “About handling of your camcorder”
( p. 124).
• Do not connect cables to your camcorder
with their terminals placed the wrong
way. Squeezing the terminals into your
camcorder's jacks may damage them or
results in a malfunction of your
camcorder.
About menu items, LCD panel,
viewfinder, and lens
• A menu item that is grayed out is not
available under the current recording or
playback conditions.
• The LCD screen and the viewfinder are
manufactured using extremely high-
precision technology, so over 99.99% of
the pixels are operational for effective
use. However, there may be some tiny
black points and/or bright points (white,
red, blue, or green in color) that appear
constantly on the LCD screen and the
viewfinder. These points are normal
results of the manufacturing process and
do not affect the recording in any way.
Do not expose your camcorder’s
viewfinder, lens, or LCD screen to the
sun or strong light source for extended
periods.
• Intense light sources, especially the sun
will converge on the viewfinder or lens
and damage the internal parts of your
camcorder. Avoid sunlight or other strong
light sources when storing your
camcorder. Protect this device by always
closing the lens cover or by placing it in
its bag when not in use.
On recording
• Before starting to record, test the
recording function to make sure the
picture and sound are recorded without
any problems.
LCD panel
Viewfinder
Lens hood
Accessory shoe
adaptor
Memory recording
unit
Microphone or
Microphone holder
Black point
White, red, blue or green points
Continued ,

4
• Compensation for the contents of
recordings cannot be provided, even if
recording or playback is not possible due
to a malfunction of the camcorder, storage
media, etc.
• TV color systems differ depending on the
countries/regions. To view your
recordings on a TV, you need a PAL
system-based TV.
• Television programs, films, video tapes,
and other materials may be copyrighted.
Unauthorized recording of such materials
may be contrary to the copyright laws.
• Because of the way that the image device
(CMOS sensor) reads out image signals,
the subjects passing by the frame rapidly
might appear crooked depending on the
recording conditions. This phenomenon
may be notable in displays having high
motion resolution.
• Because of the way that the image device
(CMOS sensor) reads out image signals,
the following phenomena may occur. The
phenomena can be reduced by adjusting
the shutter speed.
– Horizontal lines appear on the screen
during recording under fluorescent
lights.
– Images on the screen look horizontally
divided when a subject is lighted with
flashlight.
On playing back HDV tapes on other
devices
A tape recorded in the HDV format cannot
be played back on a device that is not
compatible with the HDV format.
Check the contents of tapes by playing
them back on this camcorder prior to
playing them back on other devices.
Notes on the icons used in this
manual
Features available for the HDV
format only.
Features available for the DVCAM
format only.
Features available for the DV SP
format only.
The function that can be used when
i.LINK cable is connected.
The function that can be assigned to
an ASSIGN button.
About this manual
• The images of the LCD screen and the
viewfinder used in this manual for
illustration purposes are captured using a
digital still camera, and therefore may
appear different.
• The on-screen displays in each local
language are used for illustrating the
operating procedures. Change the screen
language before using your camcorder if
necessary (p. 23).
• Design and specifications of recording
media and other accessories are subject to
change without notice.
About the Carl Zeiss lens
Your camcorder is equipped with a Carl
Zeiss lens, which was developed jointly by
Carl Zeiss, in Germany, and Sony
Corporation, and produces superior images.
It adopts the MTF measurement system for
video cameras and offers a quality typical
of a Carl Zeiss lens. Also, the lens for your
camcorder is T -coated to suppress
unwanted reflections and faithfully
reproduce colors.
MTF= Modulation Transfer Function. The
number value indicates the amount of light
from a subject coming into the lens.
Read this first (Continued)

5
Table of Contents
Read this first ...........................................................................................2
Step 1: Checking supplied items ..............................................................8
Step 2: Attaching the supplied items ......................................................10
Step 3: Charging the battery pack ..........................................................16
Step 4: Turning the power on and holding your camcorder properly .....19
Step 5: Adjusting the LCD panel and viewfinder ....................................20
Step 6: Setting the date and time ...........................................................22
Changing the language setting .......................................................... 23
Step 7: Inserting a tape or a “Memory Stick Duo” ..................................24
Recording ...............................................................................................26
Changing the settings of your camcorder recordings .............................29
Adjusting the zoom ............................................................................. 29
Adjusting the focus manually.............................................................. 30
Adjusting the exposure ....................................................................... 32
Adjusting to natural color (White balance).......................................... 34
Adjusting the black balance ............................................................... 35
Customizing the picture quality (Picture profile)................................. 35
Adjusting the volume .......................................................................... 43
Assigning the functions to the ASSIGN buttons .....................................45
Recording an index signal .................................................................. 46
Reviewing the most recently recorded scenes (Rec review).............. 47
Searching for the last scene of the most recent recording
(End search) ....................................................................................... 47
Playing back the most recently recorded movies
(Last scene review)............................................................................. 47
Using the Shot transition ........................................................................48
Marking focal point on the screen (Focus marking) ...............................51
Playback .................................................................................................52
Changing/checking the settings in your camcorder ................................55
Changing the screen .......................................................................... 55
Displaying recording data (Data code) .............................................. 55
Displaying the settings in your camcorder (Status check) ................. 56
Checking the remaining battery (Battery Info).................................... 56
Locating a scene on a tape ....................................................................57
Searching for a scene by date of recording (Date search)................ 57
Getting Started
Recording/Playback
Continued ,

6
Searching for a recording start point (Index search) ..........................57
Playing the picture on a TV .................................................................... 59
Using the menu items ........................................................... 66
Menu items ............................................................................................68
(CAMERA SET) menu .................................................................... 71
Settings to adjust your camcorder to the recording conditions (GAIN SETUP/
BACK LIGHT/STEADYSHOT, etc.)
(AUDIO SET) menu .......................................................................78
Settings for the audio recording (DV AU.MODE/XLR SET, etc.)
(DISPLAY SET) menu ..................................................................... 81
Display settings of the display and the viewfinder (MARKER/VF B.LIGHT/DISP
OUTPUT, etc.)
(IN/OUT REC) menu ....................................................................... 85
Recording settings, input and output settings (REC FORMAT/HDV PROGRE./
VIDEO OUT/EXT REC CTRL, etc.)
(TC/UB SET) menu ......................................................................... 89
(TC PRESET/UB PRESET/TC LINK, etc.)
(MEMORY SET) menu .................................................................... 91
Settings for the “Memory Stick Duo” (ALL ERASE/FORMAT, etc.)
(OTHERS) menu .............................................................................92
Settings while recording on a tape or other basic settings (QUICK REC/BEEP,
etc.)
Dubbing to VCR, DVD/HDD device, etc. ............................................... 96
Recording pictures from a VCR .......................................................... 100
Copying movies on a tape to a computer ............................................ 102
Troubleshooting ...................................................................................105
Warning indicators and messages ....................................................... 115
Using the Menu
Dubbing/Editing
Troubleshooting
Table of Contents (Continued)

7
Using your camcorder abroad ..............................................................117
Maintenance and precautions ..............................................................118
HDV format and recording/playback ................................................ 118
Compatibility of the DVCAM/DV formats........................................... 119
About the “Memory Stick” ................................................................. 121
About the “InfoLITHIUM” battery pack ............................................. 122
About i.LINK...................................................................................... 123
About x.v.Color ................................................................................. 124
About handling of your camcorder ................................................... 124
Specifications .......................................................................................128
Identifying parts and controls ...............................................................132
Indicators for the LCD screen and viewfinder ......................................139
Index .....................................................................................................142
Additional Information
Quick Reference
8
Getting Started
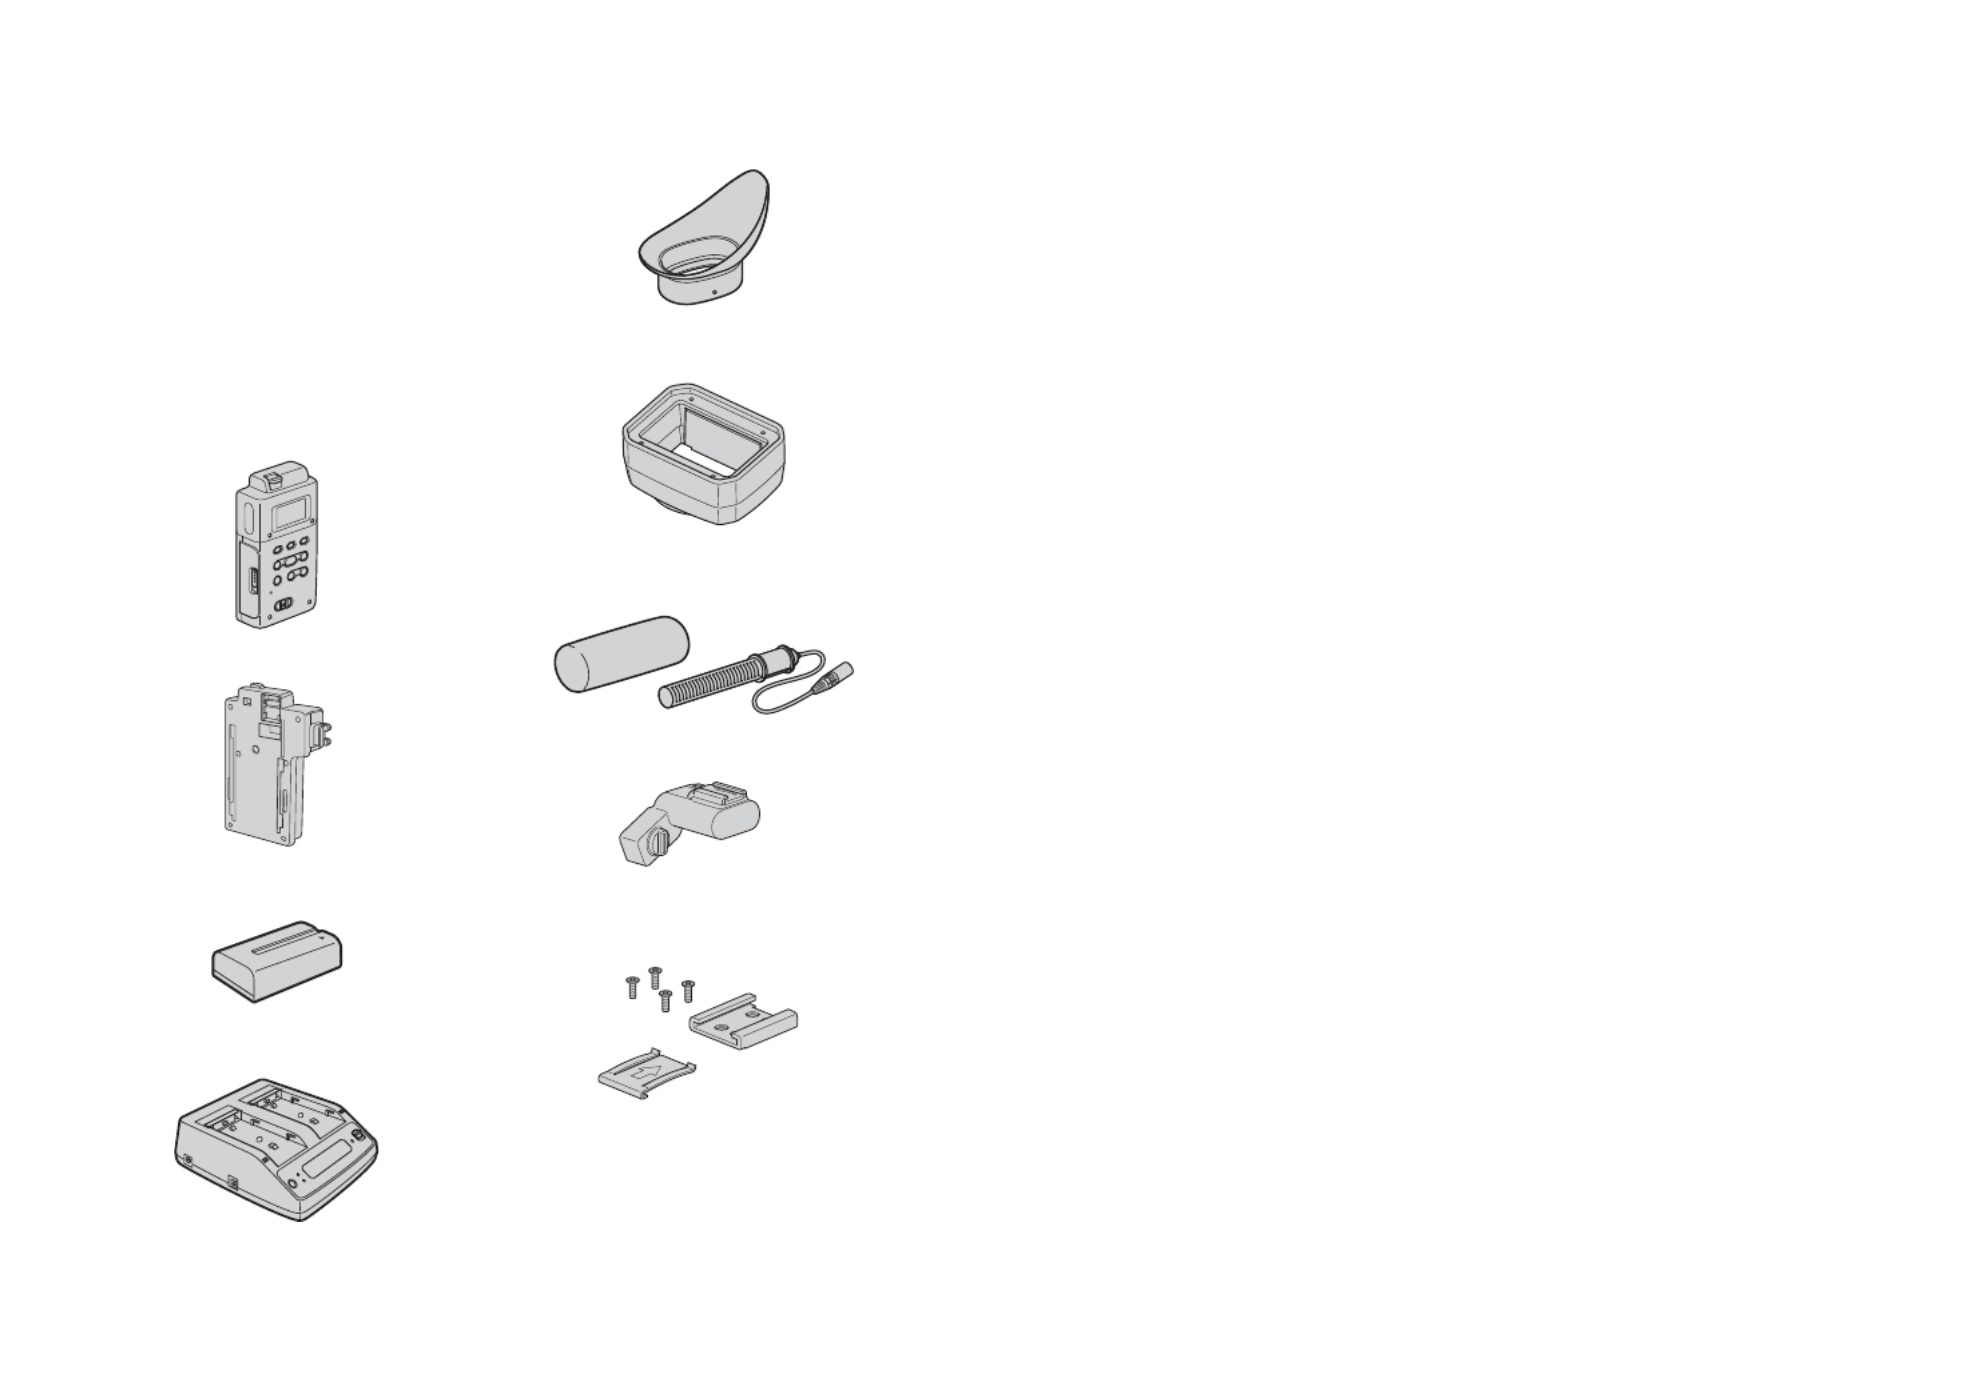
Step 1: Checking supplied items
Make sure that you have following items
supplied with your camcorder.
The number in the parentheses indicates the
number of that item supplied.
• The cassette tape and “Memory Stick Duo” are
not included. See pages 2, 118 121 and for types
of cassette tapes and “Memory Stick Duo” that
you can use on your camcorder.
Carl Zeiss lens (VCL-412BWH) (1) (p. 10)
This lens is pre-mounted.
Memory Recording Unit (HVR-MRC1) (1)
( p. 14)
i.LINK Cradle (HVRA-CR1) (1) (p. 15)
Rechargeable battery pack (NP-F570) (1)
( p. 16 122, )
AC Adaptor/Charger (AC-VQ1050) (1)
( )p. 16
Large eyecup (1) (p. 21)
Lens hood with lens cover (1) (p. 14)
This lens hood is pre-mounted.
Wind Screen (1), Microphone (ECM-XM1)
(1) (p. 13 )
Accessory shoe adaptor (1) (p. 133)
Accessory shoe kit (Accessory shoe (1),
Accessory shoe plate (1), screws (4))
( )p. 132
Lens mount cap (1) (p. 137),
Rear lens cap (1) (p. 137 )
Wireless Remote Commander
(RMT-831) (1) (p. )138
A button-type lithium battery is already installed.
A/V connecting cable (1) (p. 59, 96)
Component video cable (1) (p. 59)

9
Getting Started
Connecting cord (DK-415) (1) (p. 18)
Test chart for flange focal length
adjustment (1) (p. )11
CD-ROM “Manuals for Digital HD Video
Camera Recorder” (1)
Operating Guide (This manual) (1)

10
Step 2: Attaching the supplied items
Make sure to turn off the POWER switch of
your camcorder before mounting the lens.
Refer to the manuals provided with the lens
for details on the proper handling of the
lens.
1Push the lens locking lever C up and
remove the lens or the lens mount cap
from the lens mount.
2Align the center slot in the lens mount
with the center pin on the lens, and
insert the lens into the mount.
3While holding the lens in place, push
the lens locking lever C down to
mount the lens.
bNotes
• If the lens is not properly locked, it may come
off when in use, which may cause a serious
problem. Make sure that the lens is securely
locked. Sony recommends that you set the lens
securing tab B as illustrated.
1Push the lens locking lever C up and
remove the lens or the lens mount cap
from the lens mount.
2Align the center slot in the lens mount
with the center pin on the lens, and
insert the lens into the mount.
3While holding the lens in place, push
the lens locking lever C down to
mount the lens.
4Connect the lens cable to the LENS jack
A.
bNotes
• The maximum power current that your
camcorder can supply to a lens is 500 mA. Do
not attach an interchangeable lens that requires
over 500 mA power current. If you do so, it may
damage your camcorder.
• Power is not supplied to the LENS jack A un til
the lens locking lever is pushed down and C
the lens is securely mounted.
• Use a lens mount adaptor suitable for your lens.
– 1/3" bayonet mount lens
You can mount the lens without an adaptor.
– 2/3" bayonet mount lens
Use a Fujinon ACM-17.
A focal length is twice as that without the
adaptor.
– 1/2" bayonet mount lens
Use a Fujinon ACM-12.
A focal length is 1.3 times as that without the
adaptor.
– SONY 1/2" bayonet mount lens
Use a Fujinon ACM-19.
A focal length is 1.3 times as that without the
adaptor.
Your lens performance is not guaranteed.
• When you mount a lens other than a Carl Zeiss
lens, you cannot use the following menu items.
Even you set those menu items, the settings do
not take effect.
Mounting the lens
Mounting the Carl Zeiss lens
Mounting non-Carl Zeiss lens
For the lens with the lens cable (12 Pin)
AF ASSIST
ASSIGN BTN
CAMERA
ASSIGN#
FOCUS
FOCUS INFNTY
FOCUS MACRO
ONE PUSH AF

13
Getting Started
8 Turn the focus ring C until the subject
comes in focus, then press the SEL/
PUSH EXEC dial G.
When the adjustment is completed,
[Completed.] appears on the screen.
If the adjustment fails, [Could not adjust.]
appears on the screen. Tr y the adjustment
again.
z Tips
• You can check the focusing easily if you do the
following before adjusting the focal length.
– Set [PEAKING] in the (DISPLAY
SET) menu to [ON] (p. 81).
– Press the ASSIGN button to which
[EXP.FOCUS] is assigned (L2 button by
default) (p. 45).
• If the adjustment fails, confirm the following.
– A bright subject is not within the view.
– The ND filter switch does not stop at halfway
between two positions.
1Attach the wind screen B to the
supplied microphone A.
2Place the microphone A in the
microphone holder C with the
model name facing upward, close
the cover, and shut the clamp.
3Connect the plug of the
microphone to the INPUT1 jack
D.
Push the plug in the jack until it is
securely locked.
4Put the microphone cable into the
cable holder E.
5Select the channel with the REC
CH SELECT switch F.
The channel to be used differs
depending on the relationship between
the REC CH SELECT switch positions
and the input jacks.
See the table below.
Attaching the supplied
microphone
LINE
INPUT2 INPUT1
MIC
MIC
LINE
MIC
MIC
INPUT2 INPUT1
Put the cable in the outer cable holder.
Continued ,

15
Getting Started
b Notes
• You cannot use the HDV/DV jack when the
Memory Recording Unit is attached to your
camcorder.
• We recommend using Sony CompactFlash
Cards with your Memory Recording Unit.
When you use non-Sony CompactFlash
Cards, data may be recorded incorrectly.
When you use non-Sony CompactFlash
Cards, we recommend that you test them
beforehand as follows.
1 Format the CompactFlash Card w ith the
Memory Recording Unit.
2 Record at least 20 clips of ab out 10
seconds each in HDV recording mode.
3 If you have nonlinear editing software,
load the files into it and check whether
you can edit the data correctly.
To remove the Memory Recording
Unit
Slide the unit upward while pushing the
RELEASE lever of the Memory Recording
Unit downward.
To attach the Memory Recording Unit
to the i.LINK Cradle
Attach the Memory Recording Unit to the
i.LINK Cradle as illustrated.
To remove the Memory Recording
Unit from the i.LINK Cradle
Slide the unit upward while pushing the
RELEASE lever of the Memory Recording
Unit downward.
z Tips
• Refer to the operating instructions of HVR-
MRC1 on the supplied CD-ROM for details on
the i.LINK cradle.
Using non-Sony CompactFlash Cards
HDV/DV jack (6-pin)

20
Step 5: Adjusting the LCD panel and viewfinder
Open the LCD panel 180 degrees (1), then
rotate it to the best angle to record or play
back (2).
z Tips
• You can see your mirror image on the LCD
screen by setting the LCD panel facing you. The
image will be recorded in a normal image.
To turn off the LCD backlight to make
the battery last longer
Press and hold the DISPLAY/BATT INFO
button for a few seconds until appears.
This setting is practical when you use your
camcorder in bright conditions or when you
want to save battery power. The recorded
picture will not be affected by the setting.
To turn on the LCD backlight, press and
hold the DISPLAY/BATT INFO button for
a few seconds until disappears.
z Tips
• You can adjust the brightness of the LCD screen
from [LCD BRIGHT] (p. 84).
b Notes
• You may see primary colors shimmering in the
viewfinder when you move your eye line. This
is not a malfunction. The shimmering colors
will not be recorded on the recording media.
z Tips
• You can adjust the brightness of the viewfinder
backlight from [VF B.LIGHT] (p. 84).
• To display images both on the LCD display and
in the viewfinder, set [VF POWERMODE] to
[ON](p. 84).
• To display images in black and white in the
viewfinder, set [VF COLOR] to [OFF] (p. 84).
• Because the LCD panel on your camcorder is a
full-screen display, bottom of the screen may
look distorted, such as horizontal lines on the
screen. This does not affect on your images
recorded on your CompactFlash Card or tape.
The LCD panel
TC/U-BIT DATA CODE
2180 degrees
(max.)
290 degrees
(max.)
DISPLAY/BATT INFO button
1Open 180 degrees.
The viewfinder
Viewfinder lens
adjustment lever
Move it until the picture
becomes clear.

21
Getting Started
When the picture in the viewfinder is
hard to see
If you cannot see the picture in the
viewfinder clearly under bright
circumstances, use the supplied large
eyecup. To attach the large eyecup, stretch
it slightly and align it with the eyecup
groove in the viewfinder. You can attach
the large eyecup facing either the right or
left side.
b Notes
• Do not remove the pre-attached eyecup.
Large eyecup (supplied)
Attach with the
protruding part at
the top.

30
You can adjust the focus manually for
different recording conditions.
Use this function in the following cases.
– To record a subject behind a window covered
with raindrops.
– To record horizontal stripes.
– To record a subject with little contrast between
the subject and its background.
– When you want to focus on a subject in the
background.
– To record a stationary subject using a tripod.
In mode A, you can manually adjust focus
without automatic adjustment functions.
Set the focus ring to the mode A position
and focus manually using the focus scale on
the lens.
bNotes
• Turn the focus ring slowly. If it is forced against
either end, the focus ring may move toward the
mode B position and move past the end, and
make noises.
In mode B, you can use the automatic
adjustment functions during manual focus
adjustment. Set the focus ring to the mode
B position and do the following steps.
1Assign [FOCUS] to an ASSIGN button
(p. 45).
2Press the ASSIGN button to which
[FOCUS] is assigned.
9 appears on the screen.
3Turn the focus ring to adjust the focus.
9 changes to when you cannot
bring any further subject in focus. 9
changes to when you cannot bring
any closer subject in focus.
zTips
For manual focus
• Zoom in and bring your camcorder in focus,
then gradually zoom out.
• Fully zoom out and gradually zoom in when you
shoot a close subject.
To restore automatic adjustment
Press the ASSIGN button to which
[FOCUS] is assigned once again.
9 disappears and the automatic focus
adjustment is restored.
zTips
• If you want to adjust focus automatically or use
automatic adjustment functions such as one
push auto focus during manual focus
Adjusting the focus manually
ZEBRA
ASSIGN
CH1
AUDIO LEVEL
CH2
4
1
2
3
5 6
AE SHIFT REC REVIEW
ASSIGN 1-6
buttons
Mode B
Mode A
Focus ring
Adjusting focus manually in mode A
Adjusting focus manually in mode B
Changing the settings of your camcorder recordings (Continued)
Produkt Specifikationer
| Mærke: | Sony |
| Kategori: | Videokamera |
| Model: | HVR-Z7E |
Har du brug for hjælp?
Hvis du har brug for hjælp til Sony HVR-Z7E stil et spørgsmål nedenfor, og andre brugere vil svare dig
Videokamera Sony Manualer

15 Januar 2025
28 December 2024
16 November 2024
12 Oktober 2024
12 Oktober 2024
6 September 2024
6 September 2024
6 September 2024
6 September 2024
2 September 2024
Videokamera Manualer
- Videokamera Nilox
- Videokamera SilverCrest
- Videokamera Denver
- Videokamera Sencor
- Videokamera Canon
- Videokamera Samsung
- Videokamera Panasonic
- Videokamera Extech
- Videokamera Philips
- Videokamera Lenco
- Videokamera OK
- Videokamera Braun
- Videokamera Sharp
- Videokamera Logitech
- Videokamera Kenwood
- Videokamera HP
- Videokamera Garmin
- Videokamera Sanyo
- Videokamera Thinkware
- Videokamera Easypix
- Videokamera Nikkei
- Videokamera Bushnell
- Videokamera Toshiba
- Videokamera Pyle
- Videokamera Fujifilm
- Videokamera Nikon
- Videokamera Kodak
- Videokamera Tracer
- Videokamera Olympus
- Videokamera Nedis
- Videokamera Zorki
- Videokamera Hama
- Videokamera Creative
- Videokamera Hyundai
- Videokamera Milwaukee
- Videokamera DataVideo
- Videokamera Trevi
- Videokamera Trust
- Videokamera Laserliner
- Videokamera Mio
- Videokamera Trotec
- Videokamera JVC
- Videokamera Leica
- Videokamera Uniden
- Videokamera Hitachi
- Videokamera T'nB
- Videokamera Medion
- Videokamera Linksys
- Videokamera Cisco
- Videokamera EZVIZ
- Videokamera König
- Videokamera Gembird
- Videokamera EnVivo
- Videokamera Maginon
- Videokamera Vtech
- Videokamera BenQ
- Videokamera Contour
- Videokamera Bresser
- Videokamera National Geographic
- Videokamera Voigtländer
- Videokamera Rollei
- Videokamera Xiaomi
- Videokamera Moultrie
- Videokamera Aiptek
- Videokamera Viewsonic
- Videokamera DJI
- Videokamera Voltcraft
- Videokamera Polaroid
- Videokamera Ricoh
- Videokamera TomTom
- Videokamera Soundmaster
- Videokamera Aida
- Videokamera Konica-Minolta
- Videokamera Kyocera
- Videokamera GoPro
- Videokamera Ikan
- Videokamera Cobra
- Videokamera Xblitz
- Videokamera Velleman
- Videokamera Marshall
- Videokamera FLIR
- Videokamera Energy Sistem
- Videokamera Swann
- Videokamera Zoom
- Videokamera Salora
- Videokamera Lamax
- Videokamera Overmax
- Videokamera SBS
- Videokamera Veho
- Videokamera Midland
- Videokamera Samson
- Videokamera ION
- Videokamera RCA
- Videokamera Prixton
- Videokamera Renkforce
- Videokamera Navitel
- Videokamera Hazet
- Videokamera Transcend
- Videokamera GoClever
- Videokamera Intenso
- Videokamera ARRI
- Videokamera Evolveo
- Videokamera Genius
- Videokamera Zagg
- Videokamera Airis
- Videokamera Steinberg
- Videokamera Spypoint
- Videokamera Vivitar
- Videokamera Contour Design
- Videokamera Dragon Touch
- Videokamera Vimar
- Videokamera Klein Tools
- Videokamera Oregon Scientific
- Videokamera Magellan
- Videokamera Lexibook
- Videokamera SJCAM
- Videokamera Speco Technologies
- Videokamera Prestigio
- Videokamera Blackmagic Design
- Videokamera Kogan
- Videokamera Drift
- Videokamera Insignia
- Videokamera Minox
- Videokamera Elmo
- Videokamera Agfa
- Videokamera AgfaPhoto
- Videokamera Quintezz
- Videokamera AEE
- Videokamera ATN
- Videokamera Activeon
- Videokamera Coby
- Videokamera TacTic
- Videokamera Macally
- Videokamera Naxa
- Videokamera Mamiya
- Videokamera Tronje
- Videokamera Mpman
- Videokamera Ematic
- Videokamera Minolta
- Videokamera Iget
- Videokamera RunCam
- Videokamera SeaLife
- Videokamera Sakar
- Videokamera Jobo
- Videokamera Mediacom
- Videokamera Kreator
- Videokamera Contax
- Videokamera EE
- Videokamera Traveler
- Videokamera Kaiser Baas
- Videokamera Bluetech
- Videokamera Braun Phototechnik
- Videokamera IOPLEE
- Videokamera Vupoint Solutions
- Videokamera Kitvision
- Videokamera Praktica
- Videokamera MMTC
- Videokamera Flip
- Videokamera Jay-tech
- Videokamera Brinno
- Videokamera BlackVue
- Videokamera Storex
- Videokamera Insta360
- Videokamera DXG
- Videokamera MD 80
- Videokamera Berger & Schröter
- Videokamera Whistler
- Videokamera Curve
- Videokamera PCE Instruments
- Videokamera DOD
- Videokamera CamOne
- Videokamera Mobius
- Videokamera ISAW
- Videokamera Beaulieu
- Videokamera Revier Manager
- Videokamera Kobian
- Videokamera FHD 1080P
- Videokamera RSC
- Videokamera Stealth Cam
- Videokamera Aqua-Vu
- Videokamera Hamlet
- Videokamera Qoltec
- Videokamera Leotec
- Videokamera Replay
- Videokamera Akaso
- Videokamera Hamilton Buhl
- Videokamera FeiyuTech
- Videokamera Best Buy
- Videokamera Rexing
- Videokamera Bolex
- Videokamera Microtek
- Videokamera Teslong
- Videokamera Izzo
- Videokamera Aquapix
- Videokamera Tactacam
Nyeste Videokamera Manualer

3 April 2025

14 Marts 2025
14 Marts 2025
14 Marts 2025
13 Marts 2025
12 Marts 2025
12 Marts 2025
12 Marts 2025
27 Februar 2025
25 Februar 2025