Wir gratulieren Ihnen zum Kauf dieses qualitativ hochwertigen ESYLUX Produktes. Um ein
einwandfreies Funktionieren zu gewährleisten, lesen Sie bitte diese Bedienungsanleitung
sorgfältig durch und bewahren Sie sie auf, um gegebenenfalls zukünftig nachlesen zu können.
ACHTUNG: Arbeiten an elektrischen Systemen dürfen nur von
autorisiertem Fachpersonal unter Berücksichtigung der landesüblichen
Installationsvorschriften/-normen ausgeführt werden. Vor der Montage
des Produktes ist die Netzspannung freizuschalten.
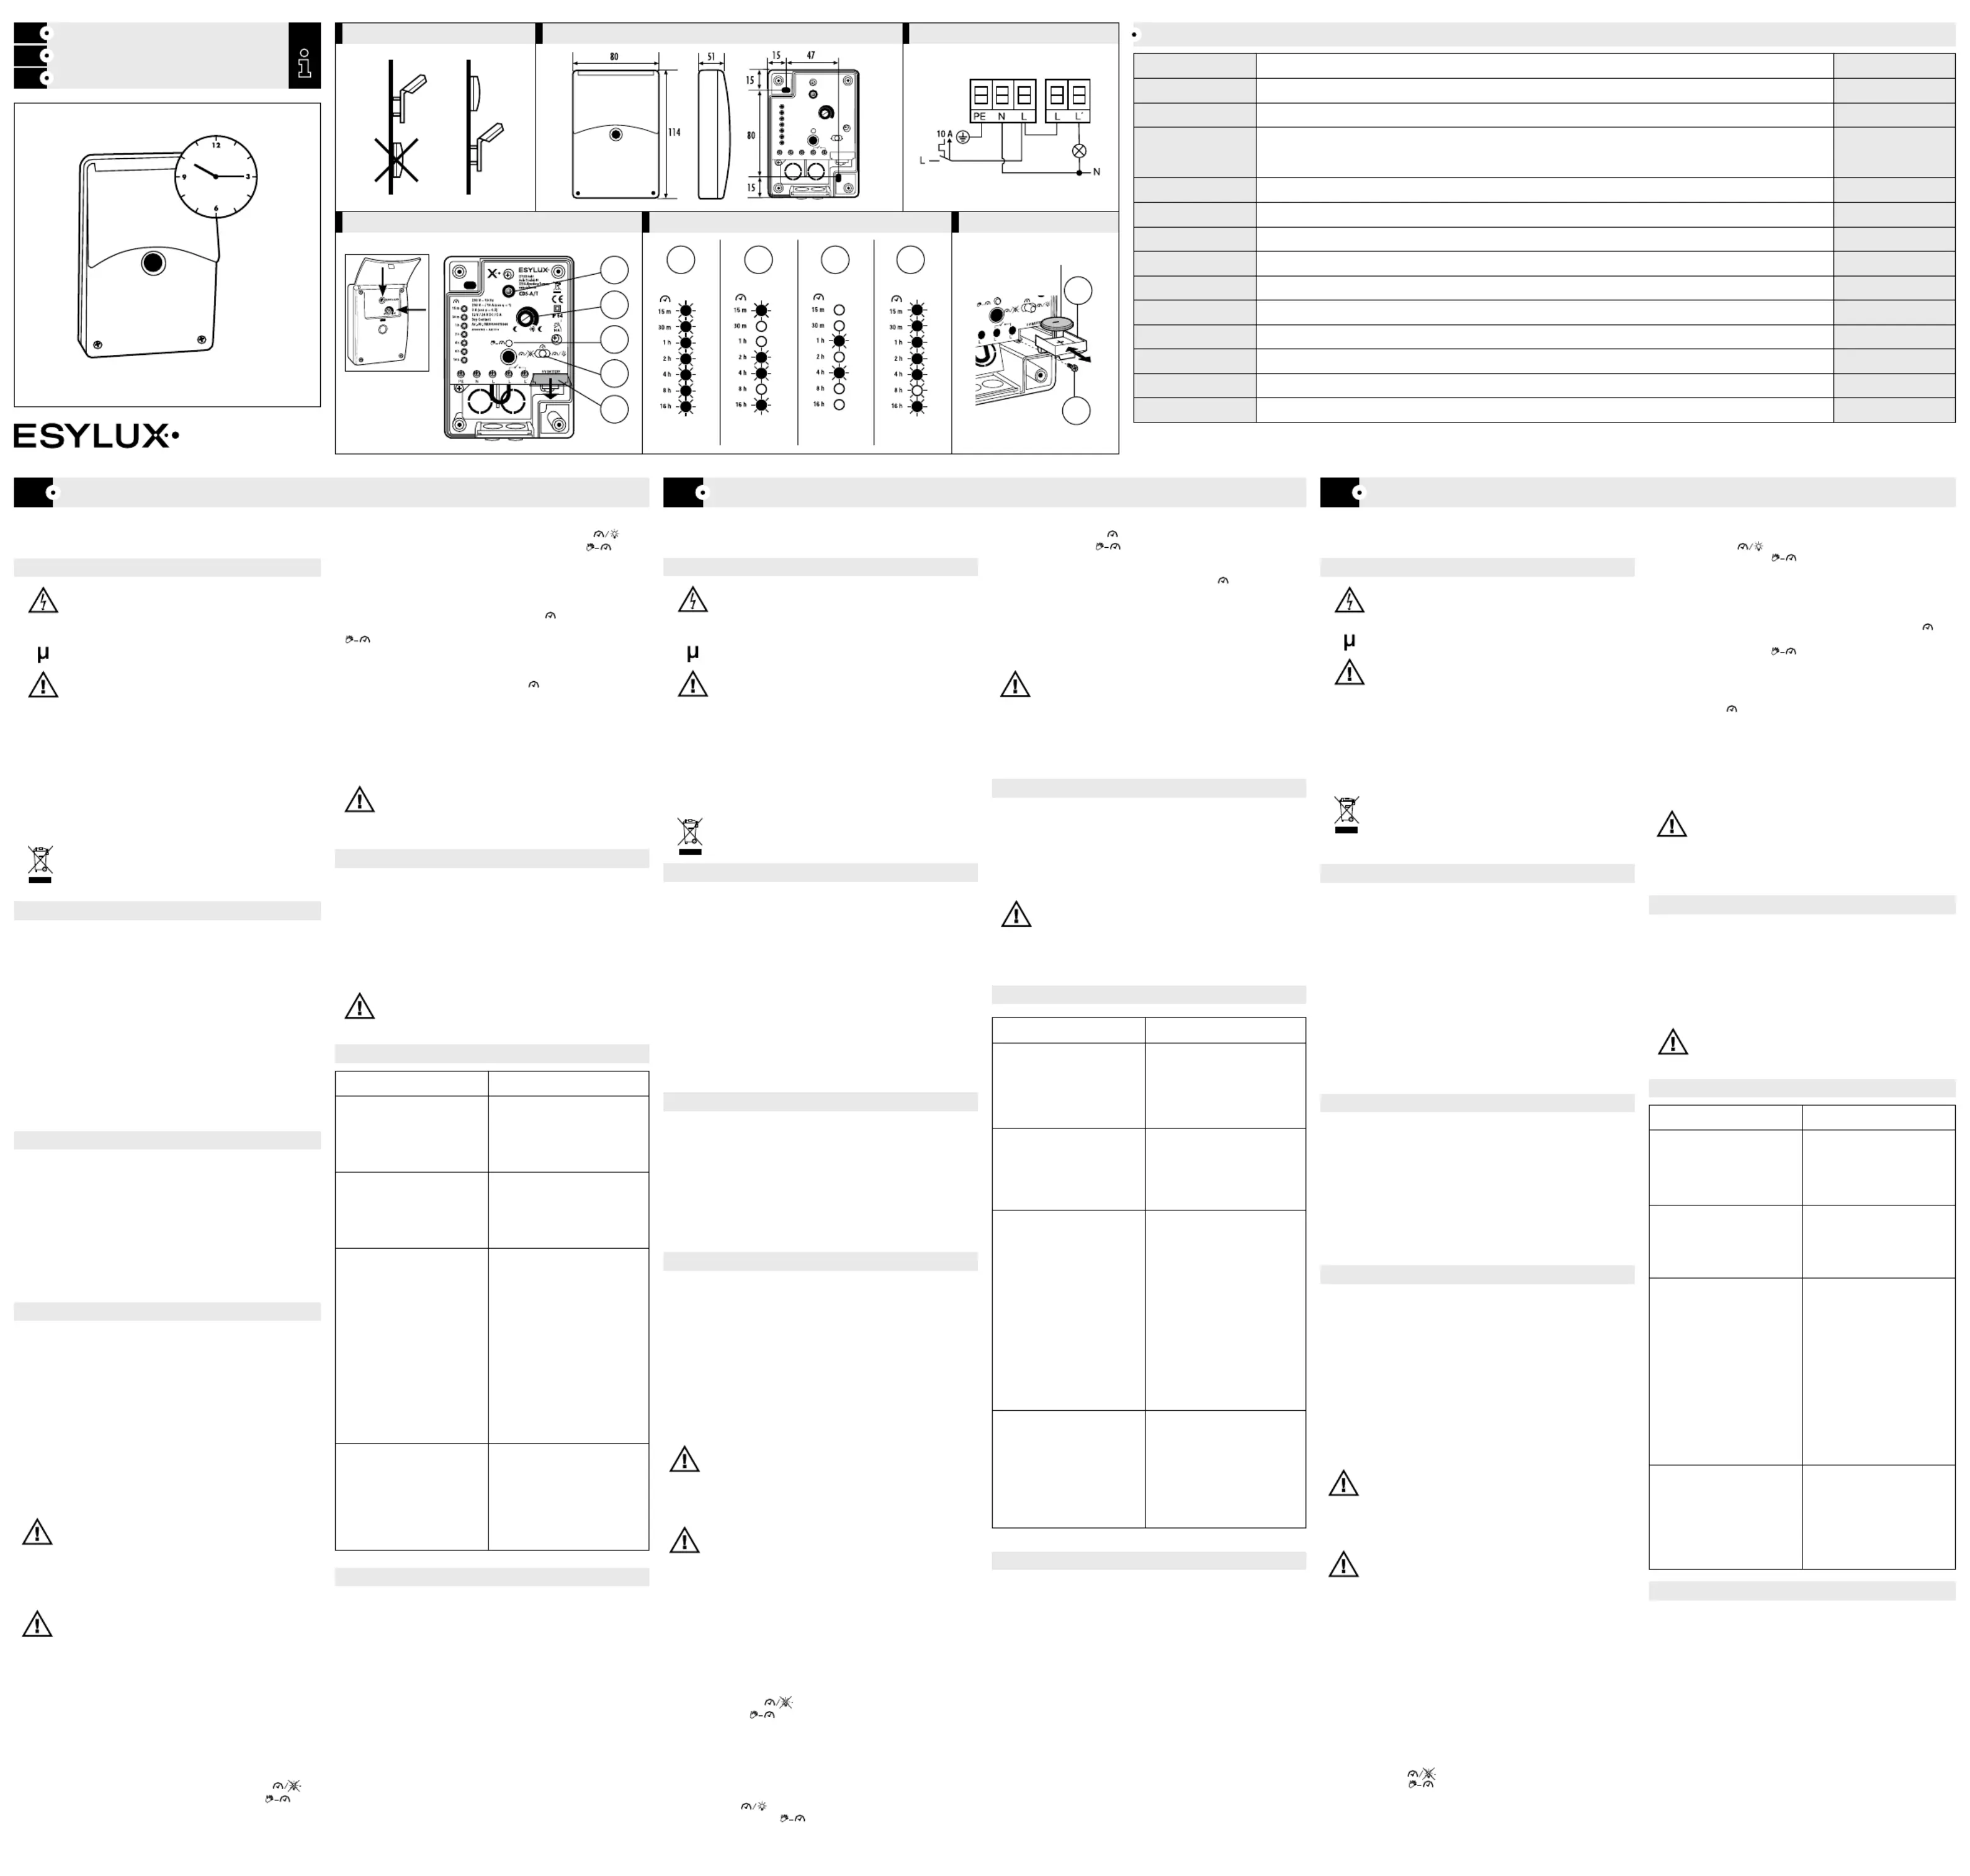
= Kontaktöffnungsweite < 1,2 mm
Das Gerät ist eingangsseitig mit einem
10 A Leitungsschutzschalter abzusichern (Abb. 3).
Das Produkt ist nur für den sachgemäßen Gebrauch (wie in
der Bedienungs anleitung beschrieben) bestimmt. Änderungen,
Modifikationen oder Lackierungen dürfen nicht vorgenommen
werden, da ansonsten jeglicher Gewährleistungsanspruch entfällt.
Sofort nach dem Auspacken ist das Gerät auf Beschädigungen
zu prüfen. Im Falle einer Beschädigung darf das Gerät keinesfalls
in Betrieb genommen werden. Wenn anzunehmen ist, dass ein
gefahrloser Betrieb des Gerätes nicht gewährleistet werden kann,
so ist dieses unverzüglich außer Betrieb zu nehmen und gegen
unbeabsichtigten Betrieb zu sichern.
HINWEIS: Dieses Gerät darf nicht mit dem unsortierten Siedlungsabfall
Besitzer von Altgeräten sind gesetzlich dazu
verpflichtet, dieses Gerät fachgerecht zu entsorgen. Informationen
erhalten Sie von Ihrer Stadt- bzw. Gemeindeverwaltung.
Der ESYLUX CDS-A/T ist ein Dämmerungsschalter mit integrierter Zeitfunktion
für die Aufputzmontage zum automatischen Schalten von Beleuchtungsanlagen
(Abb. 1). Ein Lichtsensor erfasst die Umgebungshelligkeit. Unterschreitet diese
den eingestellten Lichtwert, so schaltet der CDS-A/T die Leuchte automatisch
ein und wieder aus, wenn die Umgebungshelligkeit diesen Schwellenwert
wieder überschreitet. Über die integrierte Zeitfunktion kann die Beleuchtung
zusätzlich individuell ein- und wieder ausgeschaltet werden. Beispielsweise
können Sie den CDS-A/T so einstellen, dass dieser entsprechend des
eingestellten Lichtwertes (LUX) – z. B. Abenddämmerung – die Beleuchtung
einschaltet. Ab 22.15 Uhr wird jedoch kein Licht mehr benötigt. Somit stellen
Sie einen AUS-Schaltwert von 22.15 Uhr ein und die Beleuchtung wird zu
diesem Zeitpunkt ausgeschaltet. Um 5.00 Uhr wird wieder Licht benötigt, somit
stellen Sie einen EIN-Schaltwert von 05.00 Uhr ein und die Beleuchtung wird
wieder eingeschaltet. Nach überschreiten des eingestellten Lichtwertes – z. B.
Morgendämmerung – wird die Beleuchtung automatisch ausgeschaltet. Somit
können zusätzlich Energiekosten gespart werden, in der Zeit in der keine
Beleuchtung benötigt wird.
Vor der Montage des Produktes ist die Netzspannung freizuschalten. Die
Montage des CDS-A/T sollte nur an ebenen, senkrechten, nach Norden
ausgerichteten Flächen (Hauswänden) erfolgen. Das Gerät sollte möglichst
nicht dem direkten Sonnenlicht ausgesetzt sein. Bitte beachten Sie auch,
dass eine Beeinflussung des CDS-A/T durch die geschaltete Beleuchtung
ausgeschlossen wird . Gehäusedeckel abschrauben und das Unterteil (Abb. 1)
mit der Leitungseinführung nach unten auf die entsprechende Fläche montieren.
Die Leitungseinführung darf nur in fester Verlegung erfolgen (wasserdichter
Leitungsanschluss). Dämmerungsschalter gemäß Anschlussplan anschließen
(Abb. 3).Von L (Netzspannung) zu L (potenzialfreier Kontakt) liegt eine Brücke
. Wenn der Relaiskontakt für Kleinspannung genutzt werden soll,
muss diese Brücke entfernt werden.
Die Batterie dient dazu, bei einem Spannungsausfall die gespeicherten
Zeiten zu erhalten. Durch sie können die Einstellungen bei Spannungs-
ausfall bis zu 30 Tagen geschützt werden. Die Lebensdauer der
mitgelieferten Batterie lie
gt etwa zwischen 3 und 4 Jahren.
Ziehen Sie den Schutzstreifen zwischen Batterie und Kontakt heraus (Abb. 4c).
4.2 Einstellung des Lichtwertes (LUX)
Über den Potenziometer kann nun der gewünschte Lichtwert eingestellt
werden (Abb. 4a). Die dient als Einstellhilfe . Wenn rote LED (Abb. 4b)
der gewünschte Einschaltzeitpunkt (z. B. Dämmerung) erreicht ist,
Potenziometer langsam in Richtung „Mondsymbol“ drehen bis die rote
LED leuchtet. Nun entspricht der eingestellte Lichtwert der tatsächlichen
Umgebungshelligkeit und der CDS-A/T ist justiert.
Hinweis: Bitte beachten Sie, dass die angeschlossene Beleuchtung erst ca.
60 Sek., nachdem die LED aufleuchtet, zeitverzögert einschaltet. Durch
die Schaltverzögerung von ca. 60 Sek. wird nicht gewünschtes Schalten,
das z. B. durch kurzzeitiges Anstrahlen mit einem Autoscheinwerfer oder
durch eine dunkle Wolke ausgelöst werden kann, vermieden.
4.3 Einstellung der Zeitfunktionen
Hinweis: Die Einstellung der EIN- und AUS-Schaltzeiten muss vor der
Einstellung der aktuellen Uhrzeit erfolgen, da der CDS-A/T ansonsten
eine Einjustierungszeit von 24 Std. benötigt. In dieser Zeit würde die
angeschlossene Beleuchtung nicht dem Programm entsprechend schalten.
Nach Zuschalten der Netzspannung leuchten alle LEDs . Der CDS-A/T (Abb. 5a)
schaltet, wenn der eingestellte Lichtwert unterschritten wird, die angeschlossene
Beleuchtung ein und bei Überschreiten dieses Lichtwertes wieder aus. Der
CDS-A/T arbeitet in dieser Einstellung ohne die Zeitfunktion. Sollten Sie vorher
schon Uhrzeiten oder Schaltzeiten programmiert haben und Sie wollen in die
Grundeinstellung zurückkehren, ist es notwendig, das Gerät für mindestens 30
Sek. vom Netz zu trennen und währenddessen die Batterie zu entfernen.
4.3.2 Einstellung der AUS-Schaltzeit
Für die Ausschaltzeit ist der Zeitwahlschalter (Abb. 4d) auf
zu stellen. Drücken Sie nun den Knopf „Zeiteinstellung“
(Abb. 4e) einmal, die LEDs erlöschen. Durch weiteres Drücken dieses
Knopfes wird die Zeit dabei jeweils um 15 Min. weitergestellt. Halten
Sie den Knopf gedrückt, wird die Zeit schneller vorgestellt. Stellen
Sie nun Ihren gewünschten Ausschaltzeitpunkt ein. Beispiel: Bei einer
Zeiteinstellung für 22.15 Uhr wird die LED-Anzeige dann wie in Abb. 5b aussehen.
4.3.3. Einstellung der EIN-Schaltzeit
Für die Einschaltzeit ist der Zeitwahlschalter auf (Abb. 4d)
zu stellen. Drücken Sie nun den Knopf „Zeiteinstellung“
(Abb. 4e) und stellen Sie Ihren gewünschten Einschaltzeitpunkt ein.
Beispiel: Bei einer Zeiteinstellung für 5.00 Uhr wird die LED-Anzeige dann wie
4.3.4. Einstellung der Uhrzeit
Stellen Sie den Zeitwahlschalter auf „ “. Halten Sie nun – (Abb. 4d)
vor Einstellung der aktuellen Uhrzeit! – den Knopf „Zeiteinstellung“
solange gedrückt, bis alle LEDs (23.45 Uhr) außer die
LED 8 h aufleuchten. Stellen Sie danach die aktuelle Uhrzeit (Abb. 5d)
ein. Dieses Durchlaufen ist notwendig, damit der CDS-A/T gleich in
den eingestellten Modus geht. Nach Einstellen der Zeit lassen Sie den
Zeitwahlschalter (Abb. 4d) in der Stellung „ “ stehen.
Die Programmierung des CDS-A/T ist nun abgeschlossen.
Sollte es notwendig sein, die Schaltzeiten nach erfolgter Einstellung
zu ändern, ist es erforderlich, auch die aktuelle Uhrzeit noch einmal
Den Deckel schließen und festschrauben.
WICHTIG: Wenn der Zeitwahlschalter (Abb. 4d) länger als 20 Min.
in einer Stellung verbleibt, erlöschen die LEDs. Sie dienen nur als
Einstellhilfe. Dies stellt keinen Fehler des Gerätes dar! Bei einer
erneuten Betätigung des Zeitwahlschalters (Abb. 4d) leuchten sie
jedoch wieder auf und Sie können die Einstellungen ändern.
Die Batterie dient dazu, bei einem Spannungsausfall die gespei-
cherten Zeiten zu erhalten. Durch sie können die Einstellungen bei
Spannungsausfall bis zu 30 Tagen geschützt werden. Die Lebensdauer
der mitgelieferten Batterie (CR 2032) liegt etwa zwischen 3 und 4
Jahren. Lösen Sie zum Batteriewechsel die Schraube und (Abb. 6b)
legen Sie die neue Batterie so in das Batteriefach ein, wie in Abb. 6a
dargestellt und schrauben Sie es an die dafür vorgesehene Position im
Gerät. Achten Sie immer darauf, dass die Batterie den Anforderungen
HINWEIS: Der Endverbraucher ist gesetzlich zur ordnungsgemäßen
Rückgabe aller ge- und verbrauchten Batterien bzw. Akkus verpflichtet.
Eine Entsorgung über den Hausmüll ist nicht erlaubt
ESYLUX Produkte sind nach geltenden Vorschriften geprüft und mit
größter Sorgfalt hergestellt. Der Garantiegeber, die ESYLUX Deutschland
GmbH, Postfach 1840, D-22908 Ahrensburg (für Deutschland) bzw. der
entsprechende ESYLUX Distributor in Ihrem Land (eine vollständige Übersicht
finden Sie unter www.esylux.com) übernimmt für die Dauer von drei Jahren
ab Herstelldatum eine Garantie auf Herstellungs-/Materialfehler der ESYLUX
Geräte. Diese Garantie besteht unabhängig von Ihren gesetzlichen Rechten
gegenüber dem Verkäufer des Geräts. Die Garantie bezieht sich nicht auf
die natürliche Abnutzung, Veränderung/Störung durch Umwelteinflüsse
oder auf Transportschäden sowie nicht auf Schäden, die infolge
Nichtbeachtung der Bedienungsanleitung, der Wartungsanweisung und/
oder unsachgemäßer Installation entstanden sind. Mitgelieferte Batterien,
Leuchtmittel und Akkus sind von der Garantie ausgeschlossen. Die Garantie
kann nur gewährt werden, wenn das unveränderte Gerät unverzüglich
nach Feststellung des Mangels mit Rechnung/Kassenbon sowie einer kurzen
schriftlichen Fehlerbeschreibung, ausreichend frankiert und verpackt an
den Garantiegeber eingesandt wird. Bei berechtigtem Garantieanspruch
wird der Garantiegeber nach eigener Wahl das Gerät in angemessener
Zeit ausbessern oder austauschen. Weitergehende Ansprüche umfasst die
Garantie nicht, insbesondere haftet der Garantiegeber nicht für aus der
Fehlerhaftigkeit des Geräts entstehende Schäden. Sollte der Garantieanspruch
nicht gerechtfertigt sein (z.B. nach Ablauf der Garantiezeit oder bei Mängeln
außerhalb des Garantieanspruchs), so kann der Garantiegeber versuchen,
das Gerät kostengünstig gegen Berechnung für Sie zu reparieren.
1. Alle oder einige LEDs (Uhr)
Gerät vom Netz trennen und
Batterie entfernen. Verdrahtung
prüfen. 30 Sek. warten und
erneut Spannung anlegen und
2. Die LED (Lux) leuchtet nicht,
Lichtfühler abgedeckt wurde.
Bitte vergewissern Sie sich,
dass der Lichtfühler mit einem
lichtundurchlässigen Material
abgedeckt wurde. Verdrahtung
Die Spannung muss für min-
destens 15 Min. unterbrochen
sein. Dann erst lässt sich mit
Hilfe der LEDs prüfen, ob die
korrekte Zeit angezeigt wird.
(Zeitanzeige alle 15 Min.).
Prüfen Sie, ob die Batterie
3. Die Beleuchtung wird nicht
stellten Ein- bzw. Ausschalt-
4. Die Zeitschaltuhr läuft nicht
weiter, wenn die Spannung
ausfällt und wieder angelegt
Nach Einstellung der Schaltzeiten
muss zur Selbstjustierung des
CDS-A/T die aktuelle Uhrzeit
einmal 24 Stunden durchlaufen.
Durch Drücken des Knopfes
„Zeiteinstellung“ Zeit durchlau-
fen lassen. Überprüfen Sie, ob
der Zeitwahlschalter für EIN,
AUS und die aktuelle Uhrzeit
bei der Einstellung richtig
Zeiten korrekt eingestellt wur-
den. Besonders für die Uhrzeit
sollte ein möglichst exakter
Congratulations on your purchase of this high-quality ESYLUX product. To ensure
proper operation, please read these user instructions carefully and keep them for
WARNING! Work on electrical systems must be carried out by
authorised personnel only, with due regard to the applicable
installation regulations. Switch off the power supply before installing
On the input side, the device is to be protected against short circuits
with a 10 A circuit breaker (fig. 3).
Use this product only as intended (as described in the user
instructions). Do not make any changes or alterations as this will
render any warrantees null and void. You should check the device
for damage immediately after unpacking it. If there is any damage,
you should not install the device under any circumstances.
If you suspect that safe operation of the device cannot be guaranteed,
you should turn the device off immediately and make sure that it
cannot be operated unintentionally.
NOTE: This device must not be disposed of as unsorted household
waste. Used devices must be disposed of correctly. Contact your local
town council for more information.
The ESYLUX CDS-A/T is a surface-mounted twilight switch with
an integrated timer feature to allow lighting equipment to be
automatically switched on and off . A light sensor detects (fig. 1)
the surrounding light intensity. If this falls below the set lighting
value the CDS-A/T automatically switches the light on and then off
again if the surrounding light intensity exceeds the threshold value.
The lighting can also be individually switched on and off again
using the integrated time feature. You can, for example, set the
CDS-A/T so that this switches the lighting on according to the set
lighting value (Lux) – for example at dusk. After 10.15 p.m. the
light is, however, no longer required. To program this, set the OFF
activation value to 22.15 and the light is then switched off at this
time. At 5.00 a.m. light is required again and so you set the ON
activation value to 05.00 and the lighting is switched on again.
When the set lighting value is exceeded – e.g. at dawn, the
lighting is automatically switched off. This also saves energy costs
in the time when the lighting is not required.
Switch off the mains supply before installing the product.
The CDS-A/T should only be installed on flat, vertical surfaces (wall
of a house) facing north. If possible, the device should not be exposed
to direct sunlight. Please note that an override of the CDS-A/T is
connected via the switched lighting . Remove casing lid and (fig.1)
fit the base to the selected surface with the cable insert point facing
down. The cable must be environmentally sealed (water resistant
cable connection). Connect the twilight Switch as shown in the
circuit diagram . There is a bridge of 1.5 mm(fig. 3)
(mains voltage) and (floating output contact). If the relay contact L
is to be used for low voltage, this bridge has to be removed.
The battery is used to ensure that programmed times are not lost in the
event of a power cut, allowing the settings to be stored for up to 30
days. The life of the battery supplied is between about 3 and 4 years.
Remove the protective strip between the battery and the contact (fig. 4c).
Switch on the mains voltage.
4.2 Setting the light value (LUX)
The selected light value is set via the potentiometer . The (fig. 4a) red LED
is used to help with the settings . When the activation time is (fig. 4b)
reached (e.g. dusk) slowly turn the potentiometer towards the “moon
symbol” until the lights up. The set lighting level now corresponds red LED
to the actual surrounding light intensity and the CDS-A/T is aligned.
NB: Please note that the connected lighting only comes on about
60 seconds after the LED lights up, as it is on a time delay. This switch
delay of about 60 seconds prevents unintentional activation for
example by car headlights or a dark cloud.
4.3 Setting the time functions
NB: The ON and OFF times must be set before the current time is set, as
the CDS-A/T will otherwise take 24 hours to adjust. During this time the
connected lighting would not switch on and off as defined in the program.
When the mains current is switched on, all LEDs light up (fig. 5a).
The CDS-A/T switches on when the lighting level falls below the set
light value and then switches off again when this lighting level is
exceeded. In this setting the CDS-A/T works without the time feature.
If you have already programmed the times or the ON/OFF times
and would like to return to the basic setting, disconnect the device
from the power supply for at least 30 seconds and remove the
batteries while it is disconnected.
4.3.2 Setting the OFF time
Set the time switch to for the OFF time . Now press (fig. 4d)
the button “timer” once and the LEDs cease to light (fig. 4e)
up. Each time you press this button the time is advanced by
15 minutes. To advance the time more quickly hold the button
down. Now set your selected OFF time.
Example: To set the OFF time for 10:15 p.m., the LED display would be as shown
4.3.3. Setting the ON time
Set the timer to for the ON time . Now press the (fig. 4d)
“time adjustment” button and set the selected (fig. 4e)
Example: To set the activation time for 5:00 a.m. the LED is as shown in fig. 5c.
Set the timer to “ “. Before setting the current time hold (fig. 4d)
the “time adjustment” button until all LEDs (11.45 p.m.)
except LED 8 h light up. Then set the current time. This (fig. 5d)
process is necessary to ensure that the CDS-A/T is in the set mode.
When the time is set turn the timer to the “ “ setting. The (fig. 4d)
CDS-A/T is now programmed.
If you need to change the on/off times again you will need to
reprogram the current time.
Close the lid and screw tight.
PLEASE NOTE: When the timer (fig. 4d) is in one setting for over
20 minutes the LED lights switch off. They are only used as
programming aids. This does not mean that the device is not working
properly. When the timer (fig. 4d) is moved again they light up and
you can change the settings.
The battery is used to ensure that time settings are not lost in the
event of a power cut, allowing the settings to be stored for up to
30 days. The life of the battery (CR 2032) supplied is between about
3 and 4 years. To change the batteries remove the screw (fig. 6b)
and insert the new battery in the battery compartment as shown in
fig. 6a and screw it into the correct position in the device. Always
ensure that the battery is suitable.
NB: The consumer has a statutory obligation to return all used and
depleted batteries or rechargeable batteries to the appropriate
recycling site. Batteries may not be disposed of with household rubbish
ESYLUX products are tested in accordance with applicable regulations
and manufactured with the utmost care. The guarantor, ESYLUX
Deutschland GmbH, Postfach 1840, D-22908 Ahrensburg, Germany
(for Germany) or the relevant ESYLUX distributor in your country (visit
www.esylux.com for a complete overview) provides a guarantee
against manufacturing/material defects in ESYLUX devices for a
period of three years from the date of manufacture. This guarantee
is independent of your legal rights with respect to the seller of the
device. The guarantee does not apply to natural wear and tear,
changes/interference caused by environmental factors or damage in
transit, nor to damage caused as a result of failure to follow the user
or maintenance instructions and/or as a result of improper installation.
Any illuminants or batteries supplied with the device are not covered
by the guarantee. The guarantee can only be honoured if the device
is sent back with the invoice/receipt, unchanged, packed and with
sufficient postage to the guarantor, along with a brief description of
the fault, as soon as a defect has been identified. If the guarantee
claim proves justified, the guarantor will, within a reasonable period,
either repair the device or replace it. The guarantee does not cover
further claims; in particular, the guarantor will not be liable for
damages resulting from the device’s defectiveness. If the claim is
unfounded (e.g. because the guarantee has expired or the fault is not
covered by the guarantee), then the guarantor may attempt to repair
the device for you for a fee, keeping costs to a minimum.
1. None or only some of the
LEDs (clock light up when
the device is connected to
the power supply or during
Disconnect the device from the
mains power supply and remove
the battery. Check the wiring.
reconnect to the power supply
and replace the batteries.
2. The LED (Lux) does not light
value is set to max and the
Ensure that the light sensor is
covered with a non-transparent
material. Check the wiring.
disconnected for at least 15
minutes. Using the LEDs you
can then check if the correct
time is displayed. (time display
every 15 minutes) Check to
ensure that the battery is fitted
3. The lighting is not switched
4. The clock timer does not
switch on again if the power
When the on/off times are set
there is a 24 hour cycle to run
through for the auto-adjustment
feature of the CDS-A/T. Press
the “time adjustment” button
to run through the time. Check
to ensure whether the timer for
ON, OFF and the current time
have been properly selected
and whether the times are
correctly set. The values should
particularly for the time.
Félicitations ! Avec ce produit ESYLUX, vous avez fait le choix de la qualité.
Pour l’utiliser dans les meilleures conditions, veuillez lire attentivement ce
mode d’emploi et le conserver en vue d’une consultation future.
ATTENTION : seules des personnes autorisées et qualifiées pour effectuer une
installation conforme aux normes et prescriptions en vigueur peuvent intervenir
sur des réseaux électriques. Coupez le courant avant d’installer le produit.
= Largeur d'intervalle de coupure < 1,2 mm
L'appareil doit être protégé côté entrée
à l'aide d'un disjoncteur 10A (fig. 3).
Ce produit ne doit être utilisé que dans les conditions prévues par le
présent mode d’emploi. Tout changement ou modification entraîne
l’annulation de la garantie. Une fois que vous avez déballé l’appareil,
vérifiez qu’il ne présente aucun défaut. En cas d’anomalie, ne le
mettez pas en marche. Si vous n’êtes pas certain que l’appareil peut
être utilisé en toute sécurité, éteignez-
le immédiatement et prenez vos
dispositions pour empêcher toute utilisation involontaire.
REMARQUE : cet appareil ne doit en aucun cas être jeté avec les
déchets municipaux. Les propriétaires d'équipements électriques ou
électroniques usagés ont en effet l'obligation légale de les déposer
dans un centre de collecte sélective. Informez-vous auprès de votre
municipalité sur les possibilités de recyclage.
ESYLUX CDS-A/T est un interrupteur crépusculaire avec fonction horaire intégrée
à monter sur crépi et destiné à l’enclenchement automatique d’installation
d’éclairage (fig. 1). Une sonde de lumière capte la luminosité ambiante. Lorsque
celle-ci tombe au-dessous de la valeur lumineuse paramétrée, le CDS-A/T
enclenche automatiquement l’éclairage et l’éteint lorsque la luminosité ambiante
dépasse à nouveau cette valeur seuil. La fonction horaire intégrée permet en outre
d’allumer et d’éteindre individuellement l’éclairage. Vous pouvez par exemple
régler le CDS-A/T de sorte à ce que celui-ci enclenche l’éclairage en fonction de
la valeur lumineuse paramétrée (LUX) – p. ex. le crépuscule. À partir de 22.15
heures aucune lumière n’est cependant nécessaire. Paramétrez en conséquence
une valeur de commutation ARRÊT sur 22.15 heures et l’éclairage sera
automatiquement éteint à cette heure-là. La lumière est de nouveau nécessaire à
5.00 heures, paramétrez en conséquence une valeur de commutation MARCHE
sur 5.00 heures et l’éclairage sera de nouveau enclenché. Une fois que la valeur
lumineuse est dépassée - p. ex. à l’aube – l’éclairage sera automatiquement
éteint. Il est ainsi possible de faire des économies supplémentaires de coûts
d’énergie pendant la période où l’éclairage n’est pas nécessaire.
Avant le montage du produit, il convient de couper la tension du secteur. Le
CDS-A/T devrait être uniquement monté sur des surfaces (murs extérieurs)
planes, verticales et orientées vers le nord. L’appareil devrait autant que
possible ne pas être directement exposé au soleil. Veillez également à ce
que le CDS-A/T ne soit en aucun cas influencé par l’éclairage enclenché
(fig. 1). Dévisser le couvercle du boîtier et monter le socle sur la surface
correspondante en orientant le passage du conducteur électrique vers le bas.
Le conducteur électrique doit uniquement être introduit de façon fixe (raccord
étanche à l’eau). Raccorder l’interrupteur crépusculaire conformément au
plan de raccordement . Un shunt de 1,5 mm(fig. 3)
est établi entre (tension L
secteur) et (le client contact libre de potentiel). Si le contact de relais pour L
tension de sécurité doit être utilisé, ce shunt doit être supprimé.
4.1 Batterie de sauvegarde
La batterie sert à sauvegarder les heures mémorisées en cas de panne
de courant. Elle permet, en cas de panne de courant, de sauvegarder
les réglages jusqu’à 30 jours. La durée de vie de la batterie livrée
à environ 3 à 4 ans. Retirez la bande protectrice logée entre la batterie et le
contact (fig. 4c). Enclencher la tension du secteur.
4.2 Réglage de la valeur lumineuse (LUX)
La valeur lumineuse souhaitée peut être réglée à l‘aide du potentiomètre
(fig. 4a) DEL rouge (fig. 4b). La sert d’aide au réglage . Une fois que le moment
d‘enclenchement souhaité (p. ex. crépuscule) est atteint, tourner lentement
le potentiomètre en direction du „symbole lune“ jusqu‘à ce que la DEL
rouge s‘allume. La valeur lumineuse paramétrée correspond à présent à la
luminosité ambiante réelle et le CDS-A/T est réglé.
Remarque : pensez au fait que l’éclairage raccordé s’allume seulement 60 sec.
env. après l’allumage de la DEL. Le retard d’enclenchement d’env. 60 sec. évite
un allumage intempestif susceptible d’être provoqué p. ex. par l’illumination
provenant d’un phare de voiture ou par le passage d’un nuage sombre.
4.3 Réglage des fonctions horaires
Remarque : le réglage des horaires de commutation MARCHE et ARRÊT
doit être effectué avant le réglage de mise à l’heure, sinon le CDS-A/T
nécessite un temps de réglage de 24 heures. Pendant cette période,
l’éclairage raccordé ne serait pas enclenché conformément au programme.
Après enclenchement de la tension secteur, toutes les DEL s’allument
(fig. 5a). Le CDS-A/T enclenche l’éclairage raccordé dès que la
luminosité ambiante tombe au-dessous de la valeur lumineuse
paramétrée et l’éteint lorsque cette valeur lumineuse est dépassée.
Avec ce réglage, le CDS-A/T travaille sans fonction horaire. Si vous
souhaitez revenir au réglage de base alors que vous aviez déjà au
préalable programmé des horaires ou des heures de commutation,
vous devez séparer l’appareil du secteur pendant au moins 30 sec.
et retirer la batterie pendant cette durée.
4.3.2 Réglage de l’heure de commutation ARRÊT
Pour l’heure d’extinction, le commutateur de sélection horaire (fig. 4d)
doit être placé sur . Appuyez maintenant une fois sur le bouton
„Réglage horaire“ , les DEL s’éteignent. Un nouvel (fig. 4e)
appui sur ce bouton avance respectivement l’heure de 15 min. En
maintenant le bouton appuyé, l’avance de l’heure est plus rapide.
Réglez à présent l’heure d’extinction désirée.
Exemple : avec un réglage horaire sur 22.15 heures, l’affichage DEL sera identique
1. Toutes ou quelques DEL
(horloge) ne s’allument pas
Isoler l’appareil du secteur et
enlever la batterie. Vérifier le
câblage. Attendre 30 sec. puis
reconnecter la tension et
remettre la batterie en place.
2. La DEL (Lux) ne s’allume pas,
bien que la valeur lumineuse
soit réglée sur maxi et que le
capteur de lumière ait été
Vérifier que le capteur de
lumière a bien été recouvert
avec un matériau étanche à la
lumière. Vérifier le câblage.
La tension doit être coupée
pendant 15 min. au minimum.
C’est seulement après que l’on
peut vérifier à l’aide des DEL
si l’heure correcte est affichée.
(Affichage de l’heure toutes les
15 min.) Vérifié si la batterie
l’éclairage ne s’effectue
4. La minuterie ne continue pas
à tourner lorsque la tension
a été coupée puis rétablie.
Après avoir réglé les heures de
commutation, le CDS-A/T doit
pour son auto-réglage parcourir
un cycle de 24 heures avec
l’heure actuelle. Faire tourner
l’heure en appuyant sur le bouton
„Réglage horaire“ Vérifier si le
commutateur de sélection horaire
pour MARCHE, ARRÊT et l’heure
actuelle a été correctement
sélectionné au cours du réglage et
si les heures ont été correctement
paramétrées. Une valeur aussi
exacte que possible doit en
particulier être saisie pour l’heure.
4.3.3. Réglage de l’heure de commutation MARCHE
Pour l’heure d’allumage, le commutateur de sélection horaire (fig. 4d)
doit être placé sur . Appuyez maintenant une fois sur le
bouton „Réglage horaire“ puis réglez l’heure (fig. 4e)
Exemple : avec un réglage horaire sur 5.00 heures, l’affichage DEL sera identique
Positionnez le commutateur de sélection horaire sur „ “. (fig. 4d)
Maintenez à présent – avant le réglage de l’heure actuelle ! - le
bouton „Réglage horaire“ appuyé jusqu’à ce que toutes les
DEL (23.45 heures), à l’exception de la DEL 8 h (fig. 5d) s’allument.
Réglez ensuite l’heure actuelle. Ce déroulement est nécessaire pour
que le CDS-A/T passe immédiatement au mode réglé. Après la
mise à l’heure, laissez le commutateur de sélection horaire (fig. 4d)
sur la position „ “. La programmation du CDS-A/T est à présent
S’il était nécessaire de modifier les heures de commutation après
avoir procédé au réglage, il faudra également reprogrammer
Refermer le couvercle et le visser fermement.
IMPORTANT : lorsque le commutateur de sélection horaire (fig. 4d)
reste sur cette position pour plus de 20 minutes, toutes les
DEL s’éteignent. Celles-ci servent uniquement d’aide au réglage. Il ne
s’agit donc pas d’un défaut de l’appareil ! Si l’on actionne une nouvelle
fois le commutateur de sélection horaire (fig. 4d), les DEL s’allument à
nouveau et vous pouvez ensuite modifier les réglages.
La batterie sert à sauvegarder les heures mémorisées en cas de
panne de courant. Elle permet, en cas de panne de courant, de
sauvegarder les réglages jusqu’à 30 jours. La durée de vie de la
batterie (CR 2032) livrée s’élève à environ 3 à 4 ans. Pour remplacer
la batterie, démontez la vis et introduisez la nouvelle batterie (fig. 6b)
dans le compartiment comme illustré puis vissez ce dernier à la fig. 6a
position prévue à cet effet dans l’appareil. Veillez en permanence à
ce que la batterie corresponde aux exigences.
REMARQUE : le client final est légalement tenu de rendre conformément
aux règles en vigueur toutes les batteries ou tous les accumulateurs
usé(e)s ou usagé(e)s. Il est interdit de les éliminer avec les ordures
ménagères (directive 91/157 CEE).
Les produits ESYLUX sont fabriqués avec le plus grand soin et testés selon
les normes en vigueur. Le garant, ESYLUX Deutschland GmbH, Case postale
1840, D-22908 Ahrensburg (pour l’Allemagne) ou le distributeur de la
marque dans votre pays (vous trouverez toutes les informations nécessaires à
ce sujet sur le site www.esylux.com) garantit les appareils ESYLUX contre les
défauts de fabrication et de matériaux pour une durée de 3 ans à partir de
la date d’achat. Cette garantie est indépendante de vos droits légaux vis-à-vis
du vendeur de l’appareil. L’usure naturelle, les modifications de l’appareil
dues à son milieu d’installation et les dommages résultant de son transport
n’entrent pas dans le cadre de la garantie. De même, ne sont pas couverts
les défauts dus au non-respect des instructions de montage et d’entretien et/
ou à une installation inappropriée. Sont également exclues de la garantie les
batteries, sources lumineuses et piles fournies avec l’appareil. La procédure
de garantie ne pourra être enclenchée que sur présentation d’un appareil non
modifié après constatation du défaut, ainsi que d’un ticket de caisse valable,
accompagnés d’une courte description de l’anomalie constatée et expédié au
garant dans un emballage approprié et suffisamment affranchi. Si le recours
en garantie s’avère justifié, le garant peut décider soit de réparer, soit de
remplacer l’appareil dans les meilleurs délais. La garantie ne comprend aucun
autre recours. Le garant n’est notamment pas responsable de tout dommage
causé par un défaut de l’appareil. Si le recours de garantie s’avère injustifié
(par exemple, si la garantie a expiré ou si le défaut constaté n’est pas couvert
par celle-ci), le garant tentera de réparer l’appareil au meilleur coût.
Technische und optische Änderungen ohne Ankündigung vorbehalten. Aktuelle Informationen zum Produkt finden Sie immer auf der ESYLUX Homepage • Technical and design features may be subject to change. You can
find out more about this product on the ESYLUX homepage • Des modifications techniques et esthétiques peuvent être apportées sans préavis. Pour plus d’informations sur ce produit, consultez le site Internet d‘ESYLUX.
φ φ
φ φ
φ φ
FR
ABB. • FIG. 1 ABB. • FIG. 2 ABB. • FIG. 3


