Manhattan Plaza HDR-S (Freesat) Manual
Læs nedenfor 📖 manual på dansk for Manhattan Plaza HDR-S (Freesat) (48 sider) i kategorien Modtager. Denne guide var nyttig for 13 personer og blev bedømt med 4.5 stjerner i gennemsnit af 2 brugere
Side 1/48

User Guide
Plaza HDR • S
freesat digital HD TV recorder

2
CONGRATULATIONS
on buying a Manhattan Plaza HDR•S freesat receiver.
This high performance unit lets you record and watch the best of
digital TV and radio from freesat.
You can only use the Plaza HDR•S with a suitable satellite dish,
and you must connect an HD-ready television to watch TV in High
Denition.
When installed and used correctly, this equipment should provide
many years of trouble-free entertainment in your home.
Please take the time to read this user guide carefully before
installing or using the unit, and keep it for future reference.
If you experience any difculties connecting or using the Plaza
HDR•S, see the section at the end of this guide Troubleshooting
before contacting us.
Some of the key features of the Plaza HDR•S are:
• Over 150 freesat TV and radio channels
• Subscription-free reception
• Stunning High Denition pictures
• Digital recording and playback of programmes
• Pause and rewind live TV
• On-screen channel list and channel browsing
• 8-day electronic programme guide
• Automatic programme reminders
• Programmable favourite channels list
• Digital text and interactive services
• BBC iPlayer and on-demand TV services
• Easy viewing of non-freesat channels
• Audio Description (AD)
• Subtitles
• Automatic setup
• Auto-update for new freesat channels
• Auto-standby for power saving
• HDMI connection
• SCART connection
HDMI, the HDMI Logo, and High-Denition Multimedia Interface
are trademarks or registered trademarks of HDMI Licensing LLC
in the United States and other countries.

3
Manufactured under license from Dolby Laboratories.
Dolby and the double-D symbol are trademarks of Dolby Laboratories.
FURTHER INFORMATION
FREESAT
You can get more information and help
from the freesat website at:
www.freesat.co.uk
MANHATTAN
You can get more information and help
from our website at:
www.manhattan-tv.com
or you can phone us on: 020 8450 0005
www.manhattan-tv.com

4
CONTENTS
In The Box 5
Your receiver 6
Remote control 8
Preparation
The satellite dish 10
Connecting your receiver 10
Switching on 11
Tuning in 12
Everyday Use
Turning on the receiver 15
Changing channels 15
Changing the volume 16
Browsing bar 16
Subtitles and Audio Description (AD) 17
Using the channel list 18
Regional channels 18
Using the programme guide 19
Interactive TV services 21
Pausing live TV 21
Recording a programme 23
Using the library 24
Playing a recorded programme 26
Advanced Use 27
The lock PIN 27
Display mode 28
TV/DTV 28
Changing the channel list 28
Using the favourite channel lists 29
Manual timer recording 29
Using the menu system 30
Setup menu 31
General menu section 31
Picture menu section 32
Sound menu section 33
Record menu section 33
System menu section 35
Information menu 36
On Demand TV 37
Setting up for On Demand TV 37
Watching On Demand TV 38
Non-Freesat Channels 39
Tuning in non-freesat channels 39
Watching non-freesat channels 40
Pausing and recording non-freesat channels 41
Appendix A Safety 42
Appendix B Troubleshooting 44
Appendix C Speci cations 46
1
2
3
4
5
6

5
In The Box
In your Plaza HDR•S freesat+ receiver pack you should
nd the following items:
1
Plaza HDR•S receiver
Plug and transformer Remote control
Batteries for the
remote control
HDMI cable to connect to
an HD-ready TV
Quick Start Guide Main User Guide

6
YOUR RECEIVER
Manhattan Plaza HDR•S
Front
POWER
Switch the receiver on and off.
Power indicator light
RW
Winds backwards through a recording or upto 2
hours of live TV (if buffered)
STOP
Stops playback of a recorded programme. Returns to
live TV from paused live TV
PLAY/PAUSE
Pauses live TV. Starts and pauses playback of a
recorded programme or paused live TV
FF
Winds forwards through a recording or a programme
in live pause mode
REC
Records the selected programme

7
Manhattan Plaza HDR•S
Rear
LNB IN 1, LNB IN 2
Two inputs for connecting to
the satellite dish
DC 12v
Connection for the power supply unit
HDMI
Output for connection to an HD-ready television
USB
Socket for upgrading the receiver’s software
ETHERNET
Network socket for connecting to the Internet
TV SCART
Output for connection to a
non-HD television
L and R AUDIO
Stereo audio output for
connecting to an analogue
audio system
S/PDIF
Optical audio output for
connecting to a digital audio
system
VCR SCART
Output/input for connecting to
video recorder or DVD recorder

8
REMOTE CONTROL
Manhattan Plaza HDR•S Power - switches the receiver on and off.
Mute - silences the receiver’s sound.
0, 1 … 9 - enter channel numbers, numeric values in the set-
up menus or a jump point in playback. Also enters your postcode
during the installation process.
Turns the volume up and down.
Switches to the next or previous channel. Moves one page
up or down in the channel list and programme guide.
Exits a menu and returns to normal TV viewing.
Red, green, yellow, blue –Chooses options
within menus.
Displays the programme guide.
Displays channel and programme information.
Use the remote control within
a maximum distance from the
front of the receiver of 5m and
within an angle of 60°. Ensure
there is a clear line of sight
between the remote control
and the receiver. The operating
distance may vary depending
on the brightness of the room.

9
Up, down, left, right - move the highlight bar in menus
and in the programme guide, and allow you to browse the
channels and programmes.
Selects the highlighted option in a menu.
Displays the list of programmes already recorded and set to
be recorded.
Exits a menu and returns to the previous menu.
Winds backwards or forwards through a recording being
played. Moves through the programme guide in 2 hour steps.
Stops playback of a recorded programme. Returns to live TV
from paused live TV.
Pauses live TV. Starts and stops playback of a recorded
programme or paused live TV.
Jumps backwards or forwards through a recording being
played. Moves through the programme guide in 24 hour steps.
Records the selected programme.
Displays the main menu screen.
Selects favourite channels sequentially whilst watching TV
and adds favourite channels to the channel list.
Displays the channel list.
Switches between available screen display modes.
Switches back to the last channel watched.
Switches the TV SCART output between freesat and the TV’s tuner.
Displays the available audio menu used to change between
different soundtracks ( such as languages and audio description ).
Displays the subtitles menu used to select subtitles.
Displays interactive and digital text services (where available).

10
Preparation
This section explains how to set up your Plaza HDR•S
to receive freesat channels.
2
To receive freesat, you must connect your Plaza HDR•S receiver
to an appropriate satellite dish, xed in position and accurately
pointed at the 28.2° East satellite position.
For safety reasons and to provide reliable reception, we strongly
recommend that you have your dish installed by a professional.
You may be able to use a satellite dish already installed at your
home. If you have any questions about the dish, please consult
your installer.
THE SATELLITE DISH
CONNECTING YOUR RECEIVER
Place your Plaza HDR•S receiver on a rm, level surface close to
the television, a mains electricity socket, and the cables from the
dish. (See Appendix A – Safety.)
Connect the two cables (or one double cable) from your dish to the
LNB IN 1 and LNB IN 2 sockets at the back of the receiver (if the dish
cables are tted with a wall socket inside your home, you will need
connecting cables, which you can get from your installer). It does
not matter which of the two cables from the dish is connected to
which LNB IN socket.

11
HINT: Each “F-connector” used for the satellite dish cable
connections has a central wire that is inserted into the hole in
the LNB IN socket while the collar is screwed onto the socket.
When screwing on the collar, make sure that the central wire
goes into the socket hole and is not bent to one side.
Turn off your television and connect the HDMI cable supplied
between the HDMI socket at the back of your Plaza HDR•S receiver
and an HDMI socket on your television. There may be more than
one HDMI socket on your television. If you are not sure which to
use, check the television’s manual.
Plug the power supply lead into the POWER socket at the back of
the receiver and plug the power supply into the mains socket that
is turned off.
You may have other equipment, such as a DVD recorder or surround
sound system, to connect to the receiver.
A video recorder or DVD recorder may be connected to your Plaza
HDR•S receiver to make permanent archive recordings of freesat
programmes. You will need to connect a SCART cable between
the VCR SCART socket on the back of the receiver and a SCART
HINT: If your television has no HDMI socket, then it must
be connected to the receiver by SCART cable, and you will
not be able to watch freesat channels in High Denition.
socket on the video or DVD recorder. Check the recorder’s manual
for guidance.
You can listen to the sound from your Plaza HDR•S through a
stereo or surround sound system. For digital sound, connect an
optical lead from the sound system’s S/PDIF socket to the one
on the Plaza HDR•S. For analogue sound, connect a suitable lead
between the receiver’s L and R AUDIO sockets and the L and R
audio inputs on the sound system.
SWITCHING ON
Remove the battery compartment cover from the back of the
Plaza HDR•S remote control by pressing it gently while sliding it
off. Insert the two AAA batteries supplied, as shown on the inside
of the compartment, and replace the compartment cover.

12
SWITCHING ON (continued)
Turn on your TV set and choose the HDMI input (see your
television’s manual for guidance). Switch on the mains socket that
the Plaza HDR•S is connected to.
After a few seconds, the receiver’s rst freesat installation screen
shown opposite will appear on the television screen:
TUNING IN
When the rst installation screen is displayed, use the or
buttons to select between 16:9 Widescreen or the squarer 4:3
Traditional as the screen format of your television. Then press
the button or the button to highlight the HDMI Resolution
selection box, and use the or buttons to select the correct
resolution for your television. You should set the HDMI resolution
to the highest that your television can display (see your television’s
manual). If in doubt, set the resolution to 720p.
HINT: If you do not see this screen on your television, see
‘Troubleshooting’ on page 44.

13
HINT: Enter your postcode with the number buttons by
pressing the correct button on the remote a number of
times to produce the required letter (printed on each
button), or number, in the same way as ‘texting’ with a
mobile phone. For example, for an ‘S’, you would press
the button four times. If you make a mistake, the
button deletes the last character entered.
Press or to highlight the “Next” box and then press to
display the next installation screen. If after doing this you lose the
picture on your screen press to return to the rst installation
screen using the default resolution of 720p (supported by all HDTVs).
HINT: Setting the HDMI resolution has no effect on the
SCART output.
The signal check screen shows the strength and quality of the freesat
signal received from your satellite dish. The receiver scans the signal for
a few seconds and reports if the signal lock is successful. If the signal
lock shows “Failed”, you should check the satellite dish connection at
the back of the receiver (switch the receiver off and reconnect the cable
if necessary). If that connection is OK, consult your dealer or installer.
When the signal lock shows “Successful”, you can continue to tune
in the receiver. Press to proceed.
Enter your postcode using the number buttons on the remote control.
You do not need to enter a space. Press the button when you have
entered your postcode, and then press again to proceed.

15
Everyday Use
This section describes the day-to-day use of your Plaza
HDR•S receiver – how to select the channels that you
want to watch, view the programme schedules, pause
live TV, and record and playback programmes.
3
TURNING ON THE RECEIVER
When the receiver is in standby the symbol on the front panel
is illuminated red. To turn it on, press the button on the remote
control or on the front panel of the receiver. The power symbol and
ring around it become illuminated blue when the receiver is on.
You can turn off the Plaza HDR•S, so it goes into standby, by
pressing the button on the remote control or the button
on the receiver. The Plaza HDR•S uses less power when in standby.
HINT: The Plaza HDR•S receiver will automatically switch
to standby if it is not used for a long time. This feature can
be disabled – see the Advanced Use section of this guide.
CHANGING CHANNELS
Step through the channels by pressing the button on the
remote control. Pressing the button will select the next channel
in the channel list. Pressing the button will select the previous
channel in the list.
If you know the channel’s number, you can switch directly to the
channel you want by using the number buttons on the remote
control. As you enter a channel number, each digit appears at
the top left of the screen to show the number button you have
pressed. All the freesat channel numbers have three digits and
the rst channel is 101. The radio stations are stored from channel
number 700.
Press the button to switch from the channel you are currently
watching to the channel you were watching before.
HINT: There are some channel numbers missing in the
channel list because spaces are left for future channels to
join freesat.
HINT: If you enter a number that does not exist, the
channel will not change.
HINT: You should leave the Plaza HDR•S receiver plugged in
with the socket switched on, at all times (except when there
is lightening – see Appendix A). When you are not using the
receiver, put it in standby by pressing the button on the
remote control or the button on the front of the receiver.

16
CHANGING CHANNELS (continued)
There are other ways to change channel:
• Use the browsing bar at the bottom of the screen (see below)
• Use the on-screen channel list (see page 18)
• Use the programme guide (see page 19)
CHANGING THE VOLUME
You can increase or decrease the volume by using the button on
the remote control. The sound is silenced by pressing the button
and restored to its previous level by pressing the button again.
BROWSING BAR
Whenever you change channel, the Plaza HDR•S brie y displays a
browsing bar at the bottom of the screen that contains information
about the current channel and programme. You can press the
button at any time to display the bar again.
The browsing bar shows:
• the name and number of the channel
• the name of the programme you are watching
• the start and nish time of the programme
• the progress through the programme
• the date and time
HINT: You can also display the browsing bar by pressing
or on the remote control while you are watching TV.
At the bottom left of the browsing bar these symbols are displayed
to indicate:
the channel is locked (see the Advanced Use section)
the programme is being recorded
a reminder has been set for the programme
an HD version is available on another channel
(press the button for further details)
At the bottom right of the browsing bar symbols are displayed to
indicate:
subtitles are available
Audio Description is available
Dolby Digital audio is available
parental guidance is advised as the programme contains
language or scenes that may not be suitable for children
the programme is in High De nition
the programme is one of a series

17
While the browsing bar is displayed, press again to display
more information about the selected programme, including a
short summary and further details on the parental guidance and/
or the HD version available, if applicable. Pressing the button
once more removes the extra information from the screen.
To remove the bar from the screen at anytime, press or .
While the bar is displayed, press the or buttons to see what
is on another channel. To change to this channel, press while
the bar is still displayed. You can also press the button to see
details of the programmes coming up in the next 12 hours on the
channel currently displayed, and the button to go back again.
SUBTITLES AND AUDIO DESCRIPTION
Many freesat programmes are broadcast with subtitles for people
who are deaf or hard of hearing. Channels with subtitles available
show the symbol in the browsing bar.
If you want to turn on subtitles, rst display the subtitles menu by
pressing the button and then use the and buttons to
highlight the subtitles required and press . To turn off subtitles,
select “Off” from the subtitles menu and press .
Some programmes have an extra soundtrack to tell people who are
blind or partially sighted what is happening on screen. Channels
with this audio description available show the symbol in the
browsing bar.
To turn on audio description, press the button to display the
available audio menu and then select “English Audio Description”.
HINT: Once turned on, subtitles and audio description
remain on for all channels until turned off.
18
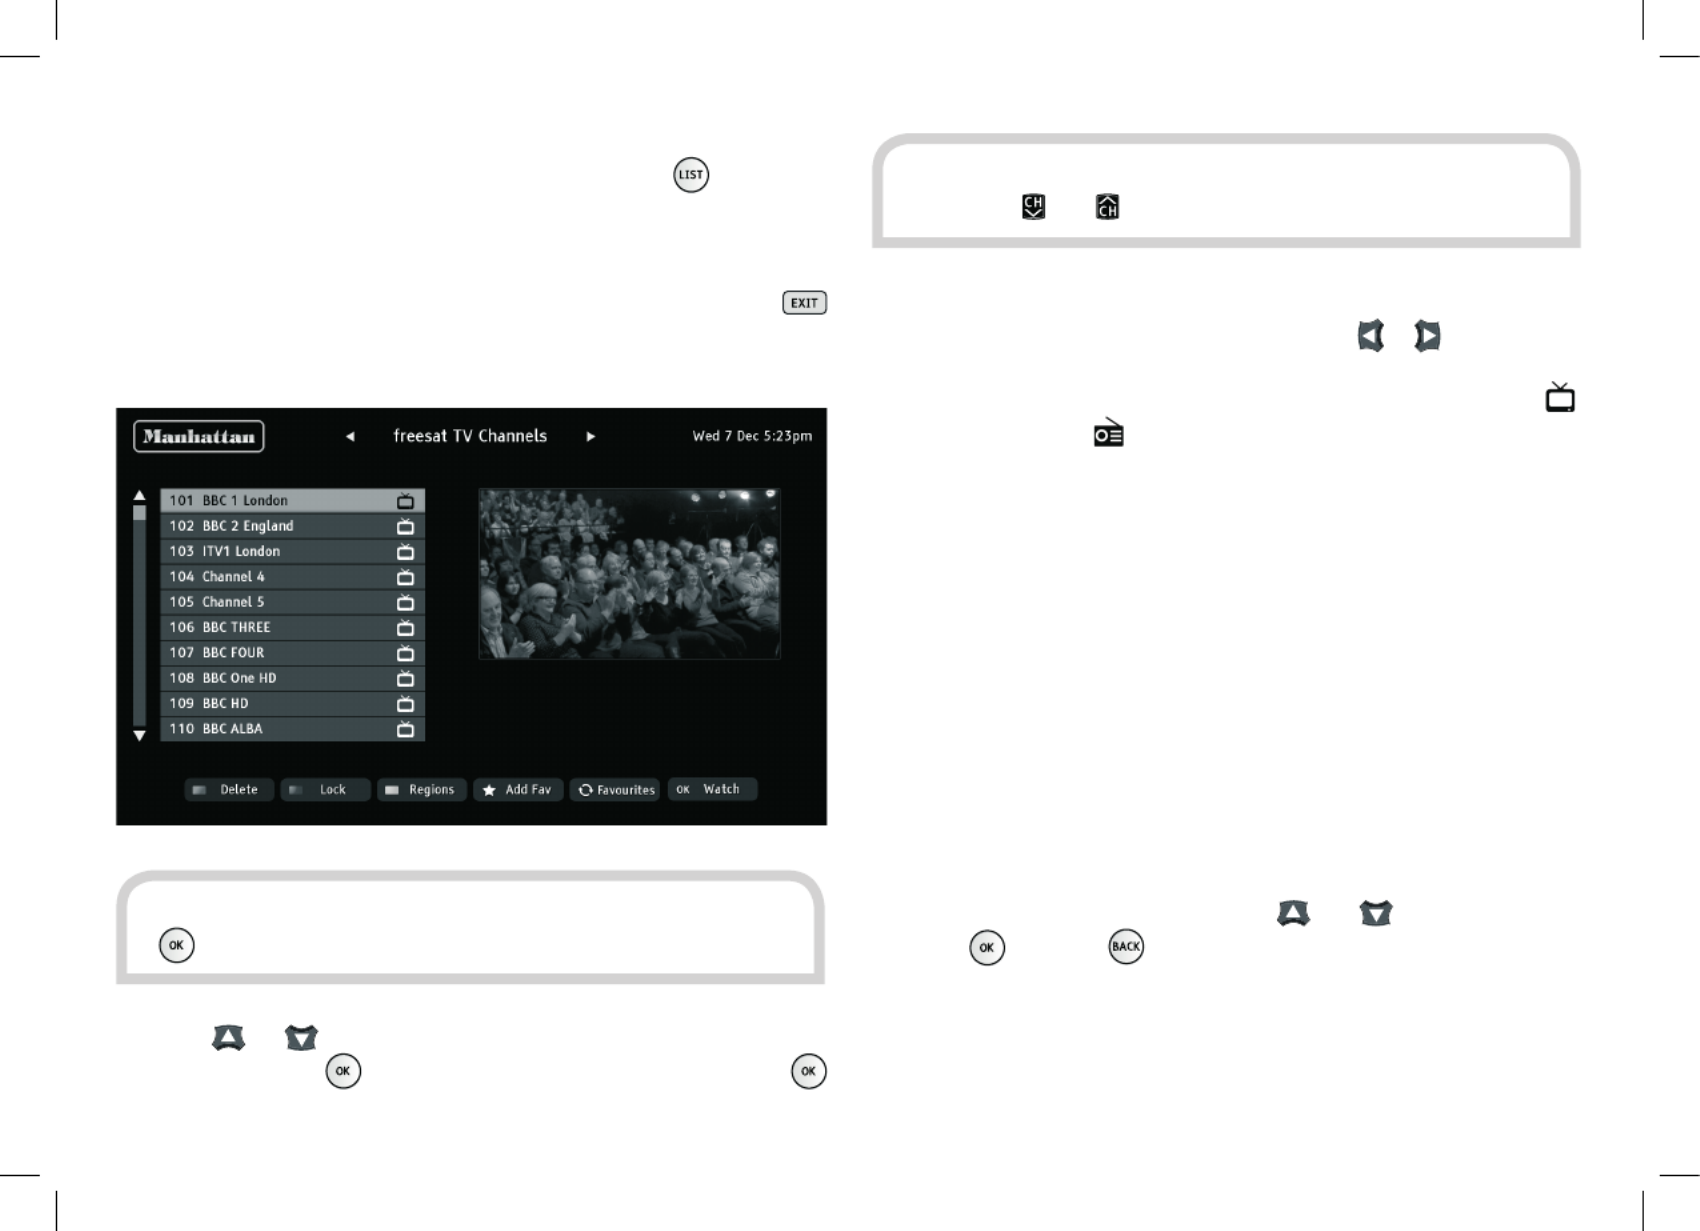
USING THE CHANNEL LIST
Display the on-screen channel list by pressing the button on
the remote control. This lists the channels on the left-hand side of
the screen, in number order, and displays a preview window of the
currently selected channel on the right-hand side of the screen.
You can return to watching TV at any time by pressing the
button.
Use the or buttons on the remote control to highlight a
channel then press to view it in the preview window. Press
again to exit the channel list and watch the channel full-screen.
TV and radio channels are stored in separate lists. Switch between
the TV and radio channel lists by pressing the or buttons. The
name of the list is displayed at the top of the screen. In addition,
a symbol next to each channel distinguishes the TV channels ( )
from radio stations ( ).
REGIONAL CHANNELS
With freesat, some channels, such as BBC1, broadcast regional
variations of their channels. The initial regional variation is chosen
according to the postcode that you entered when you installed the
Plaza HDR•S.
You can change to a different regional variation of a channel by
pressing the yellow button while the channel is highlighted. The
prompt to use the yellow button will only be displayed at the
bottom of the screen if a choice of regions is available.
Choose the region that you want from the list by moving the
highlight bar through the list with the and buttons and then
pressing , or press to leave the region setting unchanged.
HINT: You can also display the channel list by pressing the
button while watching TV.
HINT: Move a page at a time through the channel list by
using the and buttons.

19
To access the guide, press the button on the remote control.
Choose the section of the guide you want to look at – either all
channels or a specic channel genre – by pressing the , ,
or buttons to highlight the section, and then to select it.
The programme guide shows a table of the programmes, with each
page showing eight channels over a two-hour period. Information
on the highlighted programme is shown above the table and you
can read a full summary by pressing the button. Press or
again to remove the summary box.
USING THE PROGRAMME GUIDE
The Plaza HDR•S programme guide displays details of all
programmes showing on freesat channels for the next week ahead.
HINT: You can skip the genre choice stage by pressing
the button a second time, to jump straight to the
programme guide for all of the channels.

20
USING THE PROGRAMME GUIDE (continued)
The current date and time is displayed at the top right of the screen
and an orange line at the top of the table shows the present time
in the schedule.
You look through the scheduled programmes using the and
buttons to move through the channels and the and buttons
to highlight programmes showing at different times.
As you move the highlight bar through the schedule, the
programme summary shown above the list changes to re ect the
programme highlighted.
Press to switch the receiver to the channel and programme
highlighted. If the programme is on at the time, the receiver will
switch to that channel immediately. If the programme is scheduled
for later on, a reminder is set so that when the programme is
about to start, a message is displayed on-screen and, after a
few seconds, the receiver automatically switches to the relevant
channel. In the programme guide a symbol is shown next to a
programme with a reminder set.
HINT: You can jump through the list more quickly using the
and buttons to move the highlight bar through the
schedule two hours forward or back, and the and
buttons to move a day forward or back. Use the and
buttons to move through the channels a page at a time.
HINT: Programmes in standard de nition that are also
available on another channel in HD are labelled in the
schedules with an symbol. You can see the time and
channel that the HD version is broadcast by highlighting
the programme and pressing .
You can cancel a reminder by highlighting the programme in the
programme guide and pressing again.
You can set as many reminders as you want but if you try to set a
reminder on one channel for the same time as one you have already
set on another channel, a warning is displayed on the screen and
you are given the choice to cancel one of the reminders.
HINT: You can also set, and reset, reminders for programmes
from the browsing bar – press when a future programme is
displayed in the browsing bar and a reminder will be set for that
programme or, if a reminder is already set (and shown by the
symbol in the browsing bar), the reminder will be removed.

21
Press to record the programme highlighted. If the programme
is on at the time, the receiver will record the remainder of the
programme. If the programme is scheduled for later on, the
receiver will automatically record the whole programme when it is
broadcast (see Recording a Programme on P23).
Leave the programme guide and return to watching TV by pressing
or .
INTERACTIVE TV SERVICES
Several freesat channels broadcast a range of digital text and
interactive services, such as news, weather, games, sports information
and video, alongside normal TV. You can use the interactive options
by pressing or the red button while watching the TV channel. This
will display a menu of the services available.
When you have nished with the interactive services, return to
watching normal TV by pressing again or the button.
PAUSING LIVE TV
With the Plaza HDR•S, you can pause live TV to, say, answer the
phone, and then later carry on watching from where you left off.
You can even rewind a live programme to watch a section again.
While watching live TV, press the button to pause the
programme. In the top left corner of the screen the pause symbol
appears and the pause counter shows the length of time the
programme has been paused – how many minutes your viewing
is behind live TV. “Live Pause” is shown in the browsing bar and
the progress bar shows both the portion of the programme you
have watched (in orange) and the length of paused programme
that remains to watch in red.

22
PAUSING LIVE TV (continued)
When you want to continue watching TV, press again to
restart your viewing from where you left off. You can now press
or to skip any parts of the programme that do not interest
you, to catch up with the live programme, and/or press or
to review any sections of the programme again.
Each time that you press the or button, the rewind or fast
forward speed increases – to 2x, 4x, 8x, 16x, 32x and 64x normal
speed. If you press the or button while the programme is
paused, it will advance or rewind in slow motion, changing to 1/8x,
1/4x, 1/2x normal speed with each press.
HINT: As well as the pause time, the pause counter at the top left
of the screen shows the current playback mode – paused, play, fast
forward, etc – and the current speed of rewind or fast forward.
Pressing the or buttons skips forwards or backwards
through the paused programme. You can set the length of the skip
from 10 to 60 seconds in the “Record” section of the Setup menu
(see the Advanced Use section). The default is to skip forwards 30
seconds and backwards 10 seconds, which makes it easy to skip
adverts. Press while watching a paused programme to return
to watching live TV.
You can also rewind live TV without rst pausing it, by pressing
the button and then pressing when you have reached the
part of the programme that you want to see again. You can only
rewind as far back as the last channel change or to the limit of the
live pause length. A thin red line on the progress bar shows how
far back you can rewind the programme.
HINT: You can set the limit of the live pause length up to two
hours (see the Advanced Use section).
HINT: When you change channel, the continuously stored
broadcast is deleted, so you cannot rewind to watch either the old
channel or the new channel, before the channel change took place.

23
RECORDING A PROGRAMME
There are two ways to record a programme to watch later – either
record a programme that is on at the time, or set the timer to
automatically record a programme later.
To record the programme you are currently watching, press the
button. Recording will start immediately and the browsing
bar will be displayed with the symbol in the bottom left hand
corner. Once a recording has been started, you can change channel
to watch another programme and the recording will continue. You
can also start to watch a recorded programme before the recording
has nished.
You can stop the recording of a programme by pressing the
button while the browsing bar is displaying that programme’s
details (and the symbol). Press or if the bar is not
already on-screen.
You can also start and stop recording a channel from the browsing
bar, while watching another channel. When the browsing bar is
displaying the channel you want to record, press the button
to start the recording (if that channel is not being recorded) or to
stop the recording (if that channel is being recorded and the
symbol is displayed).
HINT: The Plaza HDR•S can record a programme from
one channel while you are watching another or record
programmes on two different channels at the same time.
If you try to record a third programme or watch a third
channel, the Plaza HDR•S will display a warning and options
of the actions you can take (eg to stop recording one of the
programmes so you can watch the third channel).
To record a programme that will be broadcast in the future, either
highlight the programme in the programme guide or use the
browsing bar to display that programme’s details, and press the
button.
If the programme is part of a series (indicated with a symbol in
the browsing bar and in the programme guide full summary), you
will be given the option of setting the Plaza HDR•S to automatically
record future episodes of the series as well - highlight the option
you want and press . Programmes set to series link record
display an symbol instead of an symbol.

24
RECORDING A PROGRAMME (continued)
If you choose to record a programme in Standard De nition, which
is also available in HD (indicated in the browsing bar and in the
programme guide with a symbol), you will be given the option
to record the HD version instead - highlight the version you want
and press .
Both the programme guide and browsing bar displays next
to any programme set to record just once, and next to any
programme set to series link record.
To cancel a scheduled recording, highlight the programme in the
programme guide or display that programme’s details in the
browsing bar, and press the button. You can also cancel a
scheduled recording using the library schedule list (see below).
HINT: You can set the Plaza HDR•S to record a programme
that is not in the programme guide (one that is on a non-
freesat channel or far into the future) using the manual
recording menu (see the Advanced Use section)
USING THE LIBRARY
You can see a list of recordings scheduled for the future, and
programmes already recorded and ready for playback in the library.
Open the library by pressing the button (or selecting the library
item in the main menu).
The recordings list shows all the recordings currently stored by
the Plaza HDR•S, listed with the name of the programme, the
channel, the date on which the recording was made, and its status
– recorded, viewed, or still recording. There may be symbols next
to each entry in the list to show:
the recording is protected against quick or automatic deletion
the recording is one of a series
the programme is still being recorded
A series of recordings (with the same title and recorded from the
same channel, but at different times or on different days) are grouped
together as a single entry in the list, with a label showing the number
of episodes within the group. If you highlight a group of recordings
and press the group is expanded on a new screen, with each
individual episode listed. Press to return to the main list.

25
The preview window at the top of the screen continues to show the
channel you were tuned to before opening the library screen. Above
the recordings list is shown the space free for further recordings.
The panel at the top of the screen shows details of the recording
highlighted, including the symbols seen in the browsing bar. You can
highlight the different recordings listed using the and buttons.
A highlighted recording (or group) may be deleted (press the
red button) to make room for new recordings once it has been
watched. You can protect a recording (press the button)
to prevent automatic deletion if the Plaza HDR•S runs out of
recording space, or accidental deletion with the red button (as an
on-screen con rmation is then required for deletion).
If your press the highlighted recording begins playback in
the preview window at the top of the screen and a symbol is
shown next to the programme name. While a recording is being
previewed, you can continue to browse the other recordings in the
recordings list. Press to stop preview playback and return the
preview window to live TV.
The library schedule list shows all programmes with a reminder set
or scheduled to be recorded. You can open the library by pressing
the button (or selecting the library item in the main menu) and
then display the schedule list by pressing the or buttons.
The scheduled programmes are listed with the name of the
programme, the channel, the day on which the recording or
reminder will occur, and symbols to show:
the recorded programme will be protected from deletion
the recording is one of a series that will all be recorded
the programme is set for a reminder
the programme is set to be recorded
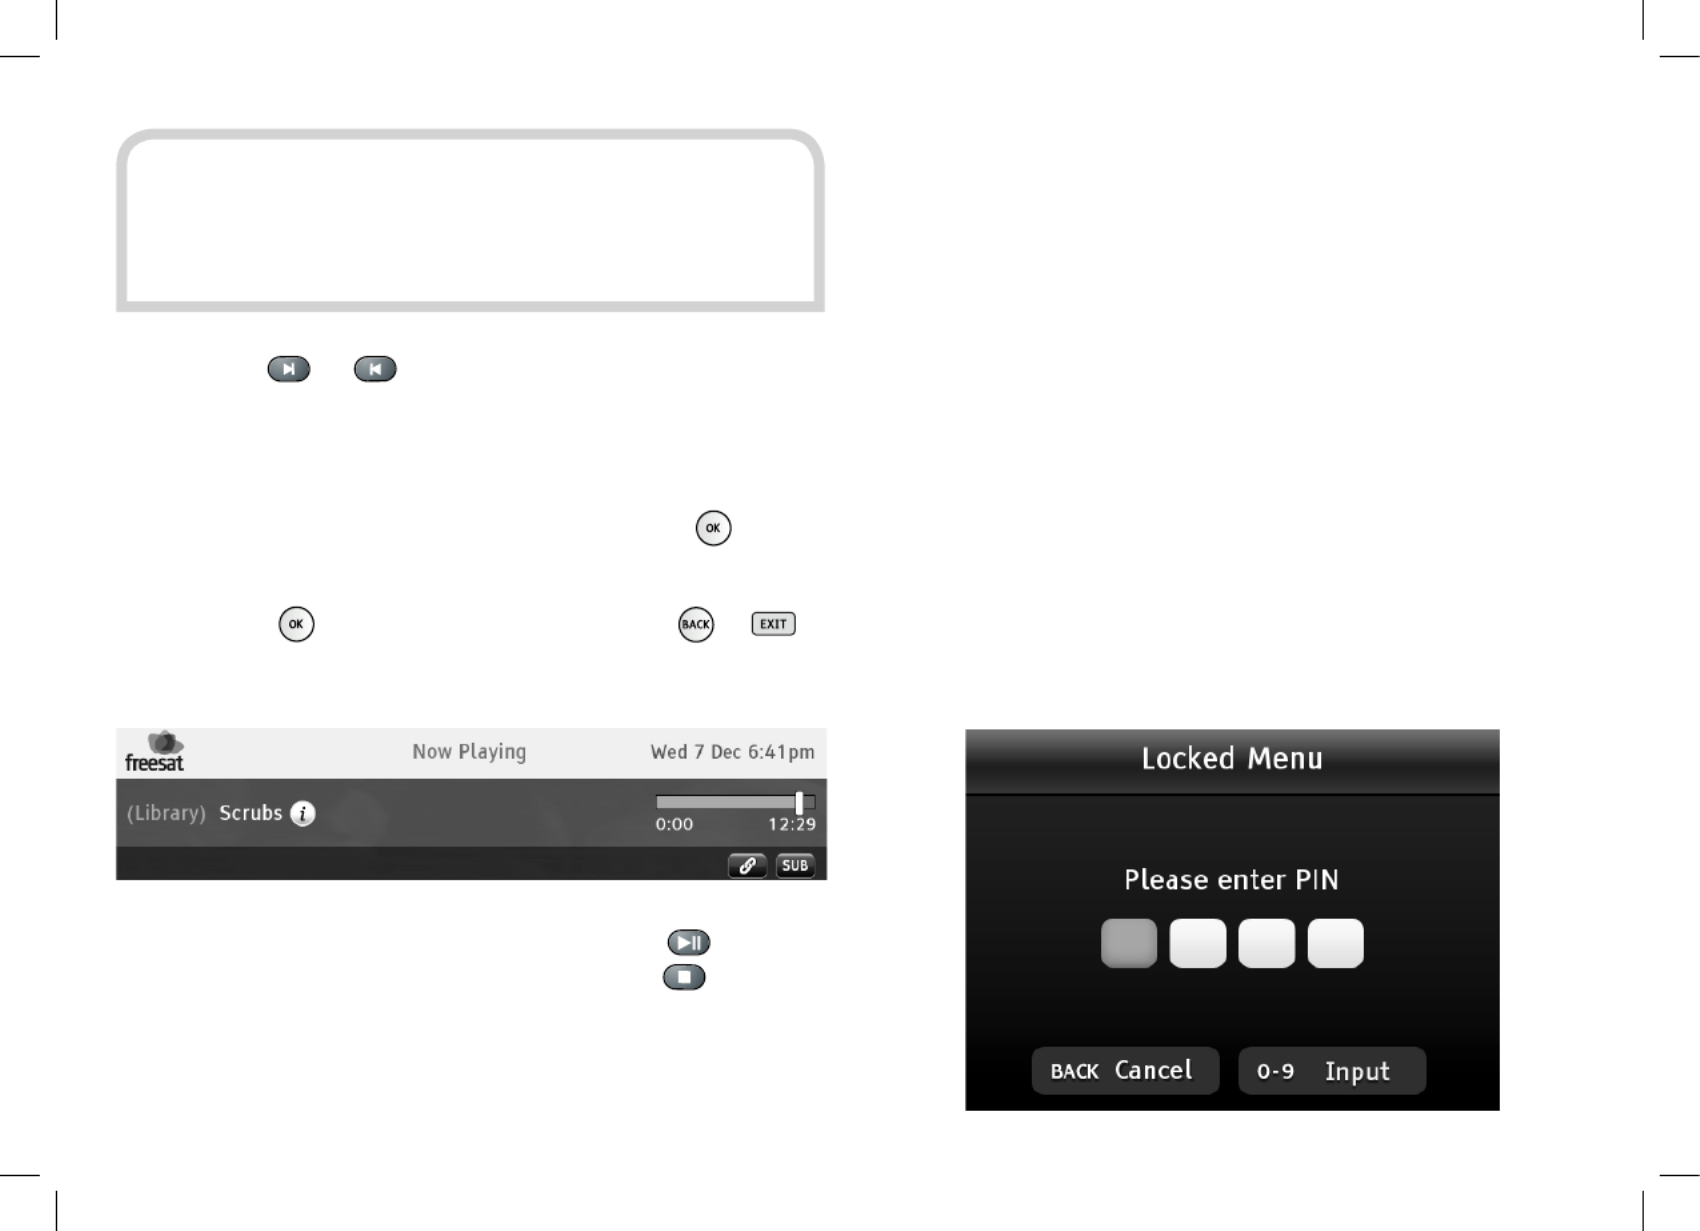
27
HINT: As well as the playback time, the playback counter
at the top left of the screen shows the current playback
mode – play, fast forward, rewind, and so on – and the
current speed of rewind or fast forward.
Pressing the or buttons skips forwards or backwards
through the recording. You can set the length of the skip from 10
to 60 seconds in the “Record” section of the Setup menu (see the
Advanced Use section).
To skip to a particular point in the recording, press and the
playback counter will change to allow you to use the number
buttons to enter the time you want to skip to in hours and minutes
(H:MM). Press once you’ve entered a time and or to
cancel.
You can temporarily halt playback by pressing the button, or
stop playback and return to the library by pressing .
THE LOCK PIN
Some of the Plaza HDR•S menu functions can be locked to avoid
accidental changes to the receiver’s setup, and you can lock
particular channels to prevent other family members, such as
children, from watching them.
To use a locked menu function or watch a locked channel, you need
to enter the four-digit PIN that you set when you rst installed the
Plaza HDR•S. You can change the lock PIN, without re-installing
the receiver, as explained later in this section.
Advanced Use
This section explains how to get the most out of your
Plaza HDR•S receiver.
4
Produkt Specifikationer
| Mærke: | Manhattan |
| Kategori: | Modtager |
| Model: | Plaza HDR-S (Freesat) |
Har du brug for hjælp?
Hvis du har brug for hjælp til Manhattan Plaza HDR-S (Freesat) stil et spørgsmål nedenfor, og andre brugere vil svare dig
Modtager Manhattan Manualer

15 August 2024
13 August 2024
10 August 2024
6 August 2024
6 August 2024
Modtager Manualer
- Modtager Bosch
- Modtager SilverCrest
- Modtager Denver
- Modtager Sencor
- Modtager Sony
- Modtager Fenton
- Modtager Panasonic
- Modtager Hager
- Modtager VOX
- Modtager Pro-Ject
- Modtager Anthem
- Modtager Philips
- Modtager IFM
- Modtager Musway
- Modtager Audio-Technica
- Modtager Peavey
- Modtager Pioneer
- Modtager TOA
- Modtager Hifonics
- Modtager Sharp
- Modtager Qtx
- Modtager Dynacord
- Modtager Logitech
- Modtager Behringer
- Modtager Emos
- Modtager Kenwood
- Modtager Neumann
- Modtager Sandberg
- Modtager MB Quart
- Modtager Smart
- Modtager Sennheiser
- Modtager Harman Kardon
- Modtager Garmin
- Modtager Grundig
- Modtager Motorola
- Modtager Roland
- Modtager Asus
- Modtager Golden Age Project
- Modtager Pyle
- Modtager Argon
- Modtager Roksan
- Modtager Denon
- Modtager Yamaha
- Modtager Bowers & Wilkins
- Modtager Matsui
- Modtager Scansonic
- Modtager AVM
- Modtager Nedis
- Modtager Sonoro
- Modtager Kicker
- Modtager Optoma
- Modtager Renegade
- Modtager LD Systems
- Modtager Hama
- Modtager Auna
- Modtager Thomson
- Modtager Aiwa
- Modtager Nokia
- Modtager Rega
- Modtager Yorkville
- Modtager Belkin
- Modtager Pyle Pro
- Modtager JBL
- Modtager AKAI
- Modtager Teufel
- Modtager DataVideo
- Modtager Strong
- Modtager Audio Pro
- Modtager RCF
- Modtager Optex
- Modtager Smartwares
- Modtager Chandler
- Modtager Trevi
- Modtager Trust
- Modtager Blaupunkt
- Modtager JVC
- Modtager Hilti
- Modtager Crunch
- Modtager Skytec
- Modtager Medion
- Modtager Vivanco
- Modtager Megasat
- Modtager Cambridge
- Modtager Tangent
- Modtager Cisco
- Modtager König
- Modtager Metronic
- Modtager TechniSat
- Modtager Meliconi
- Modtager Bang And Olufsen
- Modtager Bose
- Modtager Geemarc
- Modtager Jabra
- Modtager Klipsch
- Modtager Alpine
- Modtager Salus
- Modtager Triax
- Modtager Tripp Lite
- Modtager Exibel
- Modtager Mercury
- Modtager Genie
- Modtager Vaddio
- Modtager Goobay
- Modtager KEF
- Modtager Technics
- Modtager Summit Audio
- Modtager Jensen
- Modtager Alecto
- Modtager Icom
- Modtager Astro
- Modtager Plantronics
- Modtager HQ
- Modtager Krüger&Matz
- Modtager Canal Digital
- Modtager Marmitek
- Modtager Zalman
- Modtager PreSonus
- Modtager Kopul
- Modtager Godox
- Modtager Kathrein
- Modtager Sonos
- Modtager NAD
- Modtager AJA
- Modtager Tascam
- Modtager Bogen
- Modtager Omnitronic
- Modtager Velleman
- Modtager Marshall
- Modtager Sonance
- Modtager Telestar
- Modtager Vivotek
- Modtager Zoom
- Modtager Bush
- Modtager JUNG
- Modtager Fostex
- Modtager MIPRO
- Modtager Dual
- Modtager Electro-Voice
- Modtager HQ Power
- Modtager Fredenstein
- Modtager RME
- Modtager Sagem
- Modtager Onkyo
- Modtager Focal
- Modtager Line 6
- Modtager HK Audio
- Modtager Teac
- Modtager GlobalSat
- Modtager Imperial
- Modtager Autotek
- Modtager Magnat
- Modtager Saramonic
- Modtager Thorens
- Modtager Marantz
- Modtager ELAC
- Modtager Hartke
- Modtager McIntosh
- Modtager Hertz
- Modtager American Audio
- Modtager ART
- Modtager Bluesound
- Modtager Yaesu
- Modtager Polk
- Modtager Monacor
- Modtager Samson
- Modtager Audizio
- Modtager JL Audio
- Modtager Raymarine
- Modtager Sogo
- Modtager Rupert Neve Designs
- Modtager Jamo
- Modtager Chamberlain
- Modtager FiiO
- Modtager DBX
- Modtager Warm Audio
- Modtager Devolo
- Modtager Simrad
- Modtager Radial Engineering
- Modtager Galaxy Audio
- Modtager Renkforce
- Modtager Marshall Electronics
- Modtager Chord
- Modtager Alto
- Modtager Maxview
- Modtager Aquatic AV
- Modtager Caliber
- Modtager Audiolab
- Modtager Deaf Bonce
- Modtager Music Hall
- Modtager APart
- Modtager LogiLink
- Modtager Brondi
- Modtager Kramer
- Modtager Rotel
- Modtager Metra
- Modtager QSC
- Modtager Black Lion Audio
- Modtager Naim
- Modtager Solid State Logic
- Modtager Citronic
- Modtager Thomann
- Modtager RDL
- Modtager NAV-TV
- Modtager TV Star
- Modtager Edision
- Modtager Clarion
- Modtager Sound Devices
- Modtager Wharfedale
- Modtager Universal Audio
- Modtager Valueline
- Modtager Fender
- Modtager TIC
- Modtager Vision
- Modtager Majestic
- Modtager Zgemma
- Modtager MuxLab
- Modtager Panduit
- Modtager Morel
- Modtager Cerwin-Vega
- Modtager Axis
- Modtager Mackie
- Modtager Avalon
- Modtager Wavtech
- Modtager Xantech
- Modtager Reloop
- Modtager Crest Audio
- Modtager Oculus VR
- Modtager Lindell Audio
- Modtager Audio Limited
- Modtager ATen
- Modtager Shure
- Modtager Sangean
- Modtager Vimar
- Modtager Power Dynamics
- Modtager Rockford Fosgate
- Modtager Grace Design
- Modtager Smart-AVI
- Modtager Martin Logan
- Modtager Dahua Technology
- Modtager Fosi Audio
- Modtager Terratec
- Modtager Vivolink
- Modtager Phoenix Gold
- Modtager Memphis Audio
- Modtager Vonyx
- Modtager Scosche
- Modtager Speco Technologies
- Modtager Reely
- Modtager Boss
- Modtager Ibanez
- Modtager Nexa
- Modtager Klark Teknik
- Modtager StarTech.com
- Modtager S.M.S.L
- Modtager FBT
- Modtager InLine
- Modtager Focusrite
- Modtager Blackstar
- Modtager Crestron
- Modtager DAP-Audio
- Modtager Revel
- Modtager SPL
- Modtager Ground Zero
- Modtager Vincent
- Modtager Lindy
- Modtager GoGen
- Modtager Kogan
- Modtager Arcam
- Modtager Russound
- Modtager Audison
- Modtager Crown
- Modtager AVMATRIX
- Modtager Kanto
- Modtager Lumantek
- Modtager Elektrobock
- Modtager Rolls
- Modtager Cyrus
- Modtager Fusion
- Modtager Definitive Technology
- Modtager Kemo
- Modtager Delta Dore
- Modtager Insignia
- Modtager Adastra
- Modtager Lectrosonics
- Modtager Audac
- Modtager JETI
- Modtager Konig & Meyer
- Modtager FSR
- Modtager CYP
- Modtager Atlas Sound
- Modtager AKG
- Modtager AEA
- Modtager DiO
- Modtager AMX
- Modtager Homematic IP
- Modtager MXL
- Modtager August
- Modtager Xoro
- Modtager AudioControl
- Modtager Mooer
- Modtager Audiotec Fischer
- Modtager Bugera
- Modtager Audix
- Modtager Ibiza Sound
- Modtager Steren
- Modtager Ocean Matrix
- Modtager Comprehensive
- Modtager Orava
- Modtager Intelix
- Modtager Match
- Modtager Alfatron
- Modtager HiFi ROSE
- Modtager Classé
- Modtager Audioengine
- Modtager Musical Fidelity
- Modtager Advance Acoustic
- Modtager NuPrime
- Modtager REL Acoustics
- Modtager Artsound
- Modtager BZBGear
- Modtager Key Digital
- Modtager Ram Audio
- Modtager KanexPro
- Modtager Sonifex
- Modtager Gefen
- Modtager Cranborne Audio
- Modtager TV One
- Modtager Whirlwind
- Modtager Apantac
- Modtager Ferguson
- Modtager SRS
- Modtager Inovonics
- Modtager Blustream
- Modtager C2G
- Modtager WyreStorm
- Modtager Advance
- Modtager IFi Audio
- Modtager Cabasse
- Modtager DLS
- Modtager Ampeg
- Modtager Amplicom
- Modtager Amiko
- Modtager Hirschmann
- Modtager Palsonic
- Modtager Stinger
- Modtager Brigmton
- Modtager Sunstech
- Modtager Redline
- Modtager Marquant
- Modtager Matrox
- Modtager Mac Audio
- Modtager Denson
- Modtager Valcom
- Modtager Rocketfish
- Modtager Naxa
- Modtager Sherwood
- Modtager Conrad
- Modtager Zehnder
- Modtager Mx Onda
- Modtager Swissonic
- Modtager Pure Acoustics
- Modtager Iriver
- Modtager Lanzar
- Modtager Humax
- Modtager Pinnacle
- Modtager Graupner
- Modtager BOYA
- Modtager Integra
- Modtager Revox
- Modtager Comica
- Modtager Audient
- Modtager Hegel
- Modtager PAC
- Modtager Luxman
- Modtager Infinity
- Modtager Linn
- Modtager Monitor Audio
- Modtager Monoprice
- Modtager Aplic
- Modtager Axton
- Modtager Proel
- Modtager DB Technologies
- Modtager Neets
- Modtager OSD Audio
- Modtager Mark Levinson
- Modtager Soundstream
- Modtager Block
- Modtager PSB
- Modtager Formuler
- Modtager SVS
- Modtager LTC
- Modtager JB Systems
- Modtager Dreambox
- Modtager James
- Modtager HUMANTECHNIK
- Modtager SIIG
- Modtager PSSO
- Modtager Primare
- Modtager Kali Audio
- Modtager Wet Sounds
- Modtager Televés
- Modtager MTX Audio
- Modtager Astell&Kern
- Modtager Hughes & Kettner
- Modtager Manley
- Modtager MEE Audio
- Modtager Extron
- Modtager PureLink
- Modtager Ashly
- Modtager HEOS
- Modtager Legamaster
- Modtager Benchmark
- Modtager Madison
- Modtager Leviton
- Modtager Ebode
- Modtager Medeli
- Modtager Nubert
- Modtager Palmer
- Modtager Vocopro
- Modtager Xtrend
- Modtager Helix
- Modtager Winegard
- Modtager Laney
- Modtager Devialet
- Modtager Xsarius
- Modtager EA
- Modtager DirecTV
- Modtager Octagon
- Modtager GOgroove
- Modtager Avantree
- Modtager LYYT
- Modtager Antelope Audio
- Modtager CE Labs
- Modtager Pharos
- Modtager Accell
- Modtager Jolida
- Modtager Intertechno
- Modtager Shanling
- Modtager GigaBlue
- Modtager Black Hydra
- Modtager RetroSound
- Modtager Ecler
- Modtager Viscount
- Modtager Ashdown Engineering
- Modtager Synq
- Modtager Parasound
- Modtager Roswell
- Modtager Velodyne
- Modtager Epcom
- Modtager Sunfire
- Modtager Selfsat
- Modtager Skytronic
- Modtager Topp Pro
- Modtager Whistler
- Modtager ESX
- Modtager Karma
- Modtager Dimavery
- Modtager AMS Neve
- Modtager Powersoft
- Modtager LinksPoint
- Modtager Lotronic
- Modtager Esoteric
- Modtager Markbass
- Modtager IMG Stage Line
- Modtager Wireless Solution
- Modtager Aurel
- Modtager NUVO
- Modtager Phoenix Audio
- Modtager AVPro Edge
- Modtager Comtek
- Modtager Fishman
- Modtager Pyramid
- Modtager LEA
- Modtager Sound Ordnance
- Modtager Canyon
- Modtager FiveO
- Modtager Planet Audio
- Modtager SureCall
- Modtager Elipson
- Modtager Lyngdorf
- Modtager FoneStar
- Modtager Phonic
- Modtager Koda
- Modtager Atlona
- Modtager Hotone
- Modtager Trace Elliot
- Modtager Bang Olufsen
- Modtager JTS
- Modtager AER
- Modtager Dynavox
- Modtager Modelcraft
- Modtager Fontastic
- Modtager Simaudio
- Modtager Niles
- Modtager Knoll
- Modtager Aguilar
- Modtager Creek
- Modtager Mobile Crossing
- Modtager The T.amp
- Modtager DAP
- Modtager Krell
- Modtager Edwards Signaling
- Modtager ANKARO
- Modtager A-NeuVideo
- Modtager Bellari
- Modtager CAD Audio
- Modtager Polsen
- Modtager Triangle
- Modtager Lab Gruppen
- Modtager AmpliVox
- Modtager Audiofrog
- Modtager CyberData Systems
- Modtager Williams Sound
- Modtager SoundTube
- Modtager Glemm
- Modtager WesAudio
- Modtager AudioSource
- Modtager Stewart
- Modtager Leema
- Modtager Axing
- Modtager Seco-Larm
- Modtager Camille Bauer
- Modtager Mosconi
- Modtager Crest
- Modtager TechLogix Networx
- Modtager Audibax
- Modtager Meridian
- Modtager Quad
- Modtager BC Acoustique
- Modtager Gold Note
- Modtager IOTAVX
- Modtager Shinybow
- Modtager Rexing
- Modtager Inter-M
- Modtager Sinus Live
- Modtager Soundtrack
- Modtager Canor
- Modtager Unison Research
- Modtager Universal Remote Control
- Modtager BMB
- Modtager Inateck
- Modtager Cloud
- Modtager Taga Harmony
- Modtager Datapath
- Modtager Antelope
- Modtager PTN-electronics
- Modtager Clare Controls
- Modtager Loxjie
- Modtager Cayin
- Modtager Technical Pro
- Modtager VMV
- Modtager CSL
- Modtager DVDO
- Modtager Henry Engineering
- Modtager Line Magnetic
- Modtager ButtKicker
- Modtager Atoll
- Modtager SmartSystem
- Modtager Pearstone
- Modtager Streacom
Nyeste Modtager Manualer
29 Marts 2025
28 Marts 2025
20 Marts 2025
18 Marts 2025
13 Marts 2025
13 Marts 2025
13 Marts 2025
12 Marts 2025
12 Marts 2025
12 Marts 2025