High Performance Rechargeable AA Flashlight
MT2A Pro
(English) (Deutsch)Features
Accessories
Dimensions
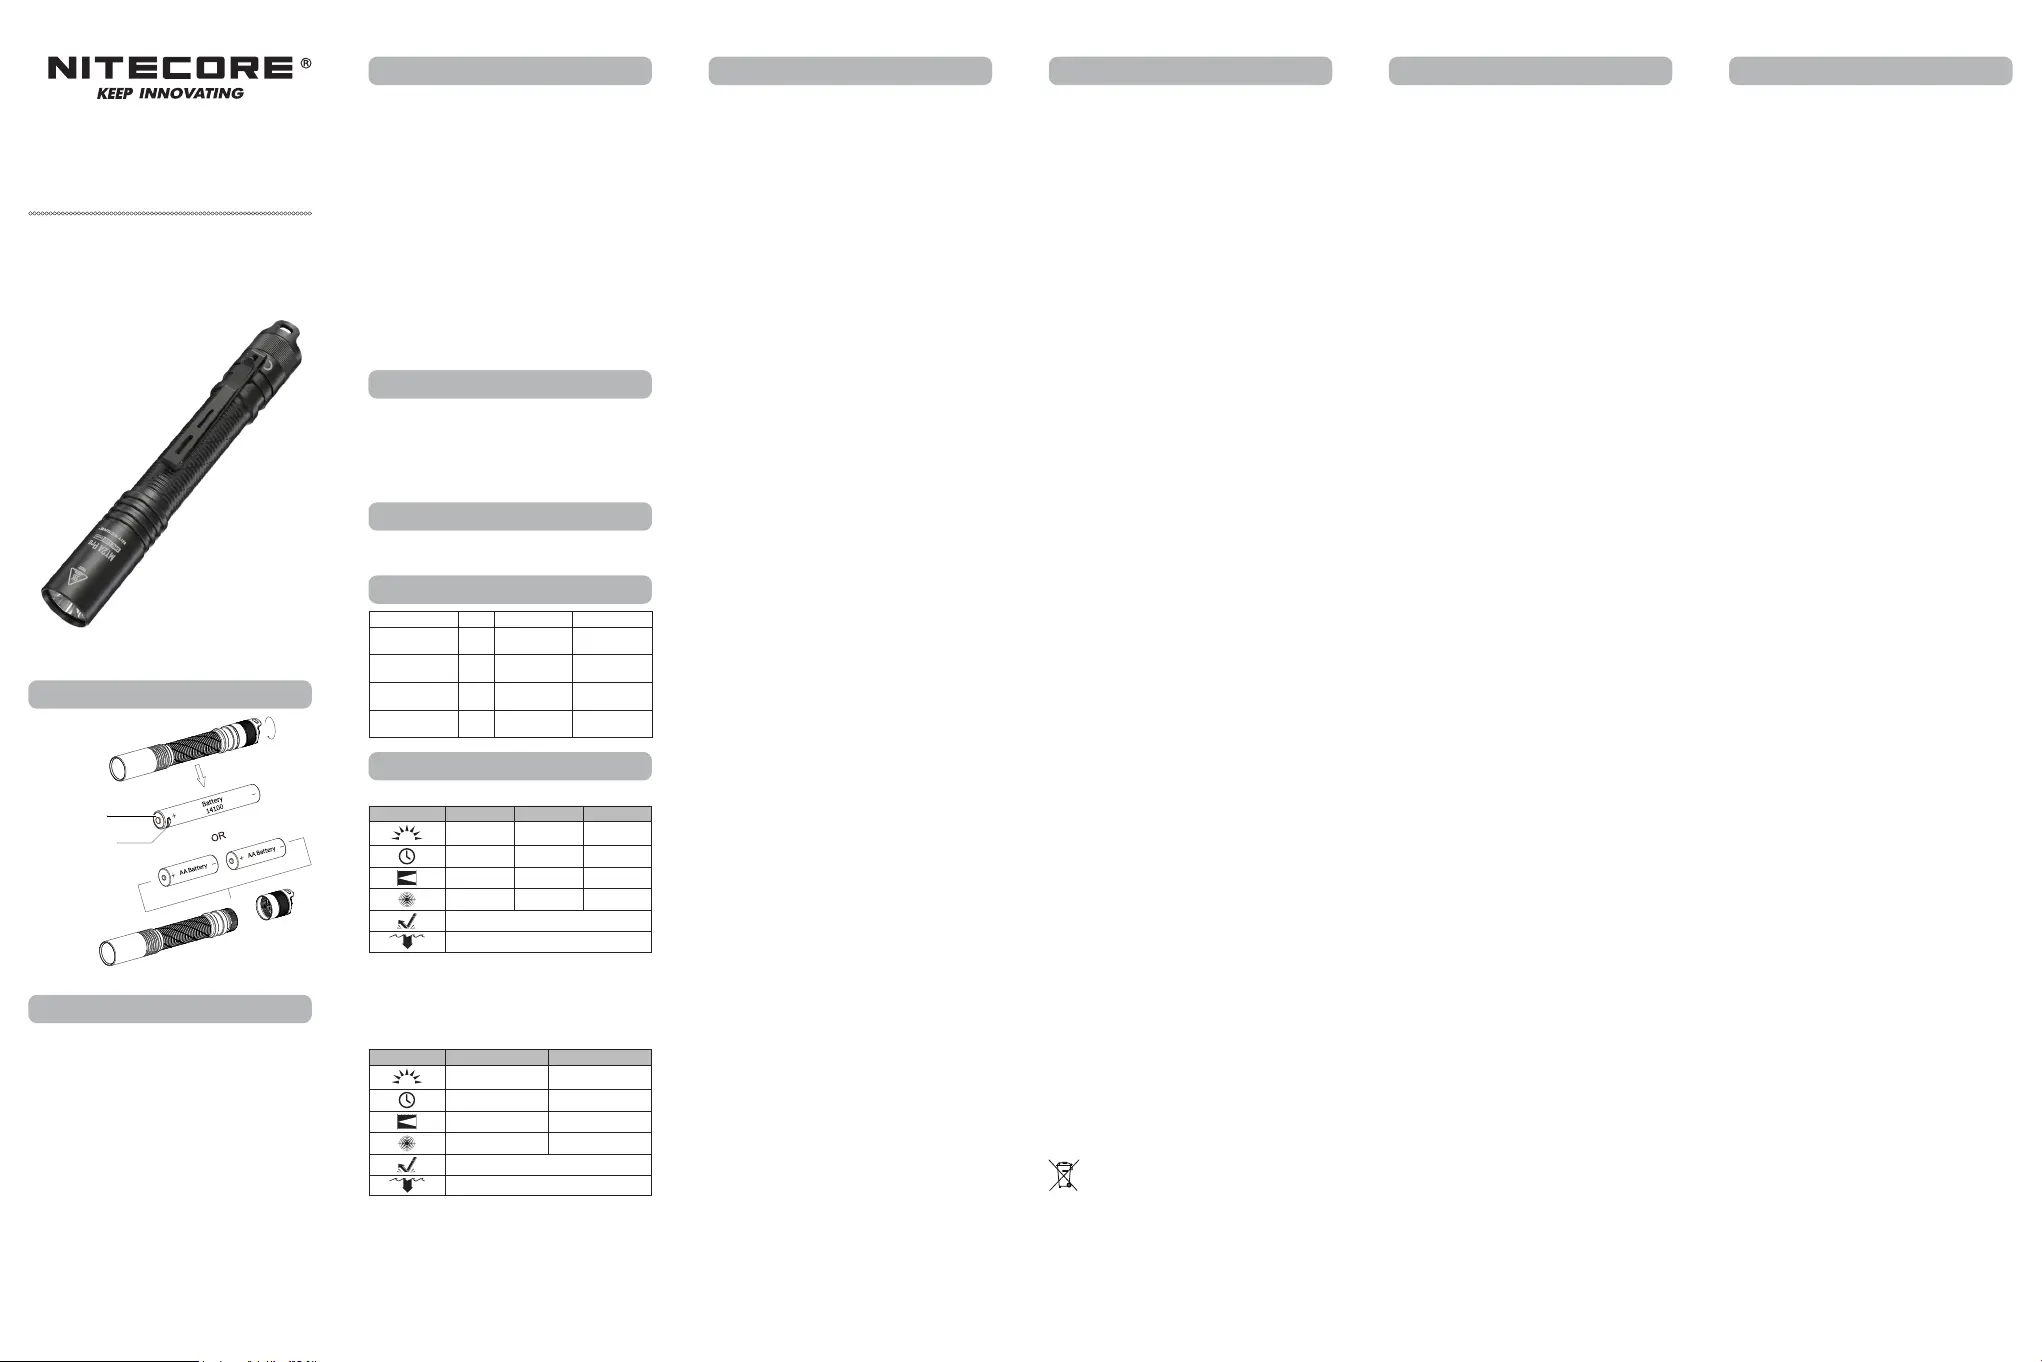
Battery Options
Technical Data
• Utilizes a UHi 20 LED with a max output of 1,000 lumens
• Max peak beam intensity of 16,500cd and max throw of 255
meters
• An optical system combined with crystal coating and
"Precision Digital Optics Technology" (PDOT)
• A single tail switch controls 3 brightness levels
• Powered by a 14100 Li-ion battery while compatible with AA
batteries, to provide a runtime up to 20 hours
• Includes a NITECORE 14100 Li-ion battery (NL1416R
1,600mAh) with a built-in USB-C charging port
• Highlyecientconstantcurrentcircuitprovidesastableoutput
• Incorporated Advanced Temperature Regulation (ATR)
module (Patent No. ZL201510534543.6)
• Electronic reverse polarity protection
• Optical lenses with double-sided scratch resistant coating
• Constructed from aero grade aluminum alloy
• HAIIImilitarygradehard-anodizednish
• Tail stand capability
• Two-way clip included
• Waterproof and dustproof rating in accordance with IP68 (2
meters submersible)
• Impact resistant to 1 meter
Length: 142.8mm (5.62")
Head Diameter: 19.7mm (0.78")
Tube Diameter: 17.2mm (0.68")
Tail Diameter: 19.5mm (0.77")
Weight: 40g (1.41 oz) (Battery Not Included)
NITECORE 14100 Rechargeable Li-ion Battery (NL1416R 1,600mAh),
USB-C Charging Cable, Clip, Lanyard, Spare O-ring
Using the NITECORE NL1416R Li-ion Battery:
FL1 STANDARD HIGH MID LOW
1,000 Lumens 300 Lumens 50 Lumens
1h 30min 2h 45min 20h
255m 148m 58m
16,500cd 5,500cd 846cd
1m
IP68, 2m (Waterproof and Submersible)
Note: The stated data is measured in accordance with the
internationalashlighttestingstandardsANSI/PLATOFL
1-2019, using 1 x 14100 Li-ion battery (1,600mAh) under
laboratory conditions. The data may vary in real world use due
todierentbatteryusageorenvironmentalconditions.
Using 2 x AA Batteries:
FL1 STANDARD MID LOW
500 Lumens 60 Lumens
2h 11h
188m 68m
8,890cd 1,170cd
1m
IP68, 2m (Waterproof and Submersible)
Note: The stated data is measured in accordance with the
internationalashlighttestingstandardsANSI/PLATOFL
1-2019, using 2 x AA alkaline batteries under laboratory
conditions.Thedatamayvaryinrealworlduseduetodierent
battery usage or environmental conditions.
* The HIGH Level cannot be activated when using AA batteries.
• Utilizes UHi 20 LED
• 1,000 Lumens Max Output
• Dual Power Sources
Charging the Battery
The included NL1416R rechargeable Li-ion battery is equipped with
a USB-C charging port. Please charge the battery before use.
Power Connection: Use the USB cable to connect an external
power supply (e.g. a USB adapter or other USB charging devices)
to the charging port to begin the charging process. The charging
timeisapprox.4hours.(Chargedviathe5V/1Aadapter)
Charging Indication: During the charging process, the red
charging indicator will turn on steadily. When the battery is fully
charged, the charging indicator will turn green steadily.
Battery Installation / Removal
Asillustrated,afterunscrewingthebatterycap,insert/remove
the battery(s) and screw to tighten the battery cap.
Warnings:
1. Make sure the battery(s) are inserted with the positive end
facing towards the head. The product will not work if the
battery(s) are incorrectly inserted.
2. When the power level is low, please stop using the product
and replace or recharge the battery to prevent damage.
3. If the product is stored in a backpack or left unused for
an extended period of time, please remove all batteries to
prevent accidental activation or battery leakage.
On / Off
On: Whenthelightiso,fullpresstheTailSwitchuntilaclick
sound is heard to turn it on
O: When the light is on, full press the Tail Switch until a click
soundisheardtoturnito.
Brightness Levels
When the light is on, half press the Tail Switch to cycle through
the following brightness levels: LOW – MID – HIGH.
The MT2A Pro has a memory function. When reactivated, it will
automatically access the previous memorized brightness level.
Battery Charging / Replacement
The battery should be charged or replaced when the output
appearstobedimortheashlightbecomesunresponsivedue
to low power.
ATR (Advanced Temperature Regulation)
The integrated ATR technology regulates the output of the
MT2A Pro according to the working condition and ambient
environment to maintain the optimal performance.
Warnings:
1.OnHIGHLevel(1,000lumens),theheadoftheashlight
will generate massive amount of heat. To avoid burns, it is
notrecommendedtoruntheashlightonHIGHLevelforan
extended period.
2. CAUTION! Possible dangerous radiation! Don't look into the
light! May be dangerous for your eyes.
3. DO NOT cover or place objects near the head of the product
to prevent accidents.
4. The product will generate massive heat during prolonged
operation. Please exercise caution when using it to avoid
potential burns.
5. DO NOT use 14500 batteries to avoid damage to the
ashlight.
6.Disposeofthedevice/batteriesinaccordancewithapplicable
local laws and regulations.
Maintenance
Every 6 months, threads should be wiped with a clean cloth
followed by a thin coating of silicon-based lubricant.
Bedienungsanleitung
Laden des Akkus
Der im Lieferumfang enthaltene Li-Ionen-Akku NL1416R ist mit
einem USB-C-Ladeanschluss ausgestattet. Bitte laden Sie den
Akku vor dem Gebrauch auf.
Stromanschluss
Verwenden Sie das USB-Kabel, um ein externes Netzteil (z.B.
einen USB-Adapter oder andere USB-Ladegeräte) an den
Ladeanschluss anzuschließen und den Ladevorgang zu starten.
Die Ladezeit beträgt ca. 4 Stunden. (Aufgeladen über einen
5V/1A-Adapter)
Anzeige des Ladevorgangs
Während des Ladevorgangs leuchtet die rote Ladeanzeige
konstant. Wenn der Akku vollständig geladen ist, leuchtet die
Ladeanzeige konstant grün.
Einsetzen / Entnehmen des Akkus
InstallierenSie/EntfernenSiedenAkku/dieAkkus-wie
dargestellt - und drehen Sie die Heckkappe fest.
HINWEIS:
1. Stellen Sie sicher, dass die Batterien korrekt eingesetzt sind.
Der positive Pol muss zum Kopfende zeigen. Die MT2A Pro
wird andernfalls nicht funktionieren.
2. Wenn der Energiepegel niedrig ist, verwenden Sie das
Produkt nicht mehr und tauschen Sie den Akku aus oder
laden Sie ihn auf, um Schäden zu vermeiden.
3. Wenn die Taschenlampe im Rucksack transportiert oder über
längereZeitgelagertwird,entnehmenSiebittedenAkku/
Batterie, um eine versehentliche Aktivierung oder Leckagen
zu vermeiden.
Ein-/Ausschalten
Einschalten: Wenn das Licht aus ist, drücken Sie den
Heckschalter, bis ein "Klick" zu hören ist.
Ausschalten: Wenn das Licht an ist, drücken Sie den
Heckschalter erneut, bis ein "Klick" zu hören ist.
Helligkeitseinstellungen
Wenn das Licht eingeschaltet ist, drücken Sie halb auf den
Heckschalter, um zwischen den folgenden Helligkeitsstufen zu
wechseln: „LOW“ – „MID“ – „HIGH“.
Die MT2A Pro verfügt über eine Speicherfunktion. Bei
erneuter Aktivierung wird automatisch die zuvor gespeicherte
Helligkeitsstufe aufgerufen.
Wechsel der Akkus/Batterien
Der Akku sollte aufgeladen oder die Batterie ersetzt werden,
wenn der Lichtschein dunkel erscheint oder die Taschenlampe
nicht mehr reagiert.
ATR (erweiterte Temperaturregulierung)
Mit dem "Advanced Temperature Regulation"-Modul
(ATR) regelt die MT2A Pro ihre Leistung entsprechend der
Umgebungstemperatur, um so die optimale Leistung zu erhalten.
Warnungen
1. Auf Stufe „HIGH“ (1000 Lumen) erzeugt der Kopf der
Taschenlampe eine enorme Hitze. Es wird empfohlen, die
Taschenlampe NICHT über einen längeren Zeitraum auf Stufe
„HIGH“ zu betreiben, um Verbrennungen zu vermeiden!
2. VORSICHT! Mögliche gefährliche Strahlung! Schauen Sie
nicht in das Licht! Dies kann gefährlich für Ihre Augen sein!
3. Decken Sie den Kopf des Geräts NICHT ab und platzieren Sie
keine Gegenstände in der Nähe, um Unfälle zu vermeiden.
4. Das Gerät erzeugt bei längerem Betrieb große Hitze. Bitte
seien Sie bei der Verwendung vorsichtig, um mögliche
Verbrennungen zu vermeiden.
5. Verwenden Sie KEINE Typ 14500 Batterien, um Schäden an
der Taschenlampe zu vermeiden.
6.EntsorgenSiedasGerät/dieBatterieninÜbereinstimmung
mit den geltenden örtlichen Gesetzen und Vorschriften.
Wartung
Alle 6 Monate sollte das Gewinde mit einem sauberen Tuch
abgewischt und anschließend mit einer dünnen Schicht
Silikonfett geschmiert werden.
Entsorgung von Elektro- und
Elektronikgeräten
Die durchgestrichene Mülltonne bedeutet, dass Sie
gesetzlichverpichtetsind,dieseGeräteeinervom
unsortierten Siedlungsabfall getrennten Erfassung
zuzuführen. Die Entsorgung über die Restmülltonne oder die
gelbe Tonne ist untersagt. Enthalten die Produkte Batterien
oder Akkus, die nicht fest verbaut sind, müssen diese vor der
Entsorgung entnommen und getrennt als Batterie entsorgt
werden.
Charger la batterie
La batterie rechargeable Li-ion NL1416R incluse est équipée
d'un port de charge USB-C. Veuillez charger la batterie avant de
l'utiliser.
Connexion électrique : Utilisez le câble USB pour connecter
une source d'alimentation externe (par exemple, un adaptateur
USB ou d'autres dispositifs de charge USB) au port de charge
pour commencer le processus de charge. Le temps de charge
estd'environ4heures.(Chargementvial'adaptateur5V/1A)
Indication de charge : Pendant le processus de charge,
l'indicateur de charge rouge s'allume en continu. Lorsque la
batterie est entièrement chargée, le témoin de charge devient
vert en continu.
Installation et retrait de la batterie
Comme illustré, après avoir dévissé le couvercle de la batterie,
insérez/retirezla/lesbatterie(s)etvissezpourserrerle
couvercle de la batterie.
Avertissements :
1. Assurez-vous que la ou les batteries sont insérées avec
l'extrémité positive orientée vers la tête. Le produit
ne fonctionnera pas si la ou les batteries ne sont pas
correctement insérées.
2. Lorsque le niveau de puissance est faible, arrêtez d'utiliser
leproduitetremplacezourechargezlabatterieand'éviter
tout dommage.
3. Si le produit est rangé dans un sac à dos ou inutilisé pendant
une période prolongée, veuillez retirer toutes les batteries
and'éviteruneactivationaccidentelleouunefuitedela
batterie.
On / Off
On: Lorsque la lumière est éteinte, pressez complètement
l'interrupteur de queue jusqu'à ce qu'un clic se fasse entendre
pour l'allumer.
O: Lorsque la lumière est allumée, pressez complètement
l'interrupteur de queue jusqu'à ce qu'un clic se fasse entendre
pour l'éteindre.
Niveaux de luminosité
Lorsque la lumière est allumée, appuyez à moitié sur
l'interrupteurdequeuepourfairedélerlesniveauxde
luminosité suivants : BAS - MOYEN - HAUT.
La MT2A Pro dispose d'une fonction de mémorisation.
Lorsqu'elle est réactivée, elle accède automatiquement au
niveau de luminosité précédemment mémorisé.
Chargement / Remplacement de la
batterie
La batterie doit être rechargée ou remplacée lorsque la sortie
semble être faible ou que la lampe de poche ne répond plus en
raison d'une faible puissance.
ATR (Régulation avancée de la
température)
La technologie ATR intégrée régule la puissance de la MT2A
Pro en fonction des conditions de travail et de l'environnement
ambiantandemaintenirdesperformancesoptimales.
Avertissements :
1. Au niveau HAUT (1 000 lumens), la tête de la lampe de
poche génère une énorme quantité de chaleur. Pour éviter
les brûlures, il n'est pas recommandé de faire fonctionner
la lampe de poche sur le niveau HAUT pendant une période
prolongée.
2. ATTENTION ! Risque de rayonnement dangereux ! Ne
regardez pas la lumière ! Peut être dangereux pour les yeux.
3. NE PAS couvrir ou placer d'objets près de la tête du produit
and'éviterlesaccidents.
4. Le produit génère une chaleur importante en cas de
fonctionnement prolongé. Veuillez faire preuve de prudence
lorsquevousl'utilisezand'éviterlesbrûlurespotentielles.
5. N'utilisez PAS de batteries 14500 pour éviter d'endommager
la lampe de poche.
6.Jetezl'appareil/lesbatteriesconformémentauxloiset
réglementations locales en vigueur.
Maintenance
Touslessixmois,leslsdoiventêtrenettoyésavecunchion
propre,puisenduitsd'unenecouchedelubriantàbasede
silicone.
Carica della batteria
La batteria ricaricabile agli ioni di litio NL1416R in dotazione
è dotata di una porta di ricarica USB-C. Si prega di caricare la
batteria prima dell'uso.
Collegamento all'alimentazione: Utilizzare il cavo USB per
collegare un alimentatore esterno (ad esempio un adattatore
USB o altri dispositivi di ricarica USB) alla porta di ricarica per
avviare il processo di ricarica. Il tempo di ricarica è di circa 4
ore.(Ricaricatramiteadattatore5V/1A)
Indicazione di carica: Durante il processo di carica,
l'indicatore di carica rosso si accende costantemente. Quando
la batteria è completamente carica, l'indicatore di carica diventa
verdesso.
Installazione/rimozione della batteria
Come illustrato, dopo aver svitato il tappo della batteria,
inserire/rimuoverelabatteria(olebatterie)eavvitareper
stringere il tappo della batteria.
Avvertenze:
1. Assicurarsi che le batterie siano inserite con l'estremità
positiva rivolta verso la testa. Il prodotto non funziona se le
batterie non sono inserite correttamente.
2. Quando il livello di potenza è basso, interrompere l'uso del
prodotto e sostituire o ricaricare la batteria per evitare danni.
3. Se il prodotto viene riposto in uno zaino o lasciato inutilizzato
per un periodo di tempo prolungato, rimuovere tutte le
batterie per evitare un'attivazione accidentale o una perdita
di batteria.
Accensione e Spegnimento
Accensione: Quando la luce è spenta, premere a fondo
l'interruttoredicodanoasentireunclicperaccenderla.
Spegnimento: quando la luce è accesa, premere a fondo
l'interruttoredicodanchénonsisenteunclicperspegnerla.
Livelli di luminosità
Quando la luce è accesa, premere a metà l'interruttore di coda
per scorrere i seguenti livelli di luminosità: LOW – MID - HIGH.
L'MT2A Pro è dotata di una funzione di memoria. Quando viene
riattivata, accede automaticamente al precedente livello di
luminosità memorizzato.
Ricarica e sostituzione della batteria
La batteria deve essere caricata o sostituita quando l'uscita
appare debole o la torcia non risponde a causa della scarsa
potenza.
ATR (regolazione avanzata della
temperatura)
La tecnologia ATR integrata regola l'uscita dell'MT2A Pro in
base alle condizioni di lavoro e all'ambiente circostante per
mantenere le prestazioni ottimali.
Avvertenze:
1. Al livello HIGH (1.000 lumen), la testa della torcia genera
un'enorme quantità di calore. Per evitare ustioni, si consiglia
di non far funzionare la torcia a livello HIGH per un periodo
prolungato.
2. ATTENZIONE! Possibili radiazioni pericolose! Non guardare la
luce! Può essere pericoloso per gli occhi.
3. Per evitare incidenti, NON coprire o collocare oggetti vicino
alla testa del prodotto.
4. Il prodotto genera un forte calore durante il funzionamento
prolungato. Si prega di prestare attenzione durante l'uso per
evitare potenziali ustioni.
5. NON utilizzare assolutamente batterie di tipo 14500 per
evitare di danneggiare la torcia.
6.Smaltireildispositivo/batterieinconformitàalleleggiealle
normative locali vigenti.
Manutenzione
Ogni6mesi,lelettaturedevonoesserepuliteconunpanno
pulitoepoipassateconunsottilestratodilubricanteabasedi
silicone.
(Francais) (Italiano)
Warranty Service
Battery Installation / Removal
All NITECORE
®
productsarewarrantedforquality.AnyDOA/
defective product can be exchanged for a replacement through
alocaldistributor/dealerwithin15daysofpurchase.After
that,alldefective/malfunctioningNITECORE
®
products can
be repaired free of charge within 60 months from the date
of purchase. Beyond 60 months, a limited warranty applies,
covering the cost of labor and maintenance, but not the cost of
accessories or replacement parts.
Thewarrantywillbenulliedif
1.theproduct(s)is/arebrokendown,reconstructedand/or
modiedbyunauthorizedparties;
2.theproduct(s)is/aredamagedduetoimproperuse.(e.g.
reversed polarity installation)
3.theproduct(s)is/aredamagedduetobatteryleakage.
For the latest information on NITECORE
®
products and services,
please contact a local NITECORE
®
distributor or send an email
to service@nitecore.com
※Allimages,textandstatementsspeciedhereinthis
user manual are for reference purpose only. Should any
discrepancy occur between this manual and information
speciedonwww.nitecore.com,SysmaxInnovationsCo.,
Ltd. reserves the rights to interpret and amend the content
of this document at any time without prior notice.
Type Nominal Voltage Compatibility
Primary AA
Lithium Battery
AA 1.5V
Y
(Recommended)
Primary AA
Alkaline Battery
AA 1.5V
Y
(Recommended)
Rechargeable AA
Battery
AA 1.2V
Y
(Recommended)
Rechargeable
Li-ion Battery
14500 3.7V
N
(Incompatible)
Charging Indicator
USB-C Charging Port


