Kodak i5200V Manual
Læs nedenfor 📖 manual på dansk for Kodak i5200V (79 sider) i kategorien Scanner. Denne guide var nyttig for 9 personer og blev bedømt med 4.5 stjerner i gennemsnit af 2 brugere
Side 1/79


Safety
User Precautions
• Place the desktop scanner on a sturdy, level work surface capable of supporting 57.6 kg (127 lbs) and leave adequate
clearance on all sides of the scanner.
• When relocating the desktop scanner, it is recommended that two people lift the scanner and use safe lifting techniques.
• Do not install the scanner in a location subject to dust, humidity or steam. This may cause electrical shock or a fire. Only use
the scanner indoors in a dry location.
• Make sure the electrical power outlet is located within 1.52 meters (5 feet) of the scanner and is easily accessible.
• When disconnecting equipment from the electric socket, be sure to grasp the plug, not the cord.
• Be sure the power cord is securely plugged into the wall outlet.
• Do not damage, knot, cut or modify the power cord or use a damaged power cord.
• The scanner requires a dedicated and properly grounded power outlet. Do not use an extension cord or power strip with the
scanner.
• Leave sufficient space around the power outlet so it can be easily unplugged in case of an emergency.
• Do not use the scanner if it becomes inordinately hot, has a strange odor, emits smoke, or makes unfamiliar noises.
Immediately stop the scanner and disconnect the power cord from the power outlet. Contact Kodak Service.
• Do not disassemble, service or modify the scanner except as explained in the User’s Guide.
• Do not move the scanner with the power cord and interface cable attached. This may cause damage to the cord/cable.
Remove the power cord from the wall outlet before moving or relocating the scanner.
• Follow the Kodak recommended cleaning procedures. Do not use air, liquid or gas spray cleaners. These cleaners displace
dust, dirt and debris to other locations within the scanner, which may cause the scanner to malfunction.
• Material Safety Data Sheets (MSDS) for chemical products are available on the Kodak website at: www.kodak.com/go/msds.
When accessing the MSDSs from the website, you will be required to provide the catalog number or keyword of the
consumable you want the Material Safety Data Sheet for. See the section entitled, “Supplies and consumables” later in this
guide for supplies and catalog numbers.
Users and their employers need to observe the common sense precautions applicable to the operation of any machinery. These
include, but are not limited to, the following:
• Do not wear loose clothing, unbuttoned sleeves, etc.
• Do not wear loose jewelry, bracelets, bulky rings, long necklaces, etc.
• Hair length should be kept short, using a hair net if needed, or tying long hair up in a bundle.
• Remove all other loose objects from the area that could be drawn into the machine.
• Take sufficient breaks to maintain mental alertness.
• Use only the recommended cleaning supplies.
• Do not use canned/compressed air.
Supervisors should review their employee practices and make compliance with these precautions a part of the job description
for operation of the scanner or any mechanical device.
Warning labels
CAUTION: Moving parts, avoid contact.
CAUTION: Hot surface, avoid contact.
Environmental information
• The Kodak i5000 Series Scanners are designed to meet worldwide environmental requirements.
• Guidelines are available for the disposal of consumable items that are replaced during maintenance or service; follow local
regulations or contact Kodak locally for more information.
• For recycling or reuse information, contact your local authorities, or in the USA, go to www.kodak.com/go/recycle.
• The product packaging is recyclable.
•Kodak i5000 Series Scanners are Energy Star compliant and shipped from the factory with the default time set to 15 minutes.
Battery Information
This product contains a battery that is not user-serviceable. This battery can only be removed or replaced by a
qualified Service Engineer.
European Union
This symbol indicates that when the last user wishes to discard this product, it must be sent to appropriate
facilities for recovery and recycling. Please contact your local Kodak representative or refer to www.kodak.com/
go/recycle for additional information on the collection and recovery programs available for this product.
Please consult www.kodak.com/go/REACH for information about the presence of substances included on the
candidate list according to article 59(1) of Regulation (EC) No. 1907/2006 (REACH).
Acoustic emission
Maschinenlärminformationsverordnung – 3, GSGV
Der arbeitsplatzbezogene Emissionswert beträgt <70 dB(A).
[Machine Noise Information Ordinance — 3, GSGV
The operator-position noise emission value is <70 dB(A).]
EMC statements - for Kodak i5200/i5600/i5200V/i5600V Scanners
United States: This equipment has been tested and found to comply with the limits for a Class B digital device pursuant to Part
15 of the FCC rules. These limits are designed to provide reasonable protection against harmful interference in a residential
installation. This equipment generates, uses, and can radiate radio frequency energy and, if not installed and used in
accordance with the instruction manual, may cause harmful interference to radio communications. However, there is no
guarantee that interference will not occur in a particular installation. If this equipment does cause harmful interference to radio or
television reception, which can be determined by turning the equipment off and on, the user is encouraged to try to correct the
interference by one or more of the following measures:
• Reorient or relocate the receiving antenna.
• Increase the separation between the equipment and receiver.
• Connect the equipment into an outlet on a circuit different from that to which the receiver is connected.
• Consult the dealer or an experienced radio/TV technician for additional suggestions.
Any changes or modifications not expressly approved by the party responsible for compliance could void the user’s authority to
operate the equipment. Where shielded interface cables have been provided with the product or specified additional
components or accessories elsewhere defined to be used with the installation of the product, they must be used in order to
ensure compliance with FCC regulation.
Korea: As this equipment has obtained EMC registration for household use, it can be used in an area including residential
areas.
Japan: This is a Class B product based on the standard of the Voluntary Control Council for interference by information
Technology Equipment (VCCI). If this is used near a radio or television receiver in a domestic environment, it may cause radio
interference. Install and use the equipment according to the instruction manual.
EMC statements - for the Kodak i5800 Scanner

United States: This equipment has been tested and found to comply with the limits for a Class A digital device pursuant to Part
15 of the FCC rules. These limits are designed to provide reasonable protection against harmful interference when the
equipment is operated in a commercial environment. This equipment generates, uses, and can radiate radio frequency energy
and, if not installed and used in accordance with the instruction manual, may cause harmful interference to radio
communications. Operation of this equipment in a residential area is likely to cause harmful interference in which case the user
will be required to correct the interference at his own expense.
European Union: WARNING: This is a Class A product. In a domestic environment this product may cause radio interference
in which case the user may be required to take adequate measures.
Japan: This is a Class A product based on the standard of the Voluntary Control Council for interference by information
Technology Equipment (VCCI). If this is used in a domestic environment, radio disturbance may arise. When such trouble
occurs, the user may be required to take corrective actions.
Taiwan: WARNING: This is a Class A product. In a domestic environment this product may cause radio interference in which
case the user may be required to take adequate measures.
Peoples Republic of China: WARNING: This is a Class A product. In a domestic environment this product may cause radio
interference in which case the user may be required to take adequate measures.
Korea: Please note that this equipment has obtained EMC registration for commercial use. In the event that it has been
mistakenly sold or purchased, please exchange it for equipment certified for home use.
声明,该
声明,该
声明,该
声明,该声明,该产
产
产
产产
此为 级产品,在生活环境中品可能会造成无线电干扰。在这种情况下,可能需要A
用户对其干扰采取切实可行的措施

OVERVIEW 1-1
INSTALLATION 2-1
SCANNING 3-1
DOCUMENT PRINTING 4-1
MAINTENANCE 5-1
TROUBLESHOOTING 6-1
APPENDICES

A-61670 December 2011 1-1
1 Overview
Contents Supporting documentation ......................................................................... 1-2
Accessories................................................................................................ 1-2
What’s in the box........................................................................................ 1-3
Scanner components ................................................................................. 1-4
Front view: all models ............................................................................ 1-4
Front view: i5800 Scanner ..................................................................... 1-6
Printer access view: all models .............................................................. 1-7
Inside view: all models ........................................................................... 1-8
Rear view: i5200/i5600/i5200V/i5600V Scanners .................................. 1-9
Rear view: i5800 Scanner .................................................................... 1-10
The Kodak i5000 Series Scanners include the following models:
Kodak i5200 Scanner — desktop duplex color scanner that scans up to 140
pages per minute (200/300 dpi, black and white/color/grayscale, landscape
orientation) A4 size documents with Kodak Perfect Page technology.
Kodak i5600 Scanner — desktop duplex color scanner that scans up to 170
pages per minute (200/300 dpi, black and white/color/grayscale, landscape
orientation) A4 size documents with Kodak Perfect Page technology.
Kodak i5200V Scanner — desktop duplex color scanner that scans up to 140
pages per minute (200/300 dpi, black and white/color/grayscale, landscape
orientation) A4 size documents, with Kofax VRS® Professional with built-in
CGA hardware.
Kodak i5600V Scanner — desktop duplex color scanner that scans up to 170
pages per minute (200/300 dpi, black and white/color/grayscale, landscape
orientation) A4 size documents, with Kofax VRS® Professional with built-in
CGA hardware.
Kodak i5800 Scanner — floor-standing duplex color scanner that scans up to
210 pages per minute (200/300 dpi, black and white/color/grayscale,
landscape orientation) A4 size documents with Kodak Perfect Page
technology.
This User’s Guide provides information and procedures for using and
maintaining the Kodak i5000 Series Scanners. The information in this guide is
for use with all models unless otherwise noted.
NOTES:
• Most of the illustrations in this guide show the Kodak i5200/i5600 Scanner.
•Kodak i5200V/i5600V Scanners are intended to work with Kofax VRS
enabled applications. Kodak Perfect Page technology is not supported on
these models.
VRS is a registered trademark of Kofax.

1-2 A-61670 December 2011
Supporting
documentation
In addition to this User’s Guide, the following documentation is also available:
•Installation Guide — provides a step-by-step procedure for installing the
scanner.
•Scanning Setup Guides — the TWAIN Datasource and ISIS Driver are
included with the Kodak i5000 Series Scanner. VRS is included with the
Kodak i5200V/ i5600V Scanners only. Each Scanning Setup Guide explains
how to use basic image processing features. All Scanning Setup Guides are
provided on the Installation CD in PDF format and are also available to
download from the website: www.kodak.com/go/docimaging and
www.kodak.com/go/scanners.
• Reference Guide — provides easy visual steps for cleaning your scanner.
Keep this guide close to the scanner so you can use it as an easy reference.
Accessories Kodak Enhanced Printer Accessory — the Kodak Enhanced Printer
Accessory provides an effective way to apply information to the scanned
document. It operates at full scanner speed. The printer can add a date, time,
document sequential counter and custom messages. See Chapter 4,
Document Printing for more information. CAT No. 140 8756
Kodak Manual Feeder — when the need arises to manually feed documents,
the Manual Feeder provides a flat work surface to aid in single-sheet feeding.
The Manual Feeder can be easily installed and removed. The Kodak Manual
Feeder comes with the shelf and two side guides which can be adjusted to the
desired position for scanning.
• For i5200/i5600/i5200V/i5600V Scanners: CAT No. 167 3953
• For i5800 Scanner: CAT No. 169 4256
Document Extenders — document extenders are available for scanning
documents longer than 43.2 cm (17 inches). These extenders are available in
66.04 cm, 76.2 cm and 86.36 cm (26-, 30-, and 34-inch) lengths. See
“Supplies and Consumables” in Chapter 5 for catalog numbers.
Kodak Feeder Kit for Ultra-Lightweight Paper — allows you to feed
lightweight paper from a paper weight range of 25 g/m2 to 75 g/m2
(7 to 20 lbs). The Kodak Feeder Kit for Ultra-Lightweight Paper includes a feed
module and separation roller that are specially designed to feed light-weight
paper through the scanner transport. CAT No. 844 5280

A-61670 December 2011 1-3
What’s in the box Before you begin open the box and check the contents:
Kodak i5200, i5600, i5200V or i5600V Scanner
• Output tray
• Short document adapter
• USB 2.0 cable
• AC power cord bundle
• Replacement tires and pre-separation pads
• Welcome Folio which includes:
- Installation CD
- Application CDs
- Warranty/Registration sheets
- Printed User’s Guide, English
- Printed Reference Guide (multi-languages)
- Printed Installation Guide
- Sample Cleaning Kit
- Service & Support Contact Information sheets
- Miscellaneous flyers/Safety sheets
NOTE: The purchase of a Kodak i5800 Scanner includes unpacking and
installation by a Kodak Service Representative. Customers should not
unpack/install the Kodak i5800 Scanner. For more information
regarding installation of the i5800 Scanner, go to: www.kodak.com/go/
dicontacts.

A-61670 December 2011 1-5
10 Start/Resume button — press to start or resume scanning.
11 Stop/Pause button — press once to temporarily pause scanning (the
Start/Resume button can then be used to resume scanning). Press twice
to stop scanning.
12 Input Elevator side guides — slide the guides in or out to accommodate
the document size you want to scan. Side guides can be left-, center- and
right-adjusted to accommodate documents of various widths. The side
guides can also be locked into position if desired.
Fold the side guides down when you want to close the input elevator
when the scanner is not in use.
13 Input Elevator — holds up to 750 documents (20 lb./75 g/m2) in place.
The input elevator can be set to accommodate stacks of 25-, 100-, 250-,
500- or 750 documents. The input elevator can be folded up when it is not
in use.
14 Input Elevator extender — pull this extender out to accommodate
documents longer than 35.6 cm (14 inches).
15 Print location indicators — if you are using the Enhanced Printer
Accessory, use the detents at the edge of the input elevator as a visual
guide to see where the printing position will be on the document.
16 Gap release toggle switch (i5200/i5600/i5200V/i5600V Scanners) —
push the “+“ button to increase the space between the feed module and
separation roller for documents that require special handling.
NOTE: The gap release toggle switch is located in a different position on
the i5800 Scanner. See the next section, “Front view: i5800
Scanner” for more information.
16
10
11
1213
14
15
1-6 A-61670 December 2011
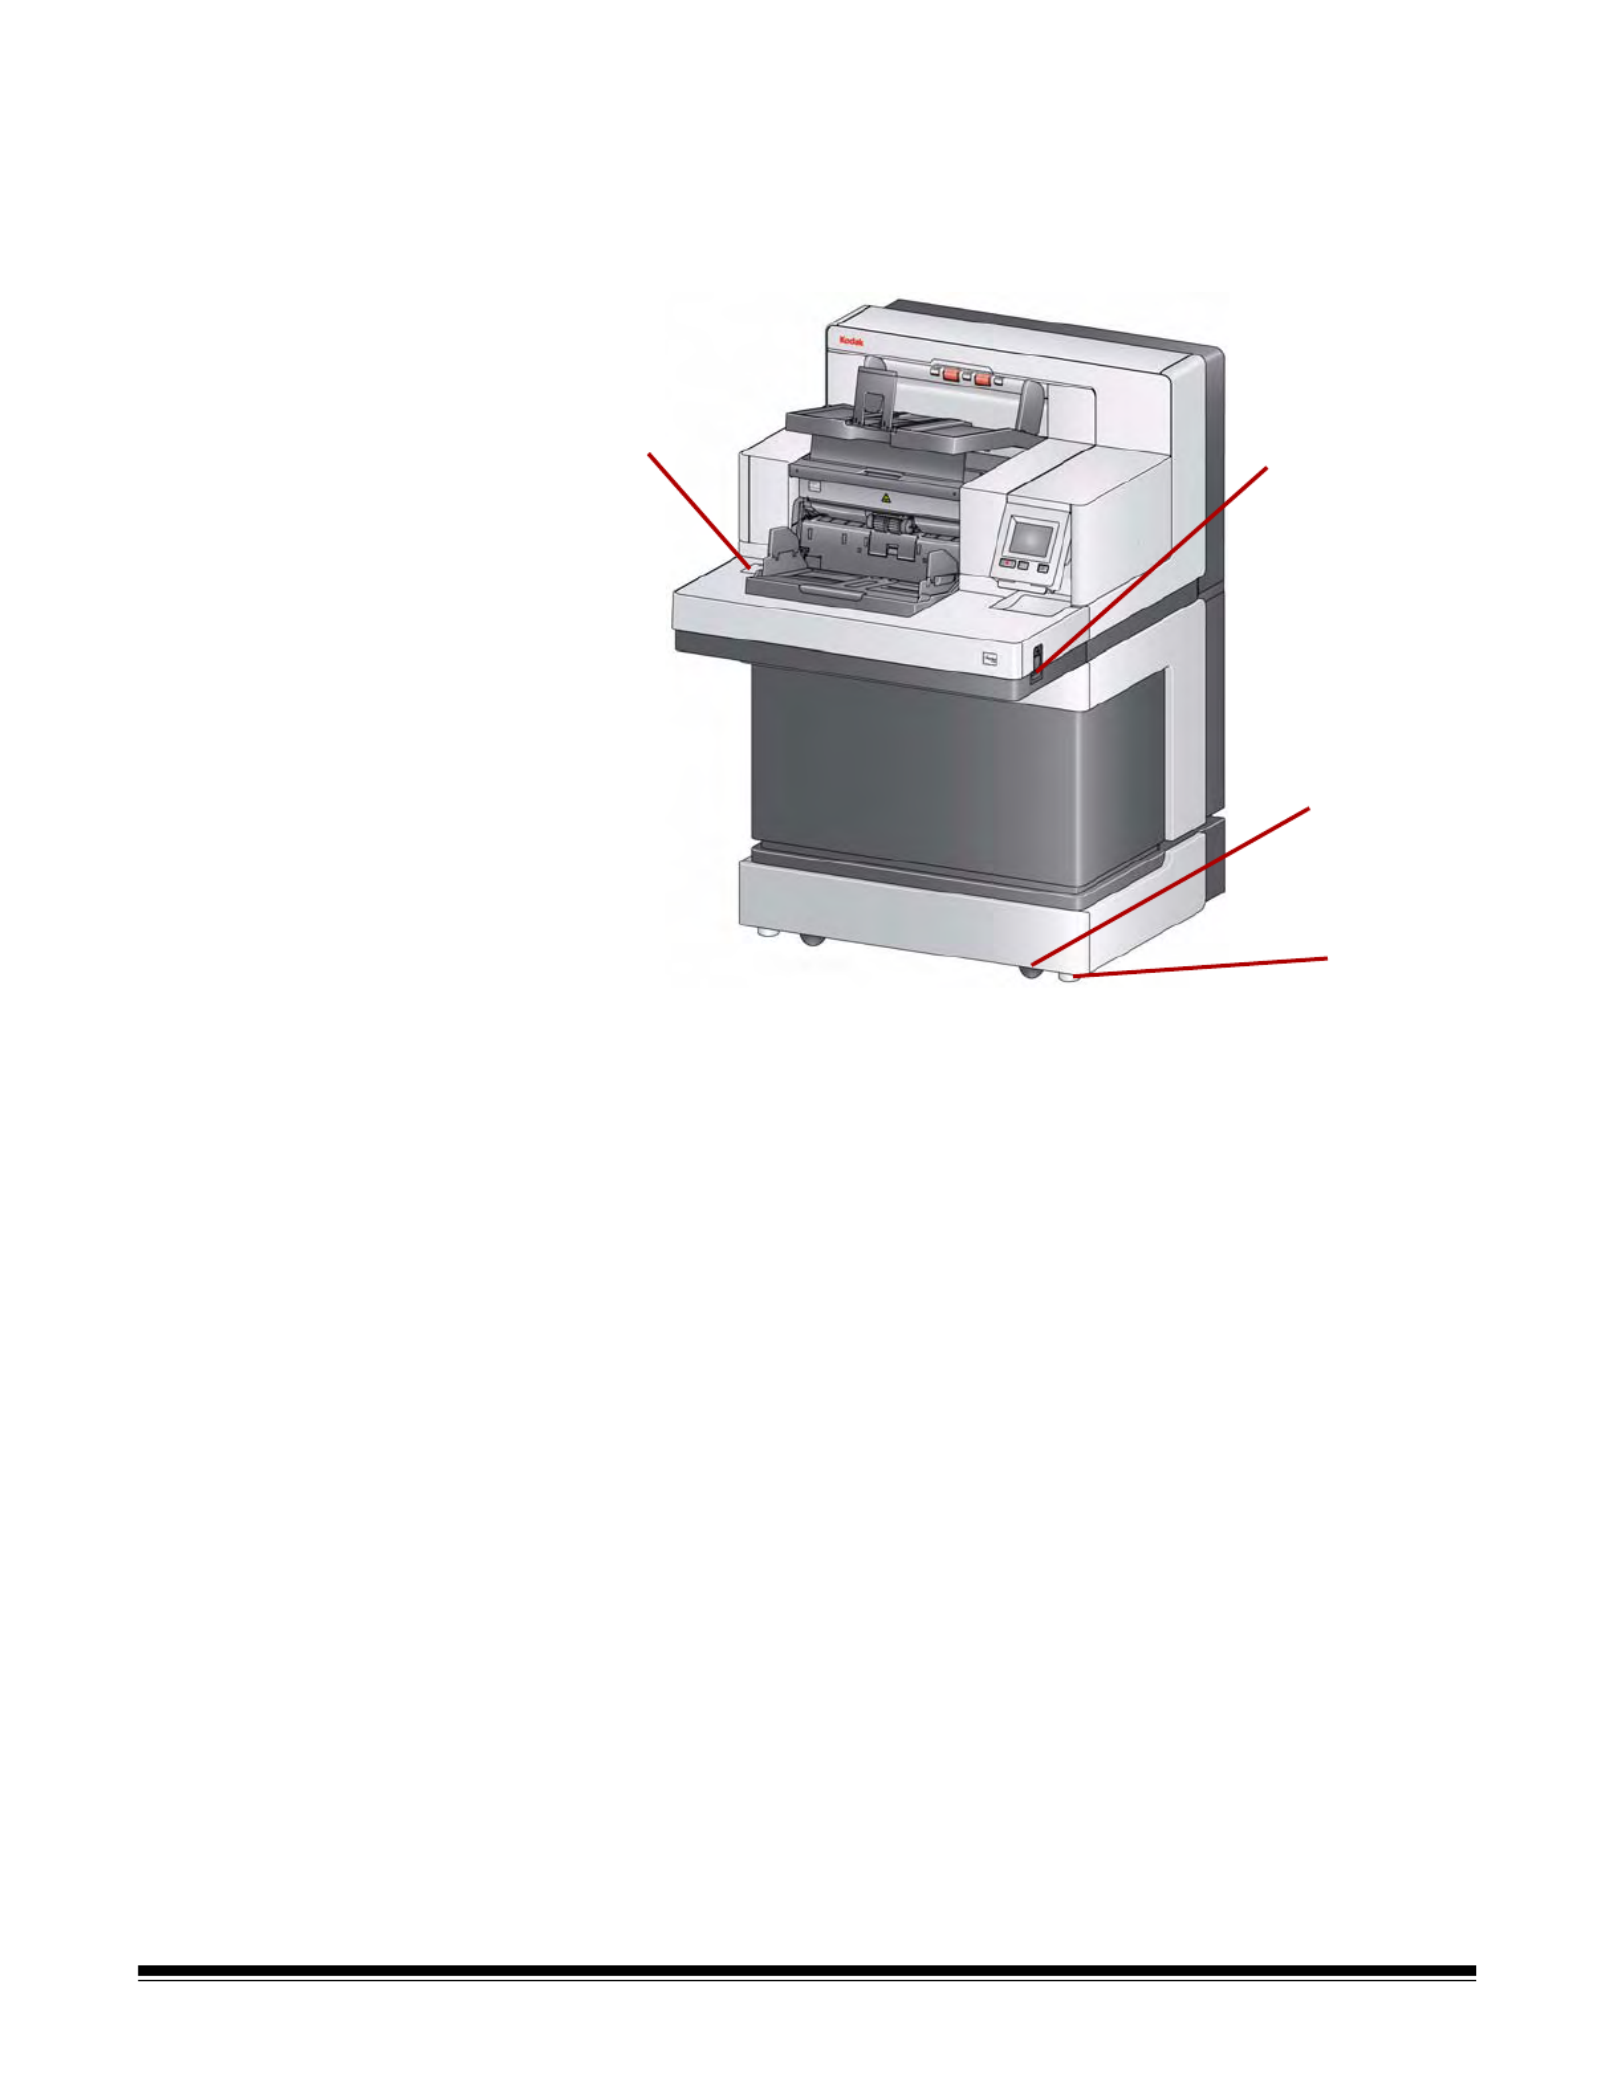
Front view: i5800 Scanner In addition to the components listed previously, the Kodak i5800 Scanner also
has a workspace height adjustment switch which is used to raise and lower the
workspace table on the scanner. The workspace table can be raised or
lowered approximately 10 inches up or down.
There are four castors and four leveling feet on the bottom of the scanner. If
you need to move the scanner, the leveling feet must be raised. Contact your
Kodak Service Representative before attempting to relocate the scanner.
Height adjustment
switch
Leveling
Gap release
toggle switch
feet
Castors

A-61670 December 2011 1-7
Printer access view: all
models
Even if you do not have the Kodak Enhanced Printer Accessory, you will still
need to access this area of the scanner. The feed module release knob is
located in this area.
1 Feed module release knob — turn this knob to release the feed module
from it’s position for cleaning or replacing. Turn the arrow to right to
disengage the feed module.
The following components are only present if the Enhanced Printer Accessory
is installed.
2 Enhanced Printer carrier/cartridge — allows front printing on
documents.
3 Printer cable — this cable connects directly to the printer carrier to allow
communication to the Enhanced Printer.
4 Print positions — 13 print positions are available.
3
2
4
1

1-8 A-61670 December 2011
Inside view: all models When you pull the scanner cover release latch forward to open the scanner
cover, the following internal components are visible.
1 Separation roller and pad — provides smooth document feeding and
separation of various sizes, thicknesses and textures of documents.
2 Black/White background — using your scanning application, this
background can be changed to White or Black. Under normal scanning
conditions you would use the black background. If you are scanning
lightweight or thin paper with printing on one side, you can use the white
background to help eliminate bleed-through in the final image. See the
Scanning Setup Guide - TWAIN Datasource/ISIS Driver for more
information.
NOTE: VRS does not support scanning with a white background.
3 Imaging guides — keep imaging guides clean to obtain optimum image
quality.
4 Rollers — provides smooth transport of documents through the scanner.
5 Feed module — provides smooth document feeding and separation of
various sizes, thicknesses and textures of documents.
6 Sensors — these five ultrasonic sensors cover the width of the paper
path which aid in detecting multifed documents.
7 Ink blotter channels and ink blotters (located underneath the drainage
strip) — the ink blotters which are placed in these channels, collect ink
residue from the optional Enhanced Printer Accessory.
8 Paper present sensor — detects the presence of documents in the input
elevator. Documents must be covering this sensor in order for the
scanner to begin scanning.
1
2
3
3
2
4
5
6
7
8

A-61670 December 2011 1-9
Rear view: i5200/i5600/
i5200V/i5600V Scanners
1 Security lock port — connects a security lock to the scanner. You can
purchase a standard security lock at an office supply store. Refer to the
instructions provided with the security lock for installation procedures.
2 USB port — connects the scanner to the PC.
3 Power port — connects the power cord to the scanner.
4 Main power switch — this switch must be On (I) to activate the power to
the scanner.
4
123

1-10 A-61670 December 2011
Rear view: i5800 Scanner
1 Storage pocket — provides a convenient and easy-access area for
storing consumables and documentation.
2 USB port — connects the scanner to the PC.
3 Main power switch — this switch must be On (I) to activate the power to
the scanner.
4 Power port — connects the power cord to the scanner.
1
2
3
4

A-61651 December 2011 2-1
2 Installation
Contents Installing the scanner ................................................................................. 2-1
Installing the Kodak Driver Software ..................................................... 2-1
Attaching the output tray........................................................................ 2-3
Connecting the power cord and USB cable: i5200/i5600/
i5200V/i5600V Scanners ..................................................................... 2-3
Connecting the power cord and USB cable: i5800 Scanner ................. 2-4
Turning the scanner on .............................................................................. 2-5
Power modes ............................................................................................. 2-7
If desired, Kodak Professional Services provides professional installation and
user training. Contact your local Kodak service organization for more details.
www.kodak.com/go/disupport.
The following installation procedures are for the Kodak i5200/i5600/i5200V/
i5600V Scanners. Installation by a Kodak Service Representative is included
with the purchase of a Kodak i5800 Scanner.
Installing the scanner This section provides detailed information supporting the Installation Guide
that is provided with your scanner. Follow these steps in the order they are
provided to install your scanner.
NOTES:
• Before you begin, verify that your host PC meets the system requirements
that are provided in Appendix A, Specifications.
• If you have already performed all of the steps in the Installation Guide, skip
this section.
• Updated drivers may be available at www.Kodak.com/go/scanners.
Installing the Kodak Driver
Software
Do not install the USB cable before installing the Kodak Driver Software.
NOTE: If you are installing a Kodak i5200/i5600 Scanner, the TWAIN
Datasource, ISIS Driver and Scan Validation Tool will be installed.
If you are installing a Kodak i5200V/ i5600V Scanner, VRS, the TWAIN
Datasource and Scan Validation Tool will be installed.
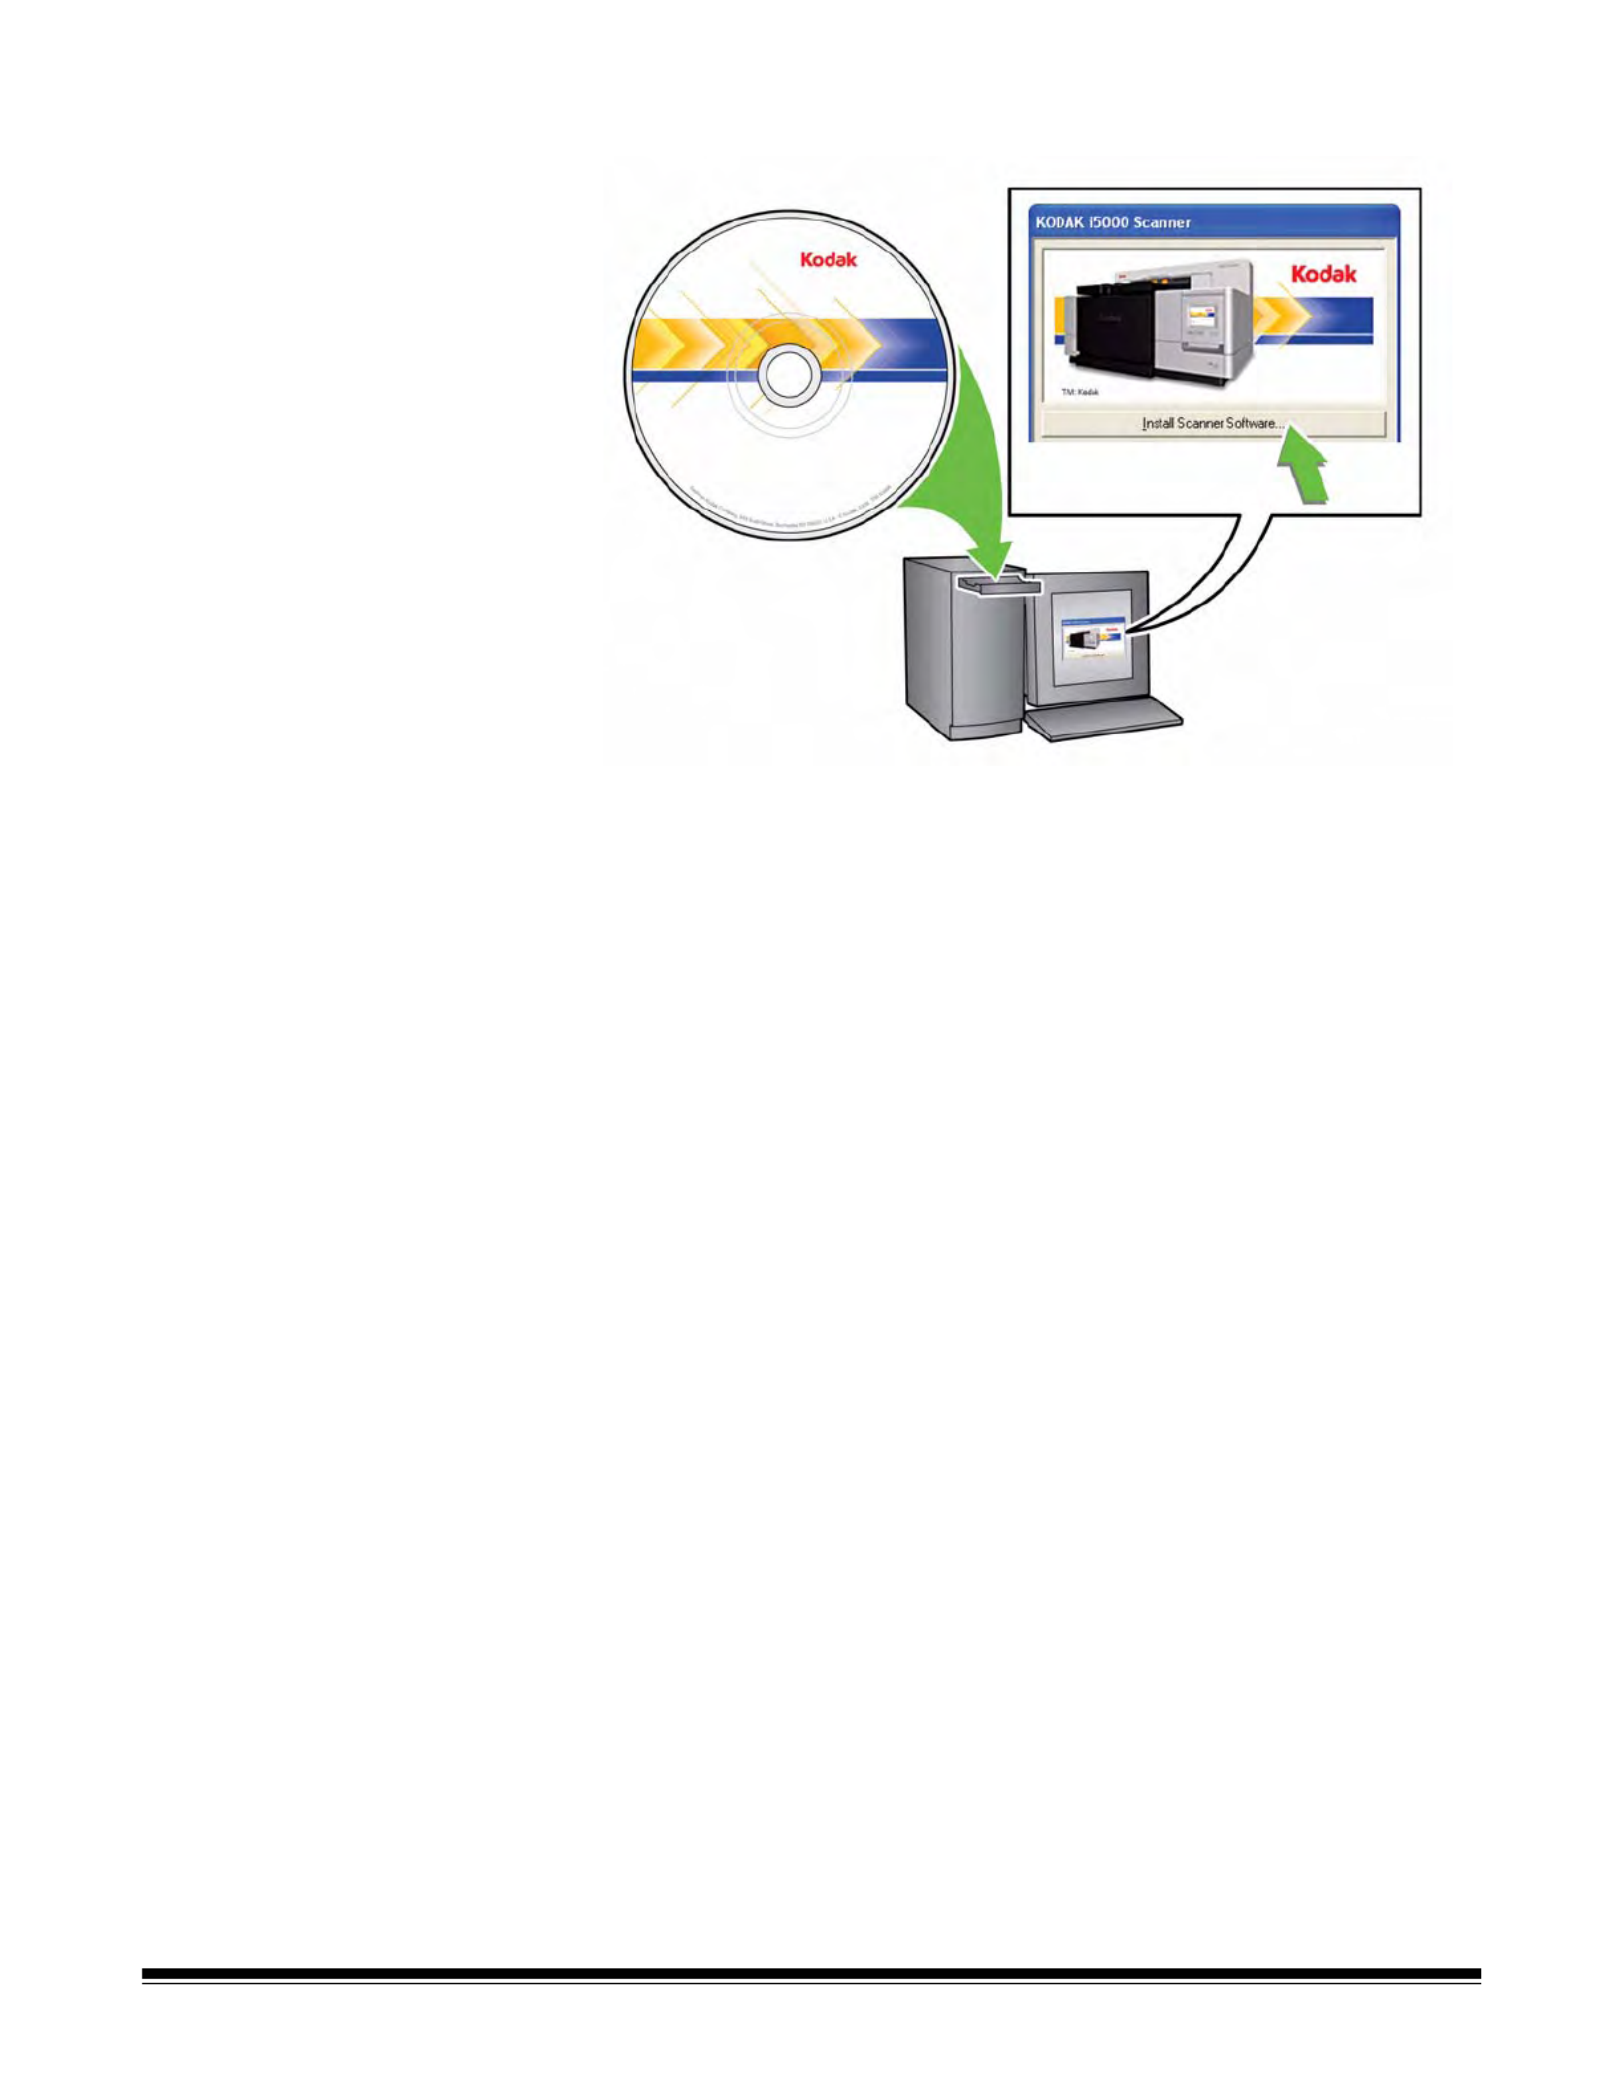
1. Insert the Kodak i5000 or i5000V Series Scanners Installation CD in the
CD-ROM drive. The installation program starts automatically.
2-2 A-61670 December 2011
2. Select Install Scanner Software.
NOTES:
• If the CD does not start automatically, open the My Computer icon on
your desktop. Double-click the icon indicating your CD-ROM drive, then
double-click on setup.exe.
• If the message, Portions of this application are already installed is
displayed, click Yes to continue the installation process. Any previously
installed Kodak Scanner software that is shared with this scanner will be
updated.
3. Click Next when the Kodak software Welcome screen is displayed.
4. Click I Agree after you have read and agreed with the terms of the
Software License Agreement. The installation will start and several
progress screens will be displayed.
• If applicable, click Next when the Kofax VRS Welcome screen is
displayed.
NOTE: If you are installing VRS, you will be asked to read and agree to
the VRS Software License Agreement the first time the VRS
software is run.
5. Click Finish when the installation is complete.
6. Remove the Installation CD from the CD-ROM drive.
2-4 A-61670 December 2011
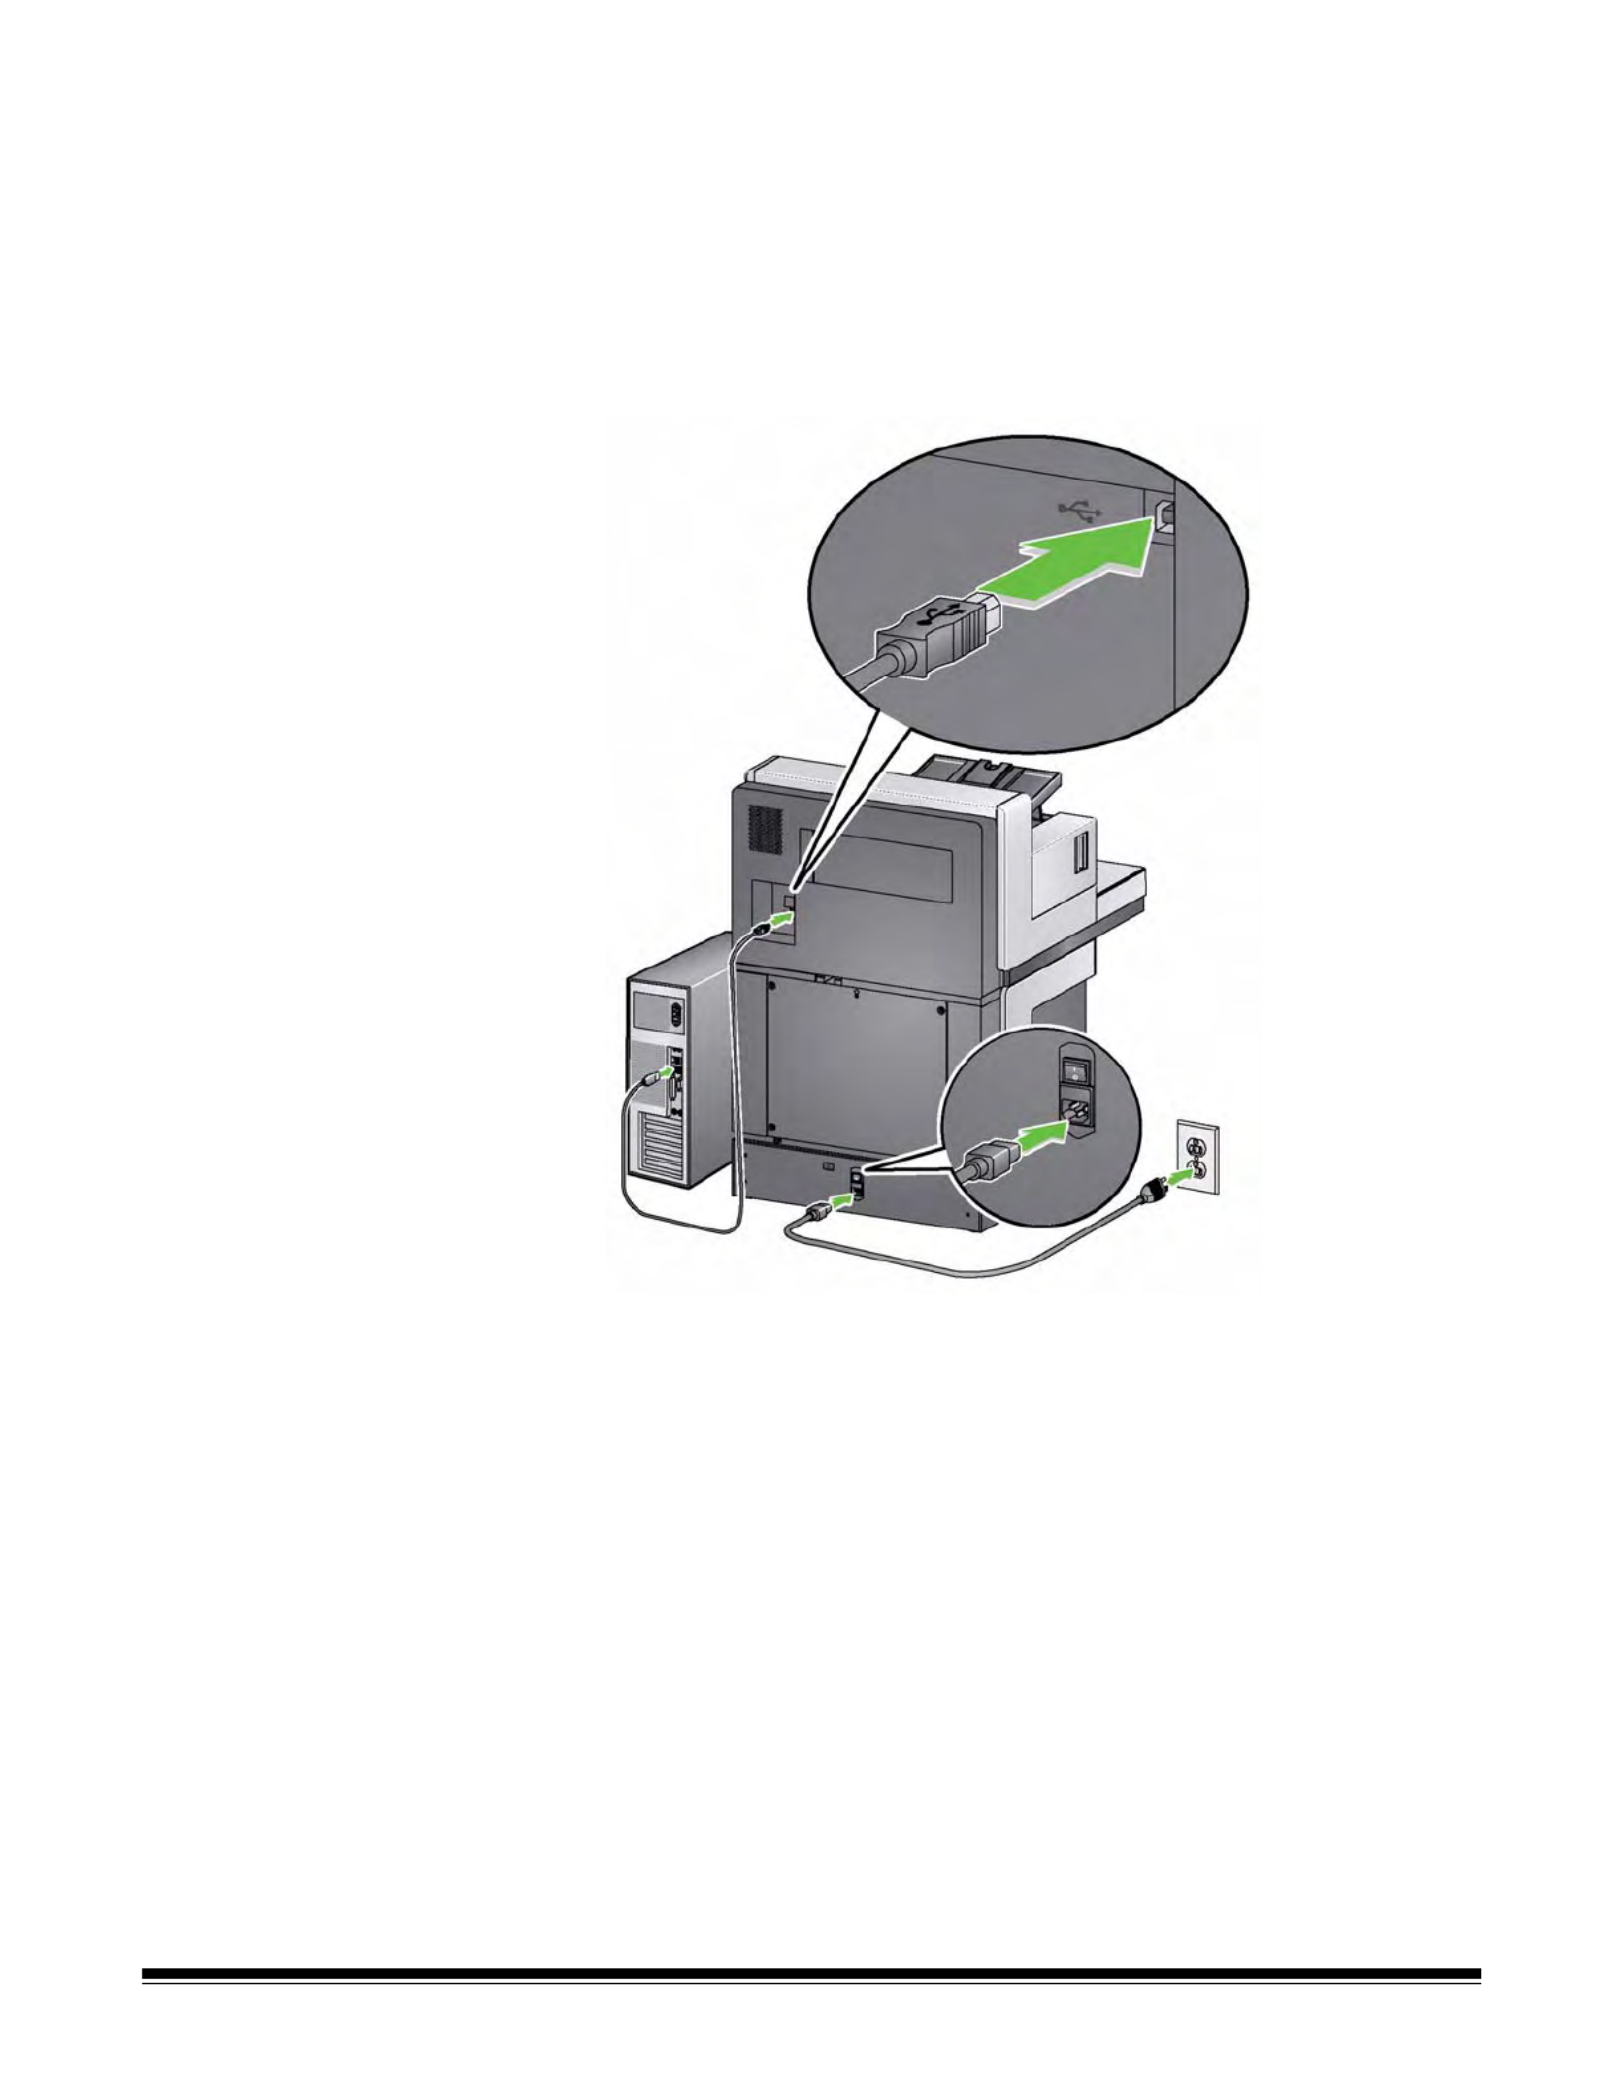
Connecting the power cord
and USB cable: i5800
Scanner
After the drivers have been installed, connect the power cord and USB cable
to the scanner. Refer to the illustration below for making proper connections.
Make sure the power outlet is located within 1.52 meters (5 feet) of the
scanner and is easily accessible.
1. Select the appropriate AC power cord for your region from the supply of
power cords packed with your scanner.
2. Plug the output power cord into the power port on the scanner. Be sure it is
securely attached.
3. Plug the other end of the power cord into the wall outlet.
4. Attach the USB cable to the scanner USB port.
5. Attach the other end of the USB cable to the proper USB port on your PC.

A-61651 December 2011 2-5
Turning the scanner
on
1. Press the main power switch on the back of the scanner to the On (I)
position. The LED on the front of the scanner will be a steady yellow and
the Operator Control Panel will be blank (this is low power mode).
NOTE: If there is paper in the input elevator, the scanner will
automatically go to the Ready mode.
NOTES:
• It is not necessary to turn the main power switch off unless you are not
going to use the scanner for a prolonged period of time, you are
performing maintenance, you are going to move the scanner or are
directed to turn the power off by Kodak Service.
•For the Kodak i5800 Scanner only: There are four leveling feet on the
bottom of the scanner. If you need to move the scanner, these leveling
feet must be raised. Contact your Kodak Service Representative before
attempting to relocate the scanner.
• Damages incurred when moving a scanner will not be covered by the
Equipment Service Agreement. Kodak Professional Services provide
relocation services. Go to www.kodak.com/go/dicontacts for more
information.
i5200/i5600
Scanners
i5800
Scanner
i5200V/i5600V

2-6 A-61670 December 2011
2. Press the Power button on the front of the scanner. The Power button LED
will temporarily go off and the Operator Control Panel will remain blank.
After a few seconds the initialization screen will be displayed, and the
Power LED will be a steady yellow.
During the initialization process, if the scanner input elevator is closed, it
will automatically open. When the scanner goes to the Ready mode, the
Power LED will turn a steady green, the scanner sound an alert and the
Idle screen will be displayed.

A-61670 December 2011 3-1
3 Scanning
Contents Getting your scanner ready to scan ........................................................... 3-1
Adjusting the input elevator .................................................................... 3-2
Installing the optional document extender.............................................. 3-4
Adjusting the output tray ........................................................................ 3-4
Installing the short document adapter .................................................... 3-6
Adjusting the height of the scanner (i5800 Scanner only)...................... 3-6
Getting your documents ready to scan ...................................................... 3-7
Scanning documents.................................................................................. 3-8
Pausing and resuming scanning ............................................................ 3-9
Scan job overrides ................................................................................. 3-9
Using the Operator Control Panel touchscreen ....................................... 3-13
Idle screen............................................................................................ 3-13
Lowering the elevator ....................................................................... 3-14
Viewing the Operator Log................................................................. 3-14
Viewing scanner information ............................................................ 3-15
Clearing the paper path.................................................................... 3-15
Diagnostics ....................................................................................... 3-15
Settings screen .................................................................................... 3-20
Changing the alarm volume.............................................................. 3-21
Selecting the sound.......................................................................... 3-21
Selecting a language........................................................................ 3-22
Units ................................................................................................. 3-22
User Counter .................................................................................... 3-23
Auto Raise........................................................................................ 3-23
Getting your scanner
ready to scan
1. Be sure the scanner is on and in Ready mode (Power button LED is green
and constant).
2. Adjust the input elevator to meet your scanning needs. See the next
section entitled, “Adjusting the input elevator” for more information.
3. Adjust the output tray to meet your scanning needs. See the section
entitled, “Adjusting the output tray” in Chapter 2 for more information.
4. Select your scanning application.
NOTE: The illustrations in this section show the i5200/i5600/i5200V/i5600V
Scanner. All adjustments are the same for the i5800 Scanner unless
otherwise noted.

3-2 A-61670 December 2011
Adjusting the input
elevator
You can adjust the side guides and input elevator height to accommodate your
scanning needs. When the scanner is not in use, the input elevator can be
folded up against the scanner.
NOTE: The input elevator must be in the lowest position and the elevator side
guides must be folded down before closing it.
•Adjusting the side guides — the side guides can be adjusted for right-
edge, left-edge or center feeding. The side guides can be moved together
for center feeding or independently for offset feeding (right-edge or left-
edge). Before moving the side guides, be sure the locking switch is not in
the locked position (see below).
NOTE: When using the optional Enhanced Printer, documents should be
placed in the input elevator in a manner that will align the print
string in the proper location. See Chapter 4, Document Printing for
more information.
• Locking the side guides — side guides may be locked into position after
they are adjusted. This may be helpful when the placement of a print string
is important.
To lock the side guides remove any documents from the input elevator and
move the lock switch to the left (the locked position).
A-61670 December 2011 3-3
•Adjusting the height of the input elevator — the input elevator can be set
to accommodate stacks of 25 or less, 100-, 250-, 500- or 750-documents of
20 lb./75 g/m2 bond paper. Input elevator settings are made through your
scanning application software (i.e., TWAIN Datasource, ISIS Driver or VRS).
If the input elevator is set to ADF mode (using the TWAIN Datasource or the
ISIS Driver), or the Feed Source is set to Manual (VRS), then the input
elevator will remain in the up position (i.e., 25 documents or less). When set
to more than 25, the input elevator will automatically raise to feed
documents and lower after the last document in your stack has been fed.
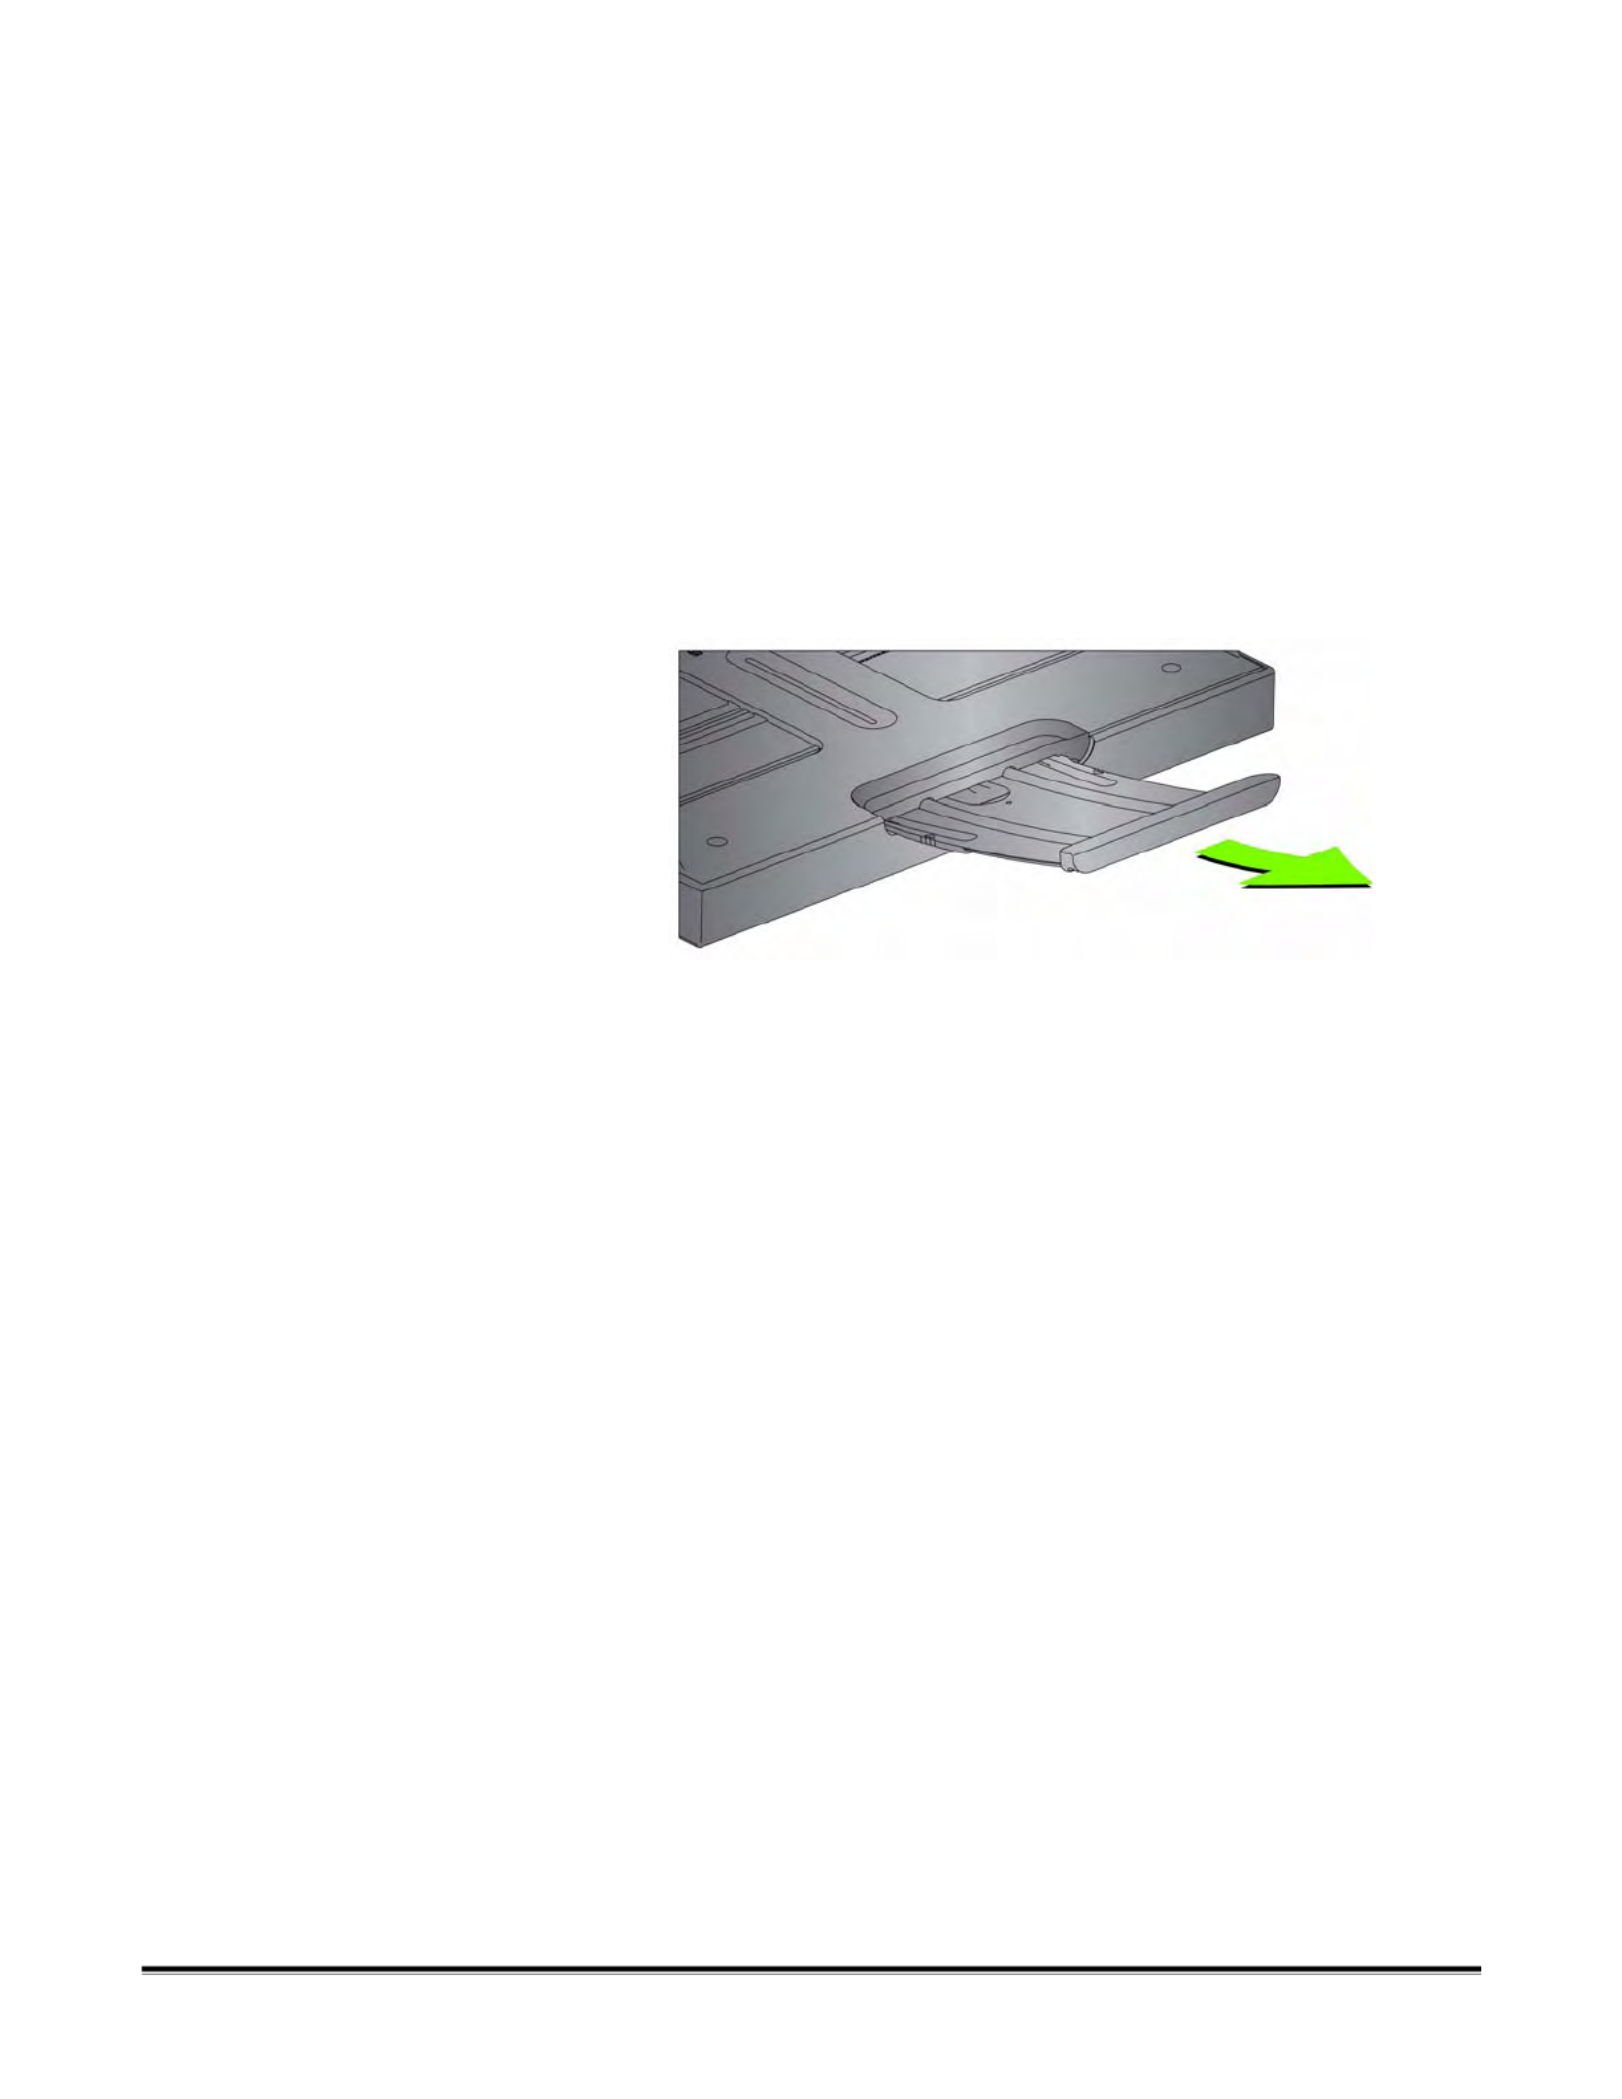
• Adjusting the input elevator
-Document lengths up to 35.6 cm (14 inches) — no adjustments are
required.
-Document lengths from 35.6 to 43.2 cm (14 to 17 inches) — slowly pull
out the document extender.
- To push the extender back into place, position your fingers on the sides of
the extender (at the arrows on the extender) and squeeze and slide the
extender back into place.
NOTES:
• Operator assistance may be required for scanning documents greater
than 43.2 cm (17 inches).
• If you are scanning documents longer than 43.2 cm (17 inches), the
scanning application must be set to accommodate these long
documents. Be sure to verify that the Maximum Length option on the
Device-General tab (TWAIN Datasource) or the Longest Document
option on the Scanner tab (ISIS Driver) is set to slightly longer than the
longest document being scanned. Setting a length longer than needed
may impact throughput.
•For i5200V and i5600V Scanners: these scanners have a set
maximum Document Length of 40 inches; therefore, no adjustment is
necessary.
• It is recommended that you use a document extender if you are
scanning documents longer than 43.2 cm (17 inches). Three sizes of
document extenders are available for scanning documents from
43.2 cm (17 inches) to 86.36 cm (34 inches). See the section entitled,
“Supplies and Consumables” in Chapter 5 for ordering information.
•Document weights — the maximum document weight for the input
elevator is the approximate weight of a 500-sheet ream of A3 (11 x 17-
inch) paper or a 750-sheet ream of A4 (8.5 x 11) paper. If you are
scanning documents larger than A3 (11 x 17-inch), the recommended
weight capacity should not exceed 4.5 kg (10 pounds). If the documents
you are scanning are larger than A3 (11 x 17-inch), scan less than 100
sheets at a time.

3-4 A-61670 December 2011
Installing the optional
document extender
• Insert the ends of the document extender into the holes on the input elevator
and the output tray and lower the extender into position.
Adjusting the output tray Various document handling settings are available to adjust the way that
documents are placed into the output tray (via the TWAIN Datasource, ISIS
Driver or VRS). The highest throughput can be obtained by scanning
documents of similar size using the output tray side guides and end stop with
Normal document handling.
Other document handling options are available for better handling when
scanning documents of varying size and thickness.
•Adjusting the angle of the output tray — it is strongly recommended that
you scan documents with the angle of the output tray in the “up” position to
achieve best stacking performance. Just lift the front of the output tray and
the height adjustment tab will release from underneath the output tray.
To lower the output tray, gently push the height adjustment tab underneath
the output tray while lowering the output tray on to the printer access cover.

A-61670 December 2011 3-5
•Adjusting the side guides and document stop — the side guides and
document stop can be adjusted in a variety of ways. Open and adjust the
side guides on the output tray to match the position of the side guides on the
input elevator. The side guides can also be folded flat against the output
tray.
Adjust the output tray document stop to slightly longer than the longest
document being fed. If you are scanning documents longer than the output
tray will accommodate, fold the document stop flat on the output tray.

3-6 A-61670 December 2011
Installing the short
document adapter
The short document adapter can be used when scanning small documents
(i.e., checks). This adapter aids in better document stacking.
1. Open the document stop on the output tray as shown in the illustration.
2. Slide the short document adapter over the document stop and push it all
the way down.
3. Adjust the sides guides if necessary.
Adjusting the height of the
scanner (i5800 Scanner
only)
The workspace table can be raised approximately 25.4 cm (10 in.) from its
lowest position for your comfort when you are sitting or standing at the
scanner. When you are raising or lowering the workspace table, be sure that
there is nothing close to the scanner that would interfere with the upward and
downward movement (e.g., chair, table, etc.).
• Press the upper portion of the button on the side of the scanner to raise to
workspace table.
• Press the lower portion of the button on the side of the scanner to lower the
workspace table.
If the workspace table will not move up or down from its position, check the
following:
• Be sure the workspace table is not already in its highest or lowest position.
• Be sure the scanner is on and is not in Low Power mode.

A-61670 December 2011 3-7
Getting your
documents ready to
scan
• Standard paper-size documents feed easily through the scanner. When
organizing your documents for scanning, stack the documents so the lead
edges are aligned and centered in the input elevator. This allows the feeder
to introduce documents into the scanner one at a time.
• Remove all staples and paper clips before scanning. Staples and paper
clips on documents may damage the scanner and documents.
• All inks and correction fluids on the paper must be dry before scanning is
started.
• Torn, damaged or crushed pages can be transported successfully through
the scanner. However, no scanner can transport every possible type of
damaged paper. If in doubt about whether a specific damaged document
can be transported through the scanner, place the document in a clear
protective sleeve. Sleeves should be manually fed, one at a time, folded
edge first, using the gap release toggle switch.
• Some very thick and/or stiff documents; such as shipping envelopes, may
require the following:
- Use of the gap release toggle switch.
- Removal of the pre-separation pad.
- Use the Fragile, Thick, Thin settings for Document Handling, which will
reduce transport speed.
3-8 A-61670 December 2011
Scanning documents The scanner must be enabled to scan documents. This is done through the
scanning application. After enabling the scanner, depending on how your
scanner is configured, your scanner will either automatically start scanning
(i.e., auto start), or will start scanning when you touch the Start/Resume
button on the scanner. For more inform cumentation that ation, see the do
supports your scanning application.
1. After you prepare your documents according to the guidelines in the
previous section, be sure your scan job is set up in your scanning
application as desired.
2. Place the documents you want to scan in the input elevator.
3. Start scanning via your scanning application.
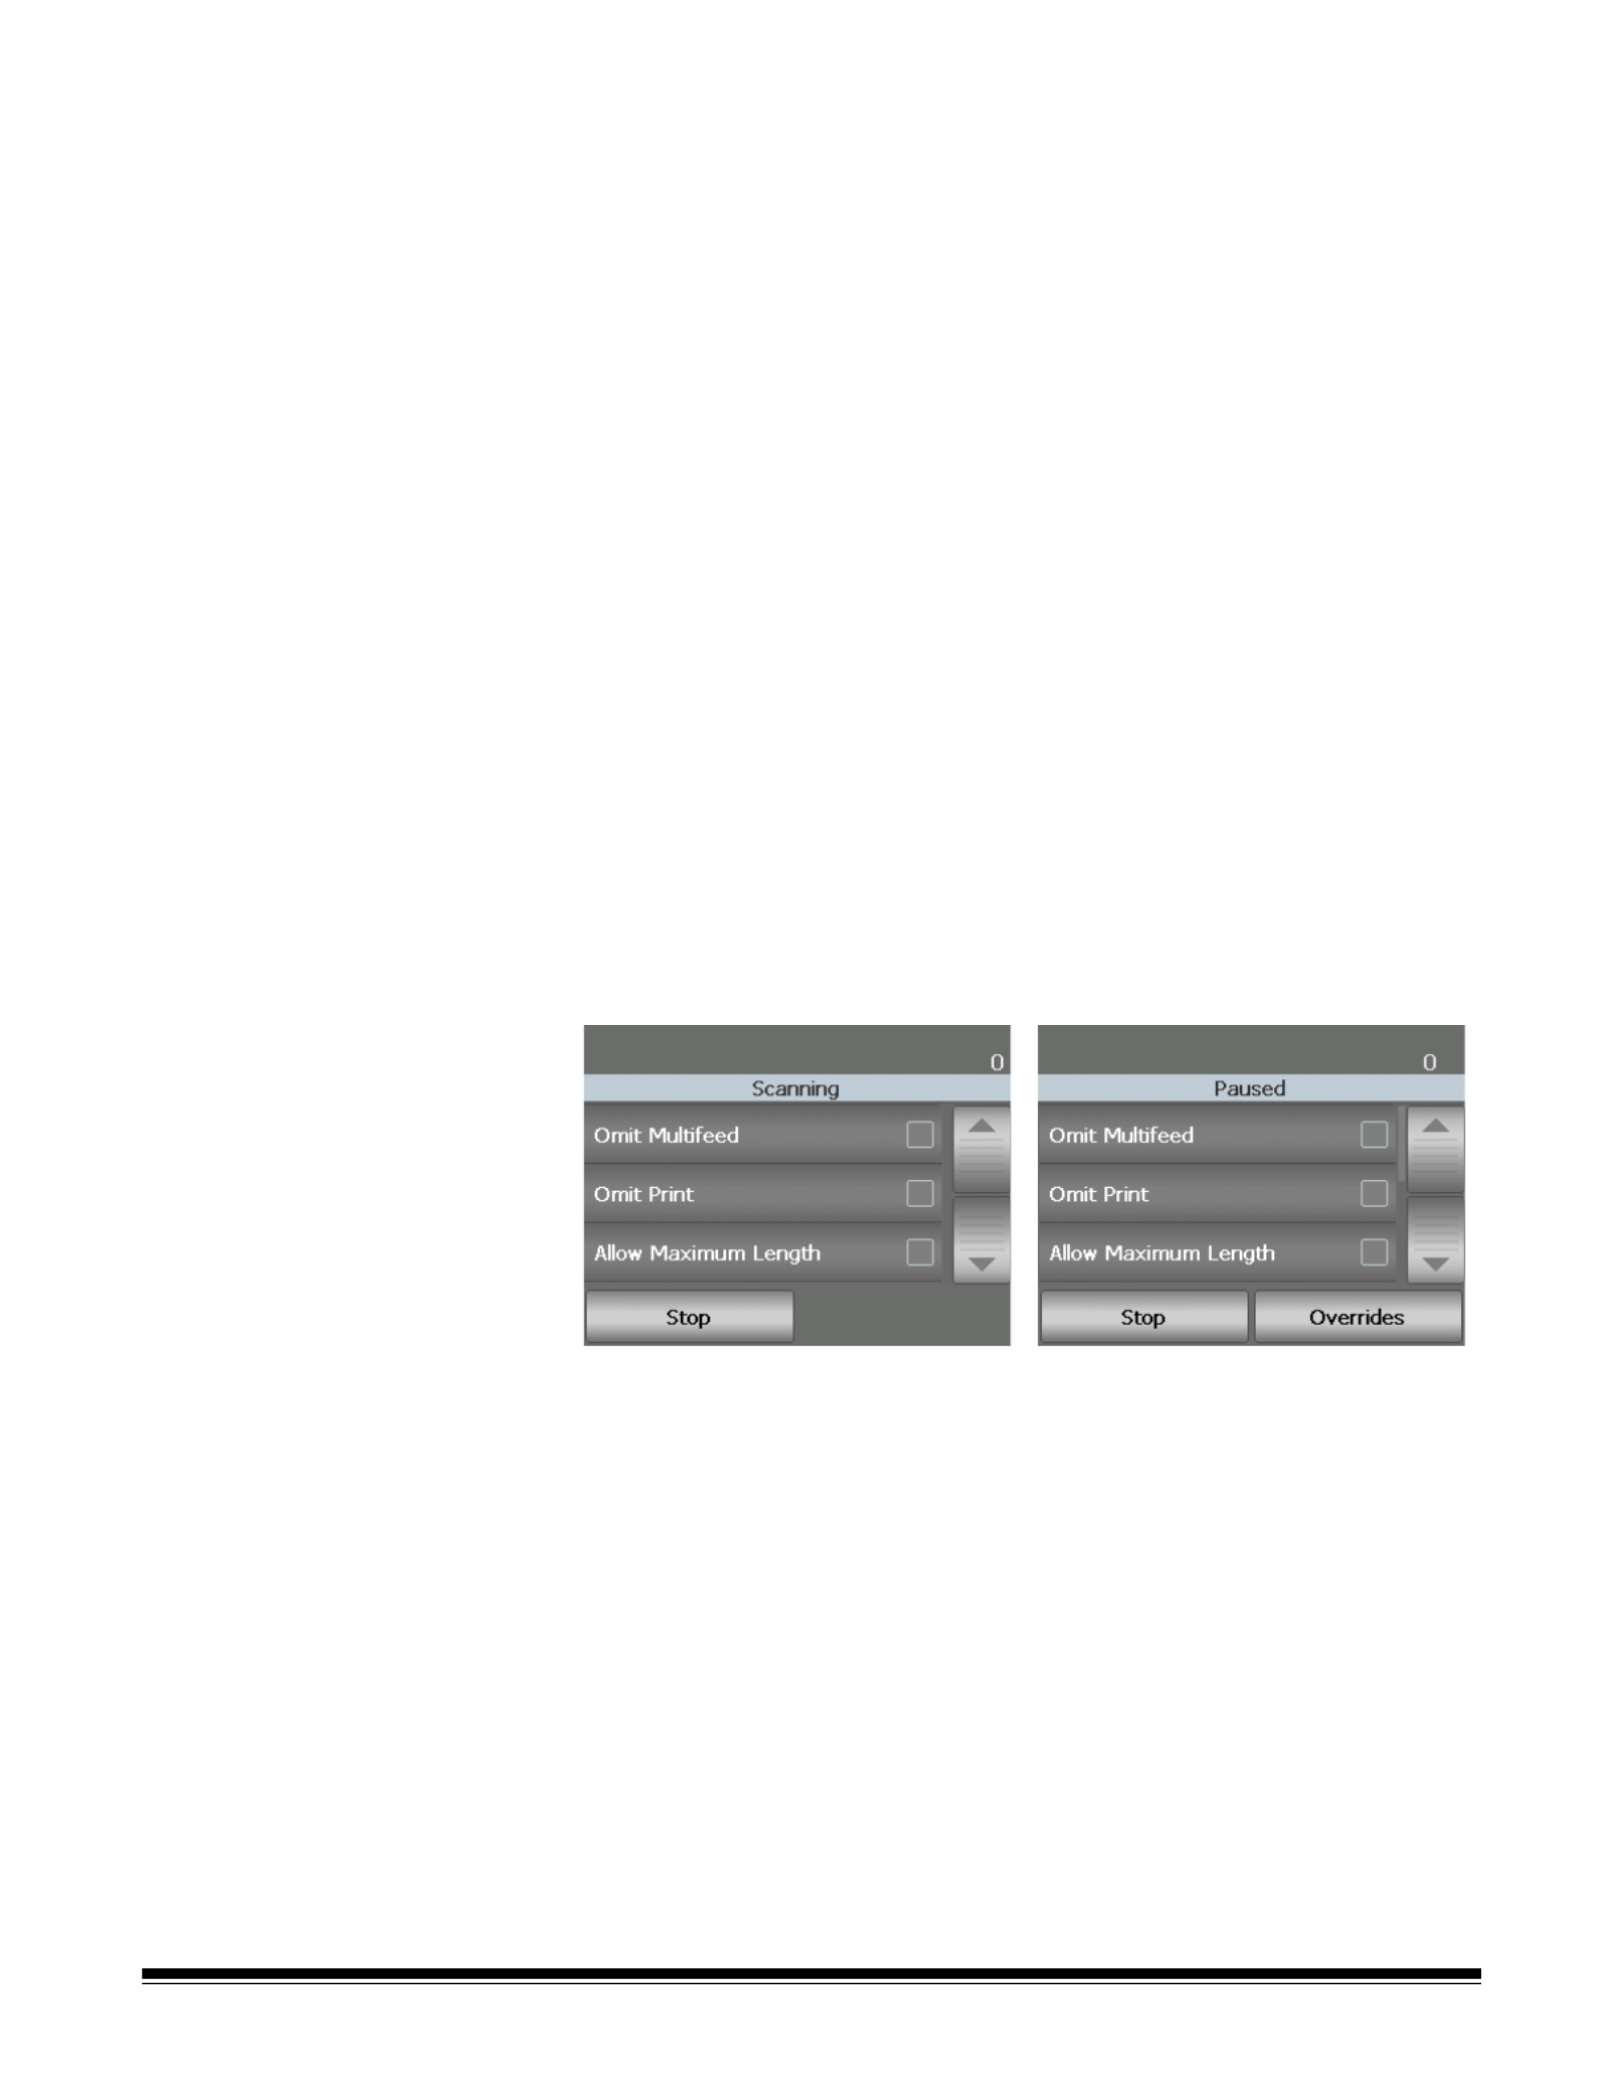
Depending on how your scanner is configured, the touchscreen will display
either the Scanning screen or the Paused screen.
Auto start options:
TWAIN: Automatically start scanning
ISIS: Automatically start transport
VRS: ADF (Auto start enabled) / Panel Feed (Auto start disabled)
See the Scanning Setup Guides for TWAIN, ISIS and VRS for more
information
NOTE: If your scan job requires a temporary override (i.e., printing,
multifeed detection, etc.), then the auto start option must be
disabled prior to starting your scan job to allow access to the
Overrides screen.
Alternatively, pressing Stop/Pause while scanning will also
provide access to the Overrides screen.
For more information, see the section entitled, “Scan job
overrides”.
4. Touching any of the options displayed on this screen, will perform the
action (i.e., Omit Printing, Omit Multifeed, Allow Maximum Length, etc.) on
the next document only. To perform these actions for the rest of the scan
job, see the section entitled, “Scan job overrides” later in this chapter.
5. You must press the Start/Resume button to begin scanning if auto start has
been disabled by the scanning application.
This screen will be displayed if the
auto start option is enabled in your
scanning application:
This screen will be displayed if the
auto start option is disabled in your
scanning application:
A-61670 December 2011 3-9
Pausing and resuming
scanning
You can manually stop/pause and start/resume the scanner while scanning
documents.
• To temporarily pause scanning, touch the Stop/Pause button on the
scanner once.
• If you want to stop scanning, you can touch Stop on the Operator Control
Panel touchscreen, or press the Stop/Pause button twice.
• Touch the Start/Resume on the scanner to restart scanning after it has
been paused.
NOTE: During scanning the scanner monitors its own internal image buffer
memory. In order to prevent overwriting images before the host
computer can retrieve them, the scanner will automatically pause the
feeder and will resume scanning when enough internal buffer memory
is free.
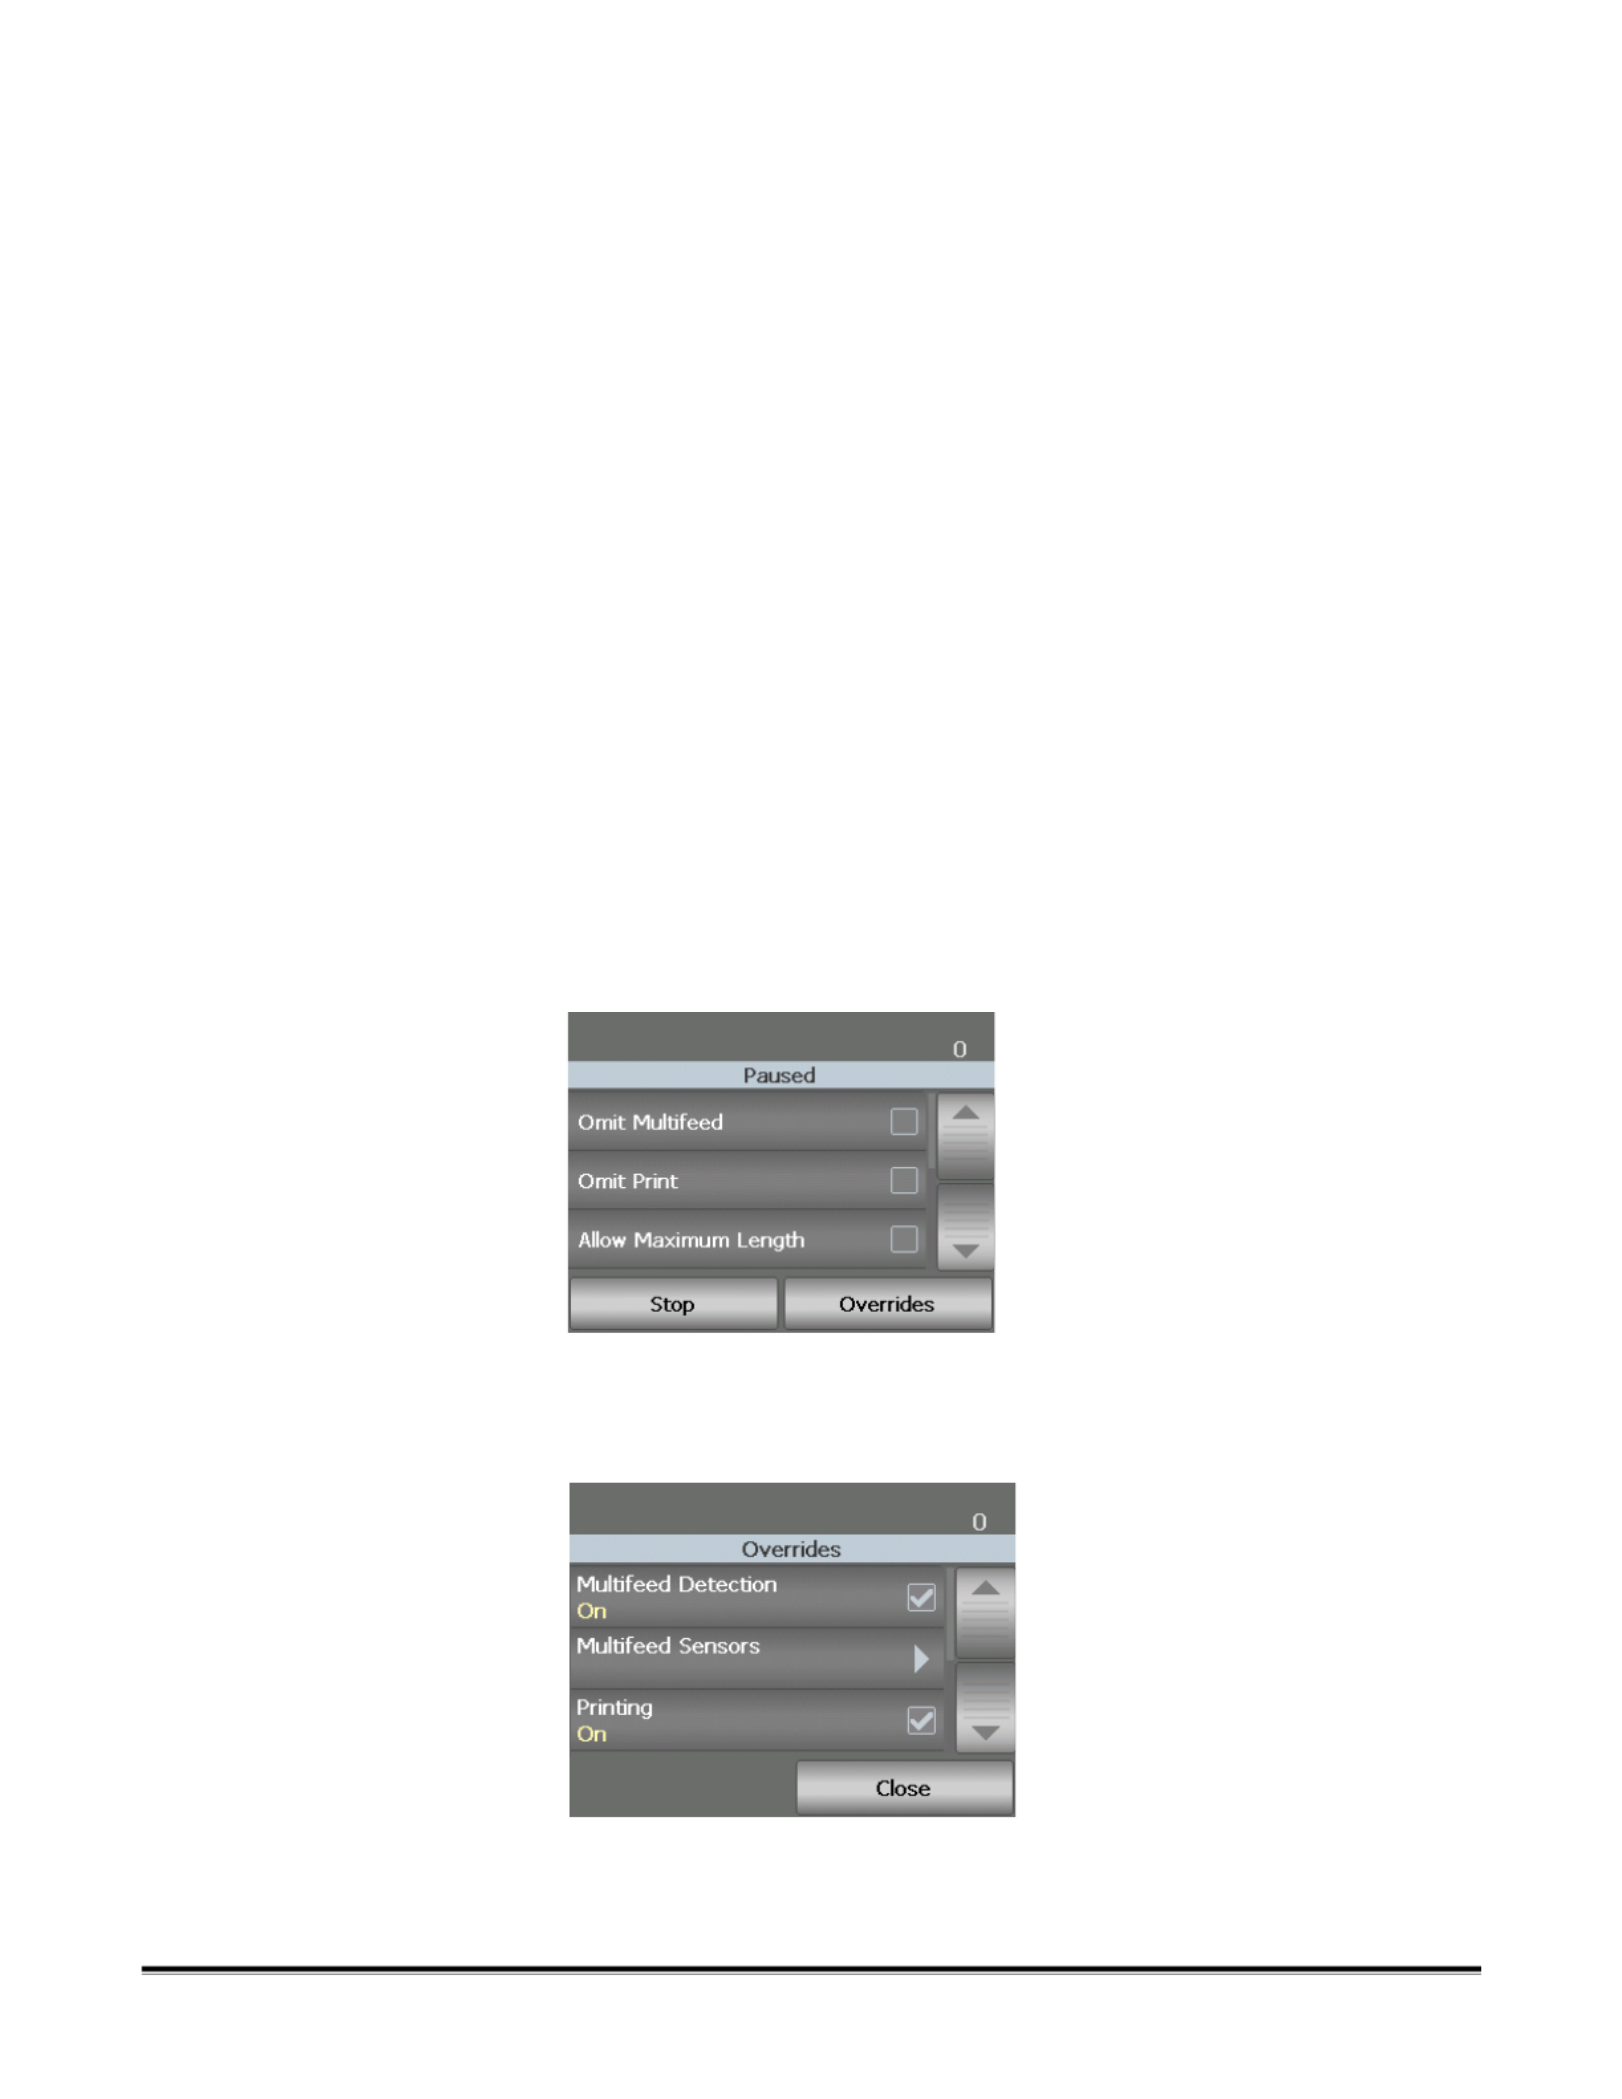
Scan job overrides The Overrides screen allows you to temporarily override your scan job setup
for Multifeed Detection, Multifeed Sensors, Printing, Print Offset, Maximum
Document Length and Document Handling for the remainder of the scan job.
NOTE: Maximum Document Length is not available on the i5200V/i5600V
Scanners.
To access the overrides screen at the start of each scan job, the auto start
setting in the scanning application must be disabled. See the section entitled
“Scanning documents” earlier in this chapter for more information.
When you pause the scanner, the Overrides button is available on the
touchscreen.
To override a setting:
1. Touch Overrides on the Paused screen. The Overrides screen will be
displayed.
2. Touch the option that you want to override, then touch Close to continue
scanning.

3-10 A-61670 December 2011
Multifeed detection If Multifeed Detection has been enabled via the scanning application, you can
turn Multifeed Detection off for the rest of the current scan job.
Multifeed sensors If Multifeed Detection has been enabled via the scanning application, you can
turn on or off any or all of the five scanner sensors. When the sensors are
selected, click OK to close the window.
Printing If printing or electronic annotation (VRS only) has been enabled via the
scanning application, you can temporarily disable it on all remaining
documents in a scan job. This may be useful if rescanning a stack of
documents that have already been printed on.
Once Printing is disabled, no documents will be printed on (or images
annotated on) until the Printing option is enabled.
If you want to disable printing/annotation for the first document in the scan job,
then your scanning application must be set up to NOT automatically start
scanning, so that this screen can be accessed and printing/annotation can be
disabled before you start scanning.
Changing the print offset The Print Offset function allows you to temporarily move the print location on a
document (e.g., if you need to rescan a document that has already been
printed on).
When you change the print offset position, the change will stay in effect until
the scanner returns to the Idle state.
NOTES:
• The Print Offset option is only displayed on the touchscreen if the printer is
enabled.
• Print Offset does not effect annotation.
• If your scanner is configured to auto start, it is recommended that you
disable autostart if you want to use the Print Offset function for the first
document.
• For more efficient scanning, it is recommended that you set the scanner to
Pause Scanning (in the scanning application) when a multifeed occurs so
the scanner will stay enabled.
• If you set the Print Offset to a dimension that is longer than your document,
there will be no printing on your document.

A-61670 December 2011 3-11
1. Verify that Printing is enabled in the scanning application.
NOTE: The number displayed on the touchscreen is the additional offset
from what was set by the scanning application. This number is 0 if
the print offset has not been changed.
2. Select Print Offset. The following screen will be displayed.
3. Use the up and down arrows to increment or decrement the print offset
value (in inches or mm). The printing will be incremented/decremented
from the value that is set up in the scanning application. For example, if
you have printing set up to start 1 inch/25 mm from the lead edge of the
document, and you increment the print offset position by 1 inch / 25 mm,
printing will start at 2 inches/50 mm from the lead edge.
4. When finished, click OK.
Maximum document length This option allows you to override the maximum document length that is setup
in the scanning application for the scan job. The maximum document length
allowed is variable and dependent on many factors including the output
resolution and format.
This following chart is a guideline and assumes duplex scanning with
compressed output.
NOTES:
• For the Kodak i5200V and i5600V Scanners the maximum document length
is always set to 40 inches and cannot be overridden.
• Setting the maximum document length longer than is needed may reduce
throughput.
• Feeding a document longer than the maximum document length will result in
a document jam error.
Scanning DPI Resolution = Maximum Document Length
100, 150, 200, 240, 300 Black and White = 180 inches
Gray = 180 inches
Color = 58 inches
400 Black and White = 100 inches
Gray = 100 inches
Color = 32 inches
600 Black and White = 43 inches
Gray = 43 inches
Color = 13 inches

3-12 A-61670 December 2011
Document handling Document handling allows you to select how the scanner transports
documents through the scanner. This affects how the documents are fed into
the scanner, how fast they move through the scanner, and how they are placed
in the output tray.
The options displayed on this screen are based upon what is set up in your
scanning application for the current scan job. The options are: Normal,
Improved Stacking and Best Stacking, OR Thick, Thin and Fragile.
If the scanning application has specified one of these three options: Normal,
Improved Stacking or Best Stacking then only these three options will be
displayed on the screen (as shown above).
•Normal — no additional handling is performed. This option is best used
when all documents are similar in size. It is recommended that you use the
side guides and document stop when scanning in the Normal mode.
•Improved Stacking — aids in controlling how the documents are stacked/
ordered in the output tray for mixed document sets. This should work for
most mixed document sets.
•Best Stacking — when your document set contains a great variability in
size, this option provides the best control of how the documents are
stacked/ordered within the output tray.
If the scanning application has specified one of these three options: Thick,
Thin or Fragile, then only these three options will be displayed on the screen.
•Thick — select when scanning thick documents.
•Thin — select when scanning thin documents.
•Fragile — allows you to feed poor quality documents through the scanner
transport at a slower pace for more reliable stacking. Select this option
when you are feeding documents of very poor quality.
A-61670 December 2011 3-13
Using the Operator
Control Panel
touchscreen
There are a variety of functions that can be accessed by using the operator
control panel touchscreen. If there is an arrow after the function, another
screen will be displayed allowing you to make additional choices. For more
information and procedures for using these functions, see the following
sections.
To navigate through the touchscreen, simply touch the desired function with
your finger. Using any object other than your finger may damage the
touchscreen and void your warranty.
NOTE: If all of the functions cannot be displayed on the touchscreen at one
time, touch the up or down arrow at the right-edge of the screen to
gain access to a desired function.
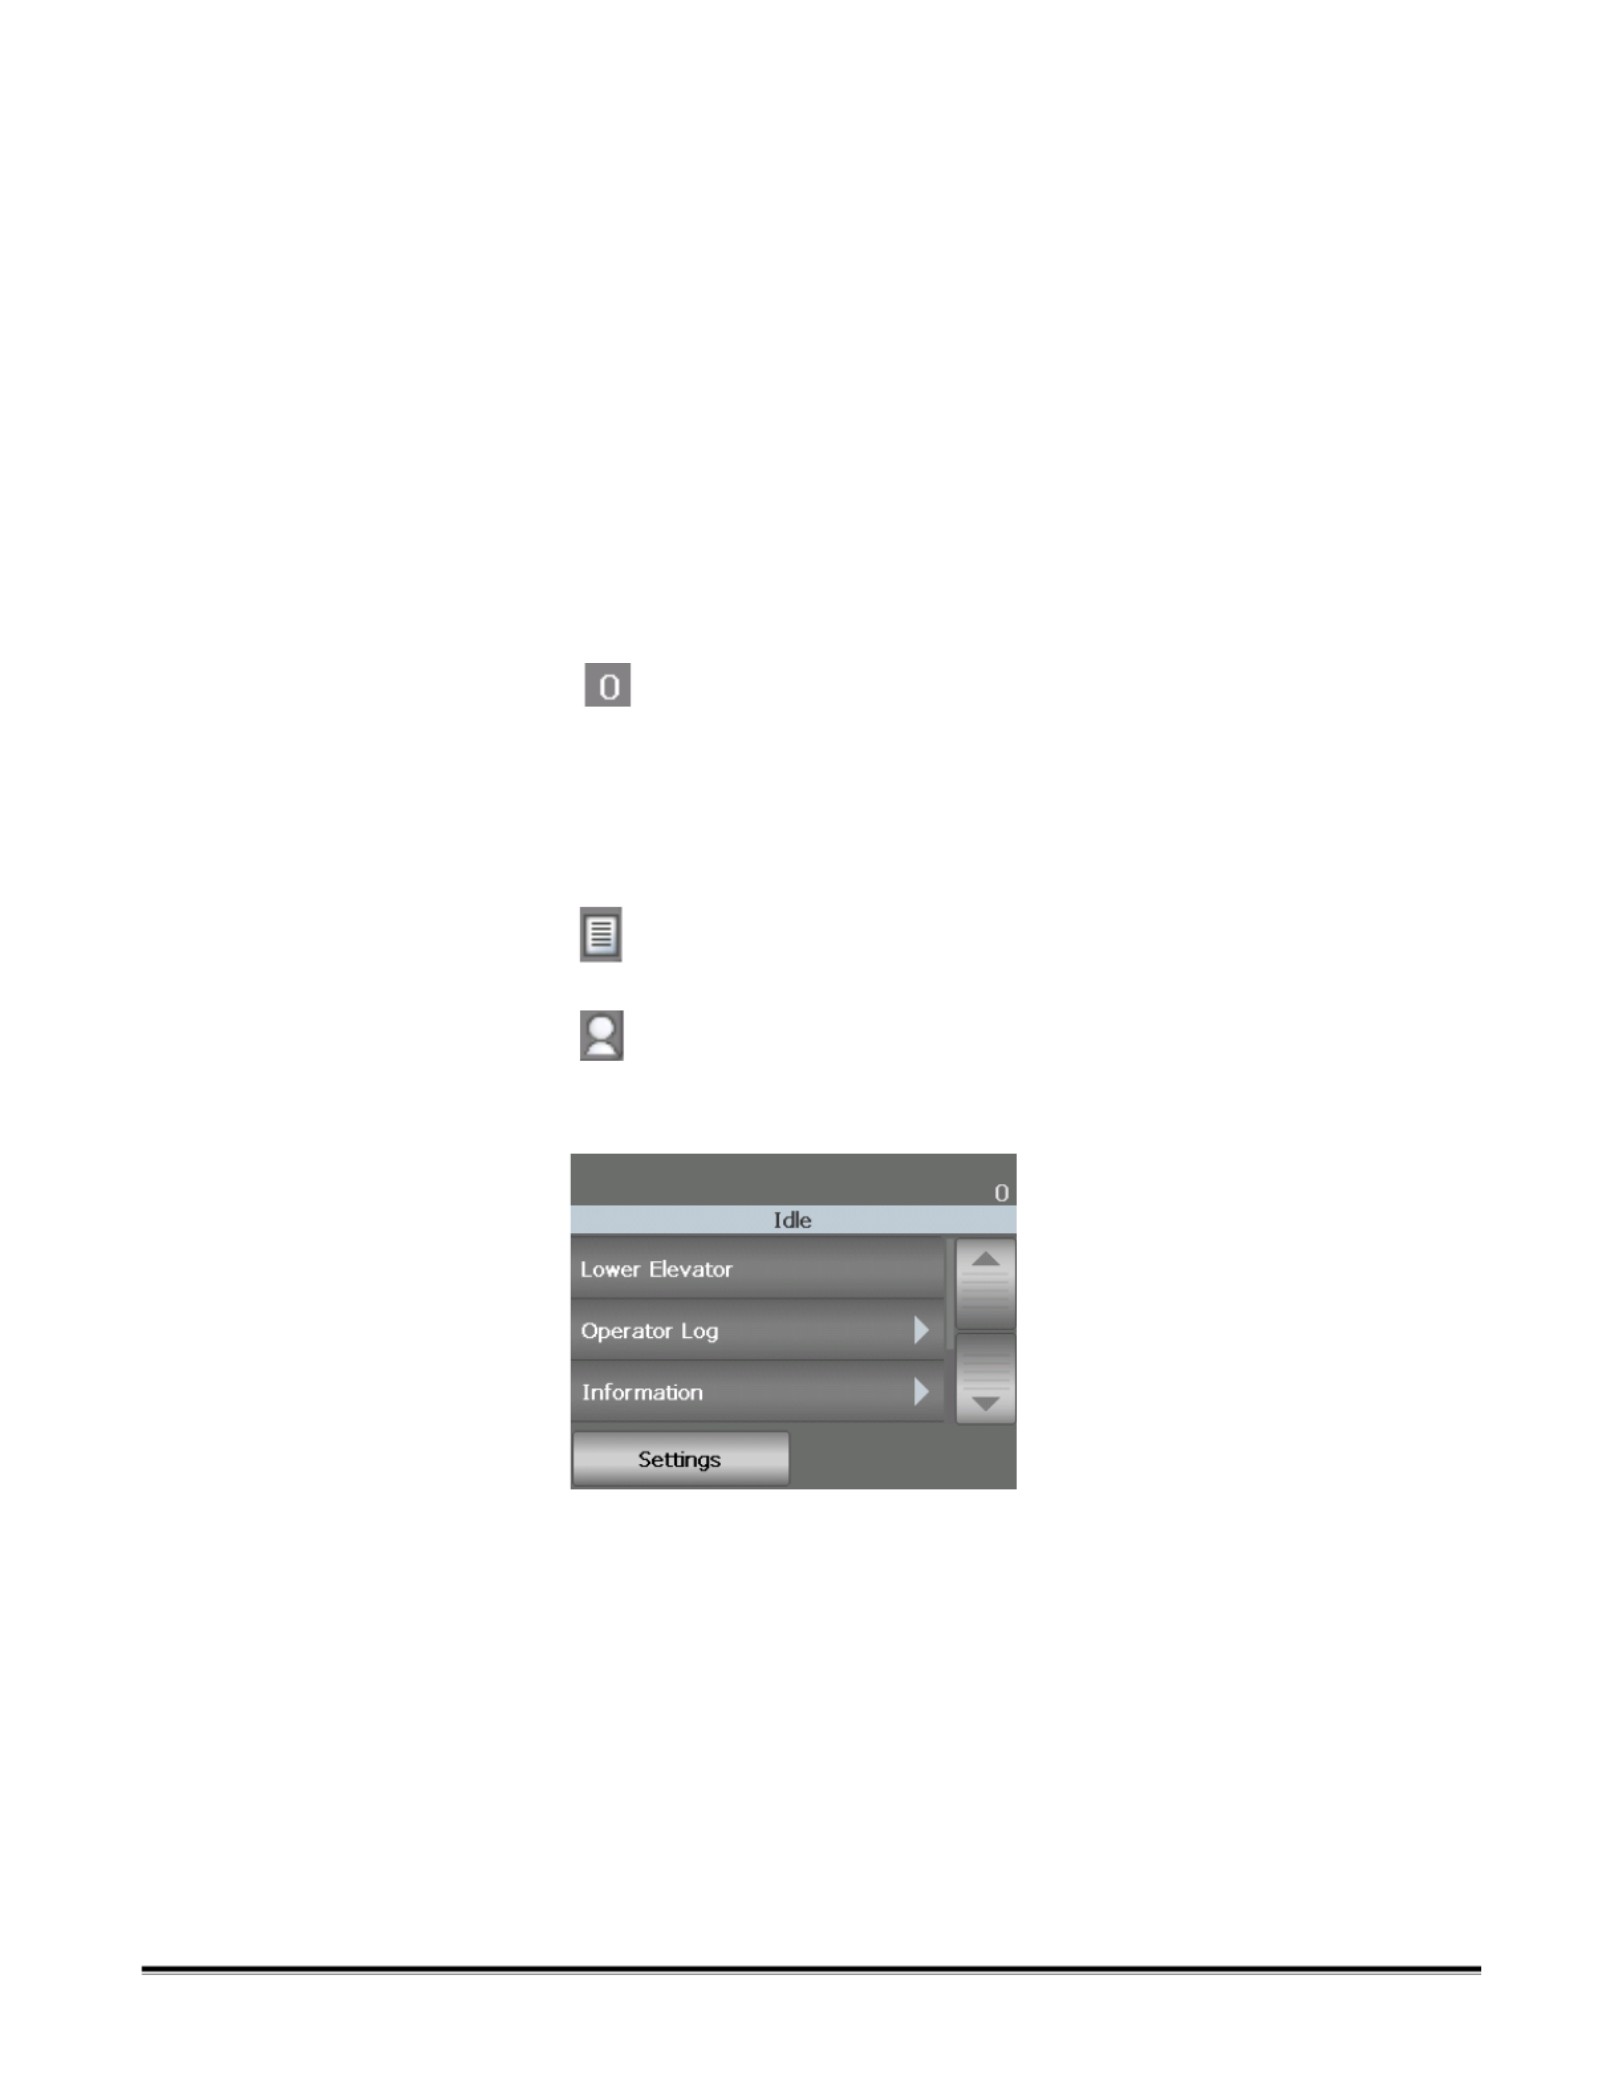
Idle screen The Idle screen provides a list of functions, scroll bar and the Settings button.
In addition, the counter value is displayed in the status area at the top of the
screen.
When the Idle screen is displayed, you can do the following:
•Lower Elevator — lowers the input elevator to the lowest position.
•Operator Log — provides error code information, such as the time the error
occurred, the error code and a brief description of the error.
•Information — provides scanner information, such as scanner model,
firmware version, etc.
Counter value the counter value will start at 0 and be
incremented with each page scanned. The
maximum value that will be displayed is
999,999,999.
NOTE: If the User Counter option is On, then the counter value is
followed by one of these two icons to indicate which counter
value is being displayed:
Document counter
icon
indicates that the Document counter is being
displayed.
User counter icon indicates that the User counter is being
displayed.

3-14 A-61670 December 2011
If the User counter is set to On (see “User counter” later in this chapter for
more information) the Show User Counter/Show Document Counter and
Reset User Counter will also be displayed on the Idle screen. These options
allow you to select which counter value is being displayed as well as reset the
value of the User counter (the Document counter must be reset by the
scanning application).
•Clear Path — clears the scanner transport of any documents.
•Diagnostics — allows you to run a Print Test, run a scanner Self Test, put
the scanner in Count Only mode, perform a UDDS (ultrasonic) calibration
and perform a Touchscreen calibration.
Lowering the elevator Use this option whenever you need to make additional room in the input
elevator tray for adding documents to the stack. The input elevator will
descend to the lowest position (750-sheet) when you touch Lower Elevator.
Viewing the Operator Log When you touch Operator Log, the Operator Log screen will be displayed.
This screen provides the time, message code and a message description.
The messages that are displayed in the log are only those messages that have
occurred since the scanner was powered on. When you turn the power off or
the scanner goes into Standby or Low Power mode, the Operator Log on the
Operator Control Panel touchscreen will be cleared.
To view messages which have been cleared from the Operator Control Panel
touchscreen, see Chapter 6, Troubleshooting.
• After viewing the operator log, touch Close to return to the Idle screen.

A-61670 December 2011 3-15
Viewing scanner
information
The Information screen provides information about your scanner (i.e.,
Firmware Version Number, Scanner Serial Number, Total Scanned
Documents, etc.). Use the scroll bar to view all information.
• After viewing this information, touch Close to return to the Idle screen.
Clearing the paper path Touch Clear Path to allow the scanner to eject any documents left in the
transport.
Diagnostics Select Diagnostics to run a Print Test, put the scanner in Count Only mode,
perform a UDDS (ultrasonic) calibration, perform a Touchscreen calibration
view the maintenance meters and view the scan history.
Viewing the Scan history 1. Touch Scan History. The Scan History screen will be displayed.
2. When finished, touch Close.

3-16 A-61670 December 2011
Viewing the Maintenance
meters
Use the Maintenance Meters to monitor when you need to replace
consumables. When you finish changing the feed module tires, feed module,
separation pad, separation module or the separation roller tires, you can
access the maintenance meters and reset the counter.
1. Touch Maintenance Meters. The Maintenance Meters screen will be
displayed.
2. When you finish changing a consumable, touch the button of the
consumable to reset the meter. For example, if you changed the pre-
separation pad, touch Separator Pad. The following screen will be
displayed.
3. Touch Yes to continue with the reset.

A-61670 December 2011 3-17
Performing a Print test The print test checks to be sure the ink jets in the optional Enhanced Printer
are working properly.
1. Touch Print Test. The Print Test screen will be displayed.
2. Place a blank sheet of paper in the input elevator.
3. Press the Start/Resume button. The document in the output tray will
display the results of the print test.
4. Remove the document from the output tray and evaluate the appearance
of the test pattern.
• If the pattern is complete, you are ready to begin.
• If the test pattern is inconsistent, verify that the ink cartridge is installed
properly, or you may need to clean the print head or change the ink
cartridge.
NOTE: Clean the print head by removing it from the printer carrier and
dabbing the print head with a damp cloth. For procedures on
removing or changing the ink cartridge, see Chapter 4, Using the
Enhanced Printer.
5. Touch Cancel to return to the Idle screen.
Acceptable Unacceptable: pattern
is inconsistent

3-18 A-61670 December 2011
Performing a self test The scanner self test will test the image capture subsystem to ensure that is
functioning correctly.
Count only mode You may want to count the number of documents entering the scanner without
actually scanning them.
1. Touch Count Only. The Count Only screen will be displayed.
2. Place the documents you want to count in the input elevator.
3. Press the Start/Resume button. When the scanner has scanned all
documents, the total number will be displayed.
4. Touch Cancel when finished to return to the Idle screen.
NOTES:
• When you press the Stop/Pause button, the feeder and transport will stop.
You can continue your Count only test by pressing the Start/Resume button.
• In Count only mode, Document Handling will default to Improved Stacking.
A-61670 December 2011 3-19
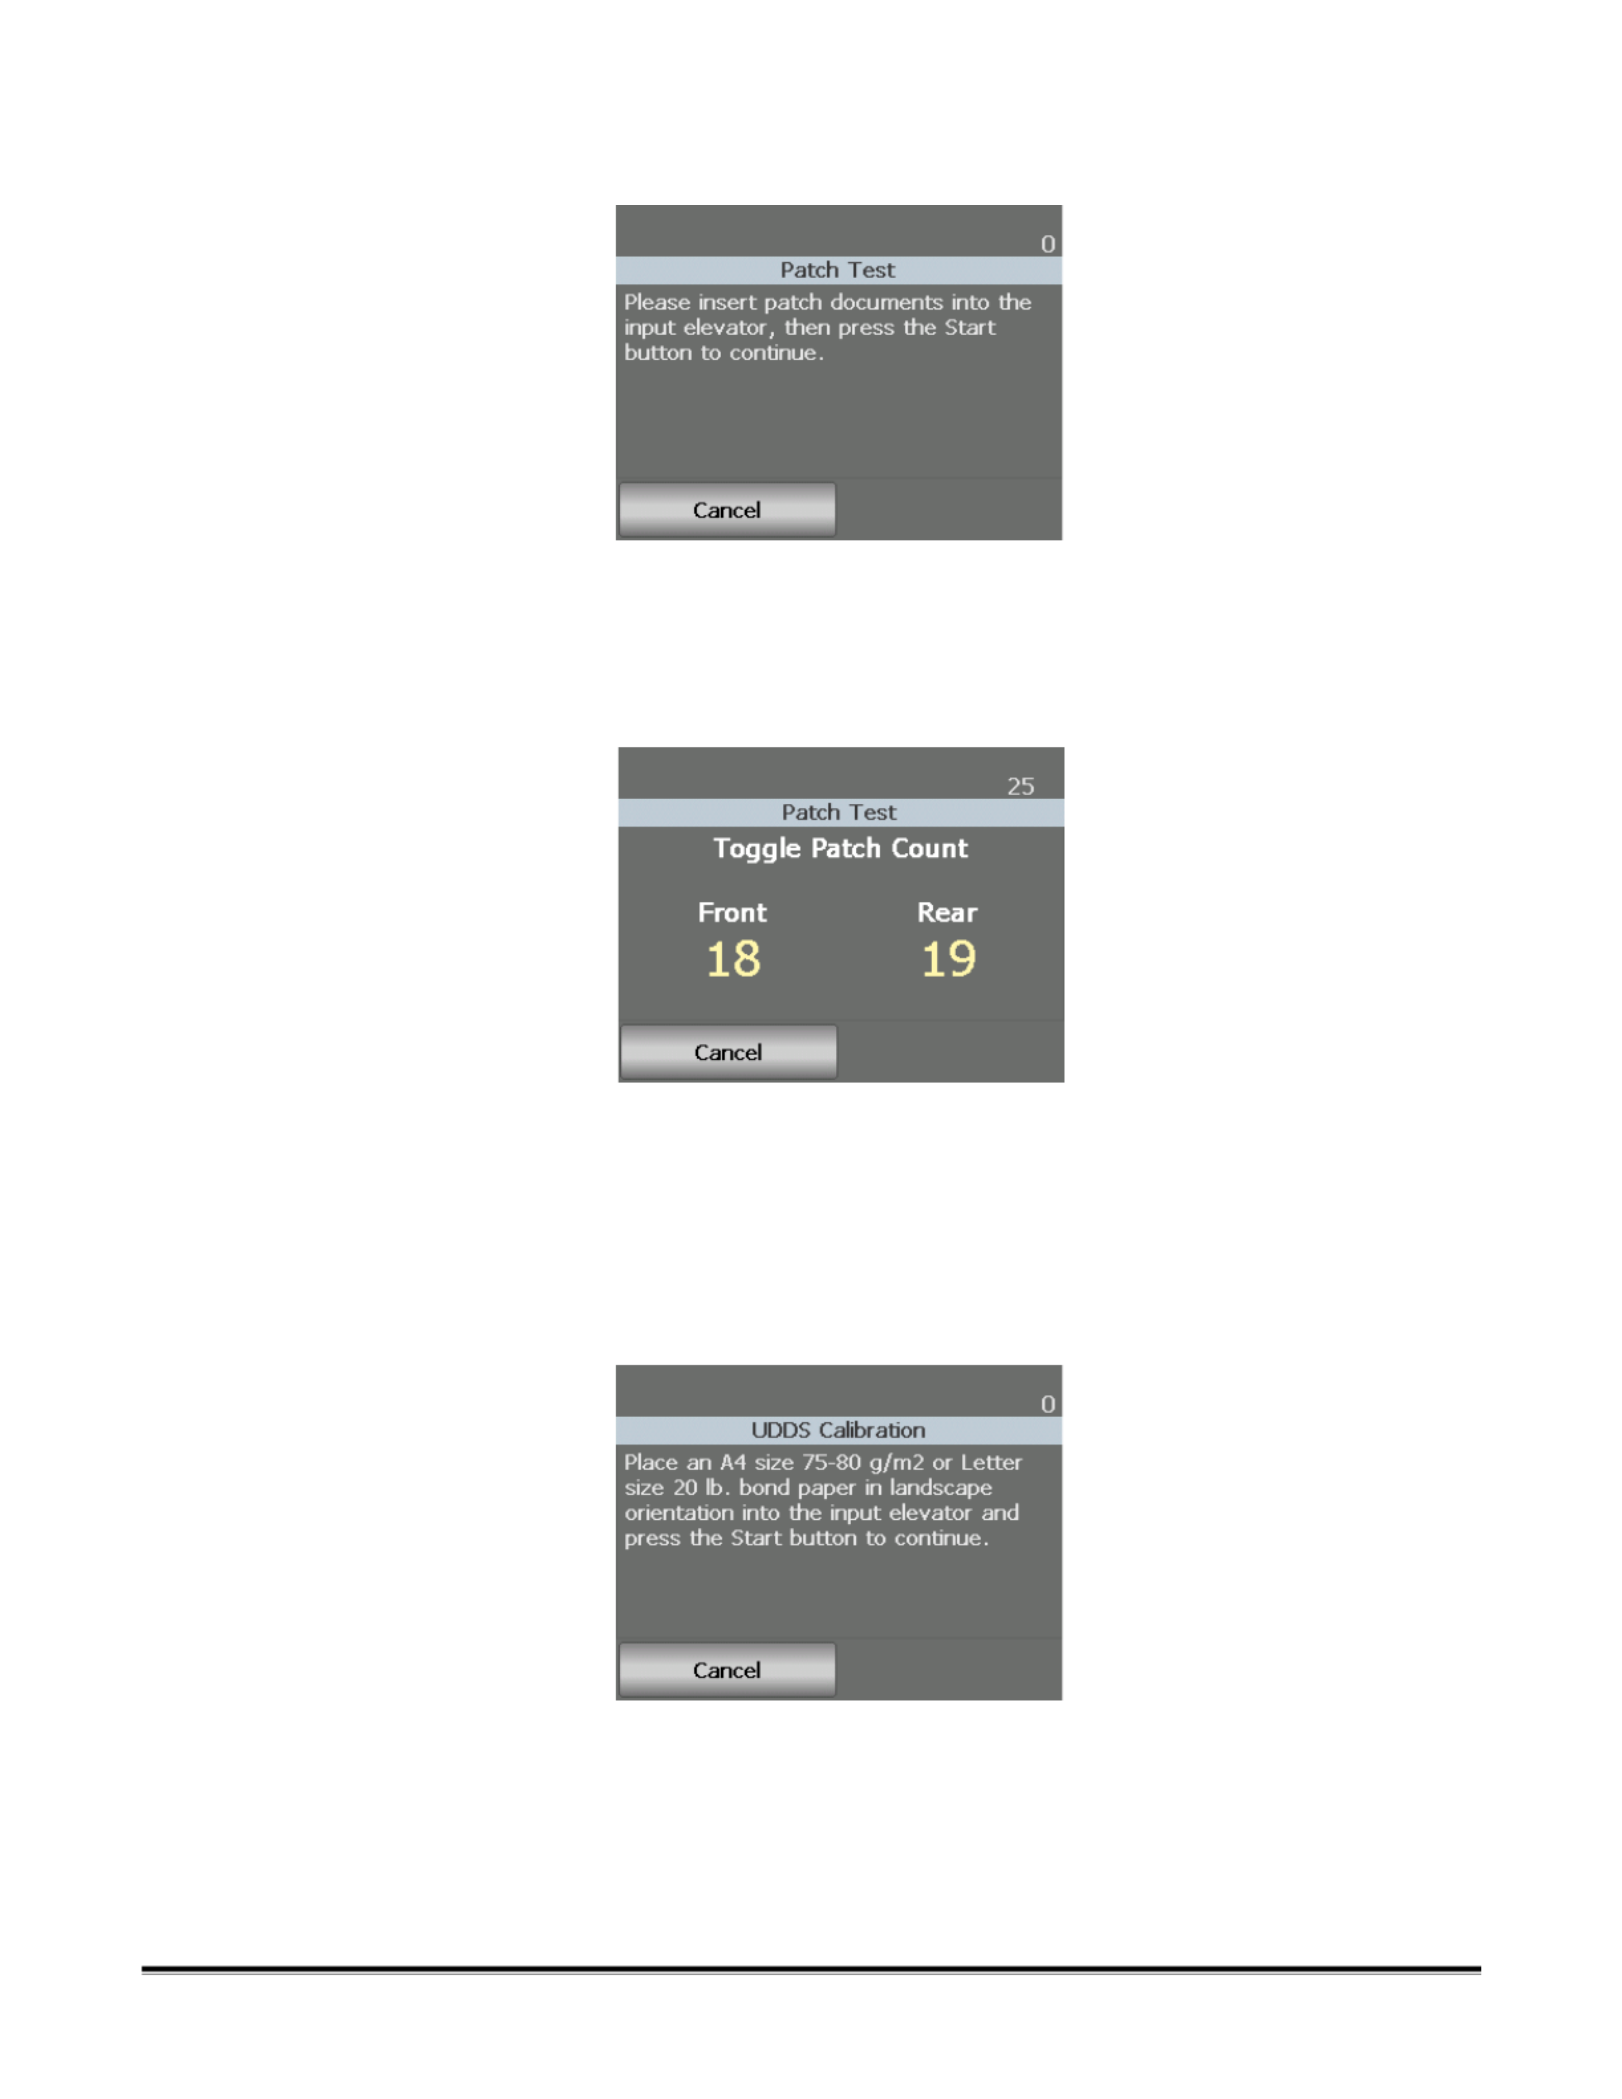
Performing a Patch test Use the Patch test to verify that the Toggle Patch sheets can be detected.
1. Touch Patch Test. The Patch Test screen will be displayed.
2. Place a document(s) with a patch(es) in the input elevator.
3. Press the Start/Resume button. When the document(s) has been
scanned, the results of the patch test will be displayed on the touchscreen.
The results show the number of patches and patch types that were
recognized by the scanner.
4. Touch Cancel to return to the Idle screen.
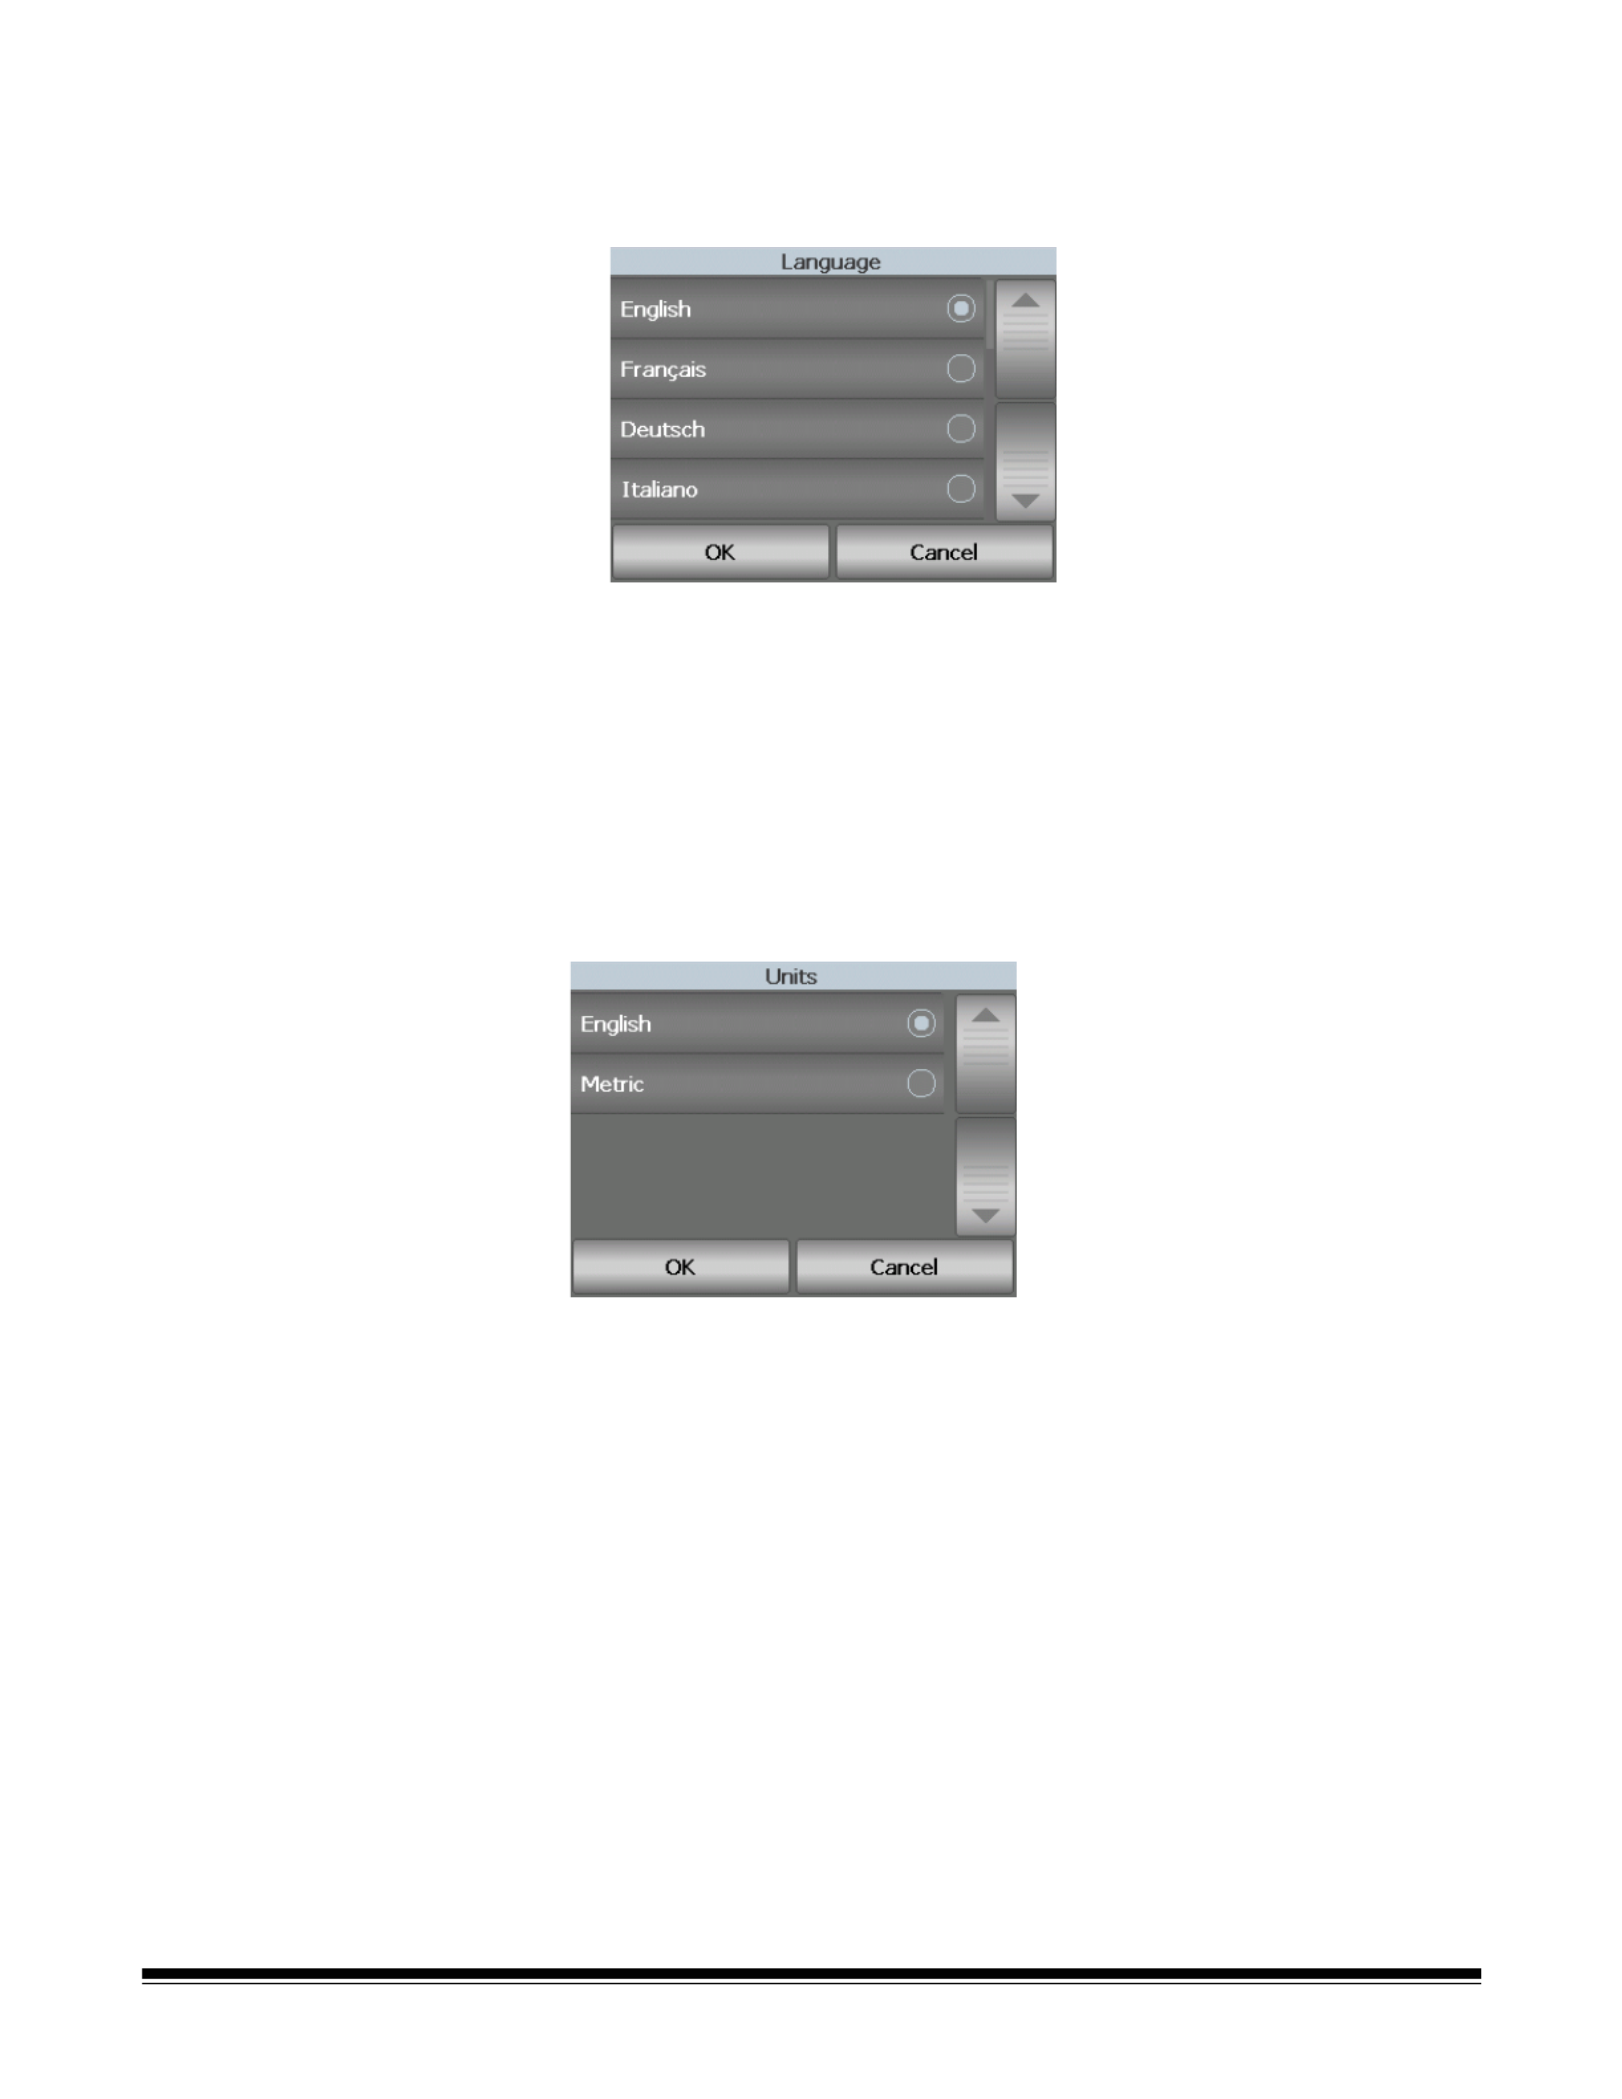
Performing a UDDS
calibration
UDDS calibration is used to calibrate the ultrasonic document detection
system for multi-feeds. UDDS calibration is rarely needed. This calibration
should only be performed if there is a feeding or multi-feed detection issue.
1. Touch Calibrate. The Calibration screen will be displayed.
2. Touch UDDS Calibration to display the UDDS Calibration screen.
3. You will be prompted to place a 20 lb. or 75 g/m2 bond sheet of paper in
the input elevator in landscape orientation.
4. Press the Start/Resume button. The calibration results will be displayed.
5. When finished, touch Cancel to return to the Diagnostic screen.
6. Touch Close to return to the Idle screen.

3-20 A-61670 December 2011
Performing a Touchscreen
calibration
Touchscreen calibration is used to verify that the touch points on the
touchscreen are working correctly. The touchscreen is factory-calibrated and
should not be performed unless directed to do so by Technical Support.
Settings screen The Settings screen is accessed by touching Settings on the Idle screen.
When you touch the Settings button on the Idle screen, a function list will be
displayed.
NOTE: The value displayed under the option is the current setting.
The Settings screen provides scanner settings that will only need to be set
infrequently.
•Volume — allows you to adjust the volume of the scanner alarm.
•Sounds — allows you to select a sound that you want the scanner to make
when a scanner condition is encountered.
•Language — allows you to select the language you want the information on
the touchscreen to be displayed in.
•Units — allows you to select the units of measurement used in the Print
Offset option.
• User Counter — when enabled, counts all documents that are fed until you
reset it.
• Auto Raise — when enabled, will automatically raise the input elevator
when paper is added to an empty input elevator.

A-61670 December 2011 3-21
Changing the alarm volume The Volume screen allows you to adjust the volume of the sound the scanner
will make when a scanner condition is encountered from a Very High volume
(loudest) to a Low volume (quietest) or to Off (no sound). The default is Low.
1. Touch Volume on the Settings screen to display the Volume screen.
2. Select the desired Volume option. A tone will sound with each selection.
3. Touch OK to save your selection and return to the Settings screen; or
touch Cancel to return to the Settings screen without saving your changes.
Selecting the sound You can select the sound you want the scanner to make when a particular
scanner condition is encountered such as, document jam or multi-feed, etc.
1. Touch Sounds to display the Sounds screen.
2. Select the event (e.g., Warning, Error, etc.) that you want a tone to be set
for. When you select an Event, another screen will be displayed listing a
variety of different sounds that you can choose from.
3. Select the type of sound you want to hear. A tone will sound with each
selection.
4. Return to the Sounds screen to set other sounds for other events by
repeating Steps 2 and 3.
5. Touch OK to save your selection and return to the Settings screen; or
touch Cancel to return to the Settings screen without saving your changes.
3-22 A-61670 December 2011
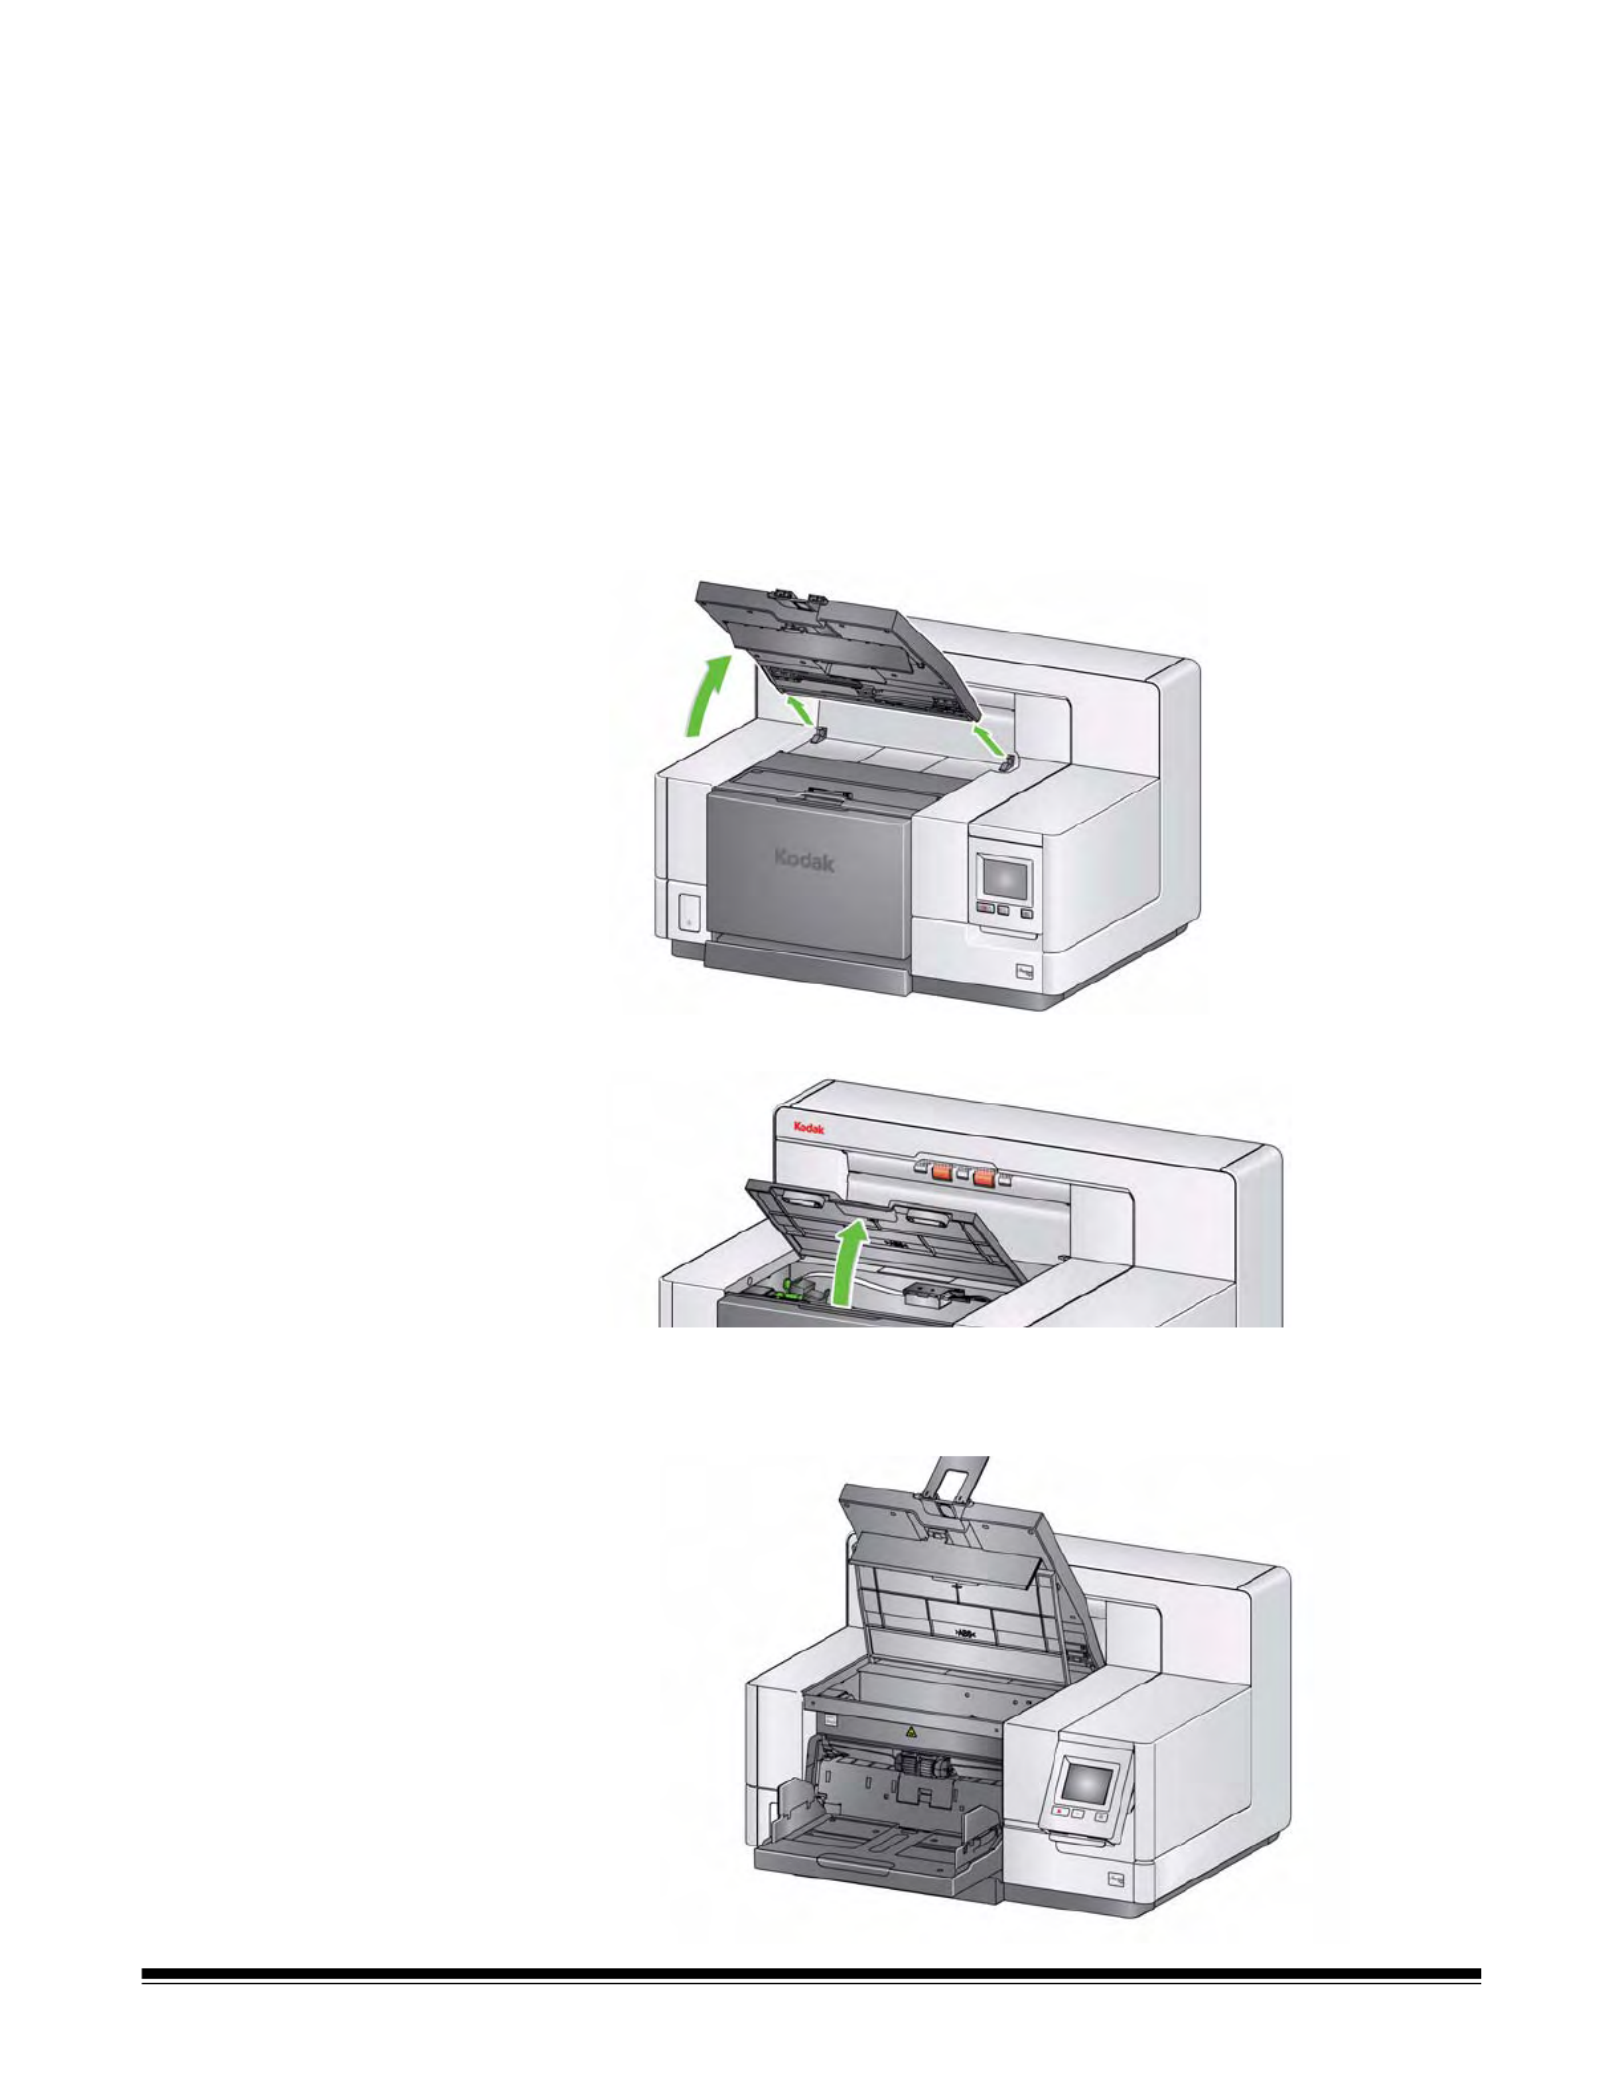
Selecting a language The Kodak i5000 Series Scanners support several languages. Select the
language you want the information on the touchscreen to be displayed in.
1. Touch Language to display the Language screen.
2. Touch the desired language. The screen will automatically be updated in
the language of choice. If the language you want is not displayed on the
screen, use the up and down arrows to display the desired language.
3. Touch OK to save your selection and return to the Settings screen; or
touch Cancel to return to the Settings screen without saving your changes.
Units The Units option is used to select the unit of measurement used in the Print
Offset option. Select either English (for inches) or Metric (for millimeters) and
click OK to save your changes or Cancel to return to the Settings window
without saving your changes.

A-61670 December 2011 3-23
User Counter This option enables a counter that you can control. Once enabled, the counter
goes to 0 and is incremented for every document fed. You can reset this
counter at any time.
If the User Counter is set to On, the option to Show User Counter/Show
Document Counter and Reset User Counter will be available from the Idle
screen.
• If you touch Show User Counter on the Idle screen, the User counter
icon will be displayed in the status area of the Scanning and Idle screens
next to the Counter value.
• If you touch Show Document counter on the Idle screen, the Document
counter icon will be displayed in the status area of the Scanning and Idle
screens, next to the Counter value.
If the User Counter is set to Off, these options: Show User Counter/Show
Document Counter and Reset User Counter will not be available from the
Idle screen. Only the Document Counter value will be displayed in the status
area of the Scanning and Idle screens.
Auto Raise When this option is enabled, the input elevator will automatically raise to the
feeding position when paper is added to an empty input elevator.

A-61670 December 2011 4-1
4 Document Printing
Contents Printer specifications .................................................................................. 4-2
Installing/Replacing the ink cartridge ......................................................... 4-3
Changing print positions ............................................................................ 4-5
Installing/Replacing the ink blotter strips.................................................... 4-6
Problem solving ......................................................................................... 4-8
This chapter provides information for using the optional Kodak Enhanced
Printer Accessory. In order to use the printing option you must have purchased
and installed the Kodak Enhanced Printer Accessory.
This accessory allows physical printing on the front of all pages scanned. The
printing occurs before the page is imaged so the printing will be visible in the
scanned image of the page. Post scan or back of page printing is not available.
NOTE: See the instructions that came with the Enhanced Printer Accessory
for procedures on how to install this accessory.
Refer to the Scanning Setup Guide for the TWAIN Datasource, ISIS Driver or
VRS on the CD or your scanning application documentation for more
information about enabling printing and setting up print strings.
The Enhanced Printer operates at full scanner speed. The printer can add a
date, time, document sequential counter and custom messages.
The print string can be configured to include information that stays the same
for each document; such as batch name or operator and information that may
change for each page scanned; i.e., the document sequential counter.
All printer controls and functions are accessible through the TWAIN
Datasource, ISIS Driver or VRS advanced scanner controls.
NOTES:
• Printing must be enabled and an ink cartridge must be installed before
starting a scan session.
• Clean the scanner’s paper path components daily when using the printer.
• You cannot print on documents that are smaller than 10 cm (4 in.) in length.
• If you attempt to scan with a job setup that has Printing enabled, and you do
not have an Enhanced Printer installed, an error will be displayed.
• The illustrations in this section show the i5200/i5600/i5200V/i5600V
Scanner. All adjustments are the same for the i5800 Scanner unless
otherwise noted.
• Electronic image annotation is available on the i5200V and i5600V. Image
annotation does not require the Enhanced Printer Accessory.

4-2 A-61670 December 2011
Printer specifications More information about the following specifications can be found in the
Scanning Setup Guide for the TWAIN Datasource, ISIS Driver or VRS.
Characteristic Description
Maximum lines 1
Maximum characters 40 (including spaces)
Print locations (horizontal) 13 front manually set
Print locations (vertical) Set by the scanning application
Print orientation 0, 90, 180 and 270 degrees
Font size Normal, Bold and Extra Bold
NOTE: Not all languages can support a Bold
font based on the complexity of the
characters, such as half-width
Katakana.
Print side Front (pre-scan)
Minimum printing distance
from document lead edge
0.64 cm (0.25 in.)
Ink cartridge Black: HP-C6602A
Red: HP-C6602R
Green: HP-C6602G
Blue: HP-C6602B
Characters per ink cartridge Up to 1,500,000 to 2,000,000 (based on font
size used)
Static fields available User-specified messages via the scanning
application
Dynamic fields available Up to a nine-digit sequential document
number, date, four-digit time and Julian date
Languages supported Any phonetic language. For example: Dutch,
English, French, German, Italian,
Portuguese, Spanish, Japanese (half-width
Katakana)
A-61670 December 2011 4-3
Installing/Replacing
the ink cartridge
You must install the ink cartridge before using the printer. Refer to the section
entitled, “Supplies and consumables” in Chapter 5 for ordering information.
After initial installation, replace the ink cartridge when:
• printed characters appear light or uneven
• missing characters are evident
• a print test reveals inconsistent character quality
• cleaning has not improved the overall print quality
IMPORTANT: Consult the Hewlett-Packard website for recycling printing
supplies or dispose the empty ink cartridge in accordance with
all federal, state and local laws.
1. Remove the output tray.
2. Open the printer access cover.
NOTE: If you do not want to remove the output tray, you can lift the front of the
output tray, then lift the printer access cover and position the printer
access cover behind the height adjustment tab.

4-4 A-61670 December 2011
3. Open the ink cartridge package and remove the tab from the new ink
cartridge.
4. Push down on the printer carrier tab to rotate the printer carrier up.
5. Snap the ink cartridge into the printer carrier as shown.
6. Rotate the printer carrier up and snap the ink cartridge in place.
7. Slide the printer carrier into the desired print position. See the section
entitled “Changing print positions” later in this chapter.
8. Close the printer access cover and reinstall the output tray.
9. Run a print test (see the section entitled, “Performing a print test” in
Chapter 3).

A-61670 December 2011 4-5
Changing print
positions
The horizontal print position must be changed manually.
1. Remove the output tray.
2. Open the printer access cover.
NOTES:
• The horizontal print positions are visible by a small detent on the printer
rail.
• Printing automatically stops approximately 1.27 cm (½-inch) from the
trailing edge of the document, even if the information has not been
completely printed.
3. Slide the printer carrier to the desired position, so that is aligned with the
slot on the printer carrier with the desired horizontal print position.
NOTE: The print location indicators at the edge of the input elevator can
be used as a guide to verify your horizontal print position.
4. Close the printer access cover and reinstall the output tray.

4-6 A-61670 December 2011
Installing/Replacing
the ink blotter strips
The three ink blotter strips on the scanner transport collect ink overflow from
the printer. These strips should have been installed in the ink blotter channels
at the time of printer installation. If they have not been installed, the following
steps can be performed to install these strips for the first time.
Replace these strips as ink overflow collects on the blotter(s). Depending on
your print position, all strips may not need to be replaced at the same time. To
order additional ink blotter strips, see the section entitled, “Supplies and
Consumables” in Chapter 5.
1. Pull the scanner cover release latch forward to release and lift the scanner
cover.
2. Remove the black drainage strip from the transport.
3. Locate the blotter strip channel. These channels are where the blotter
strips will be installed or replaced.
4. If you are replacing a blotter strip, proceed with Step 5. If you are installing
the blotter strips for the first time, go to Step 6.

A-61670 December 2011 4-7
5. Grasp the blotter strip(s) that needs to be replaced and carefully pull it off
of the channel. Discard the soiled strip according to local regulations.
6. Remove the backing from a new blotter strip.
7. Align the blotter strip in one of the channels.
NOTE: Improperly aligned blotter strips may cause document jams.
8. Press the adhesive side of the blotter strip down firmly into the channel.
9. If other strips need to be replaced, repeat Steps 5-8.
10. Replace the black drainage strip.
11. Close the scanner cover.

4-8 A-61670 December 2011
Problem solving Use the list below as a guide to check possible solutions to problems you may
encounter when using the printer.
Problem Possible Solution
Print quality is poor or inconsistent • Be sure the ink cartridge is not empty.
• Be sure the ink cartridge is properly installed.
• Be sure the ink cartridge is in the correct position for printing.
• Verify that the printer has been enabled in the scanning application and
that the expected print string has been specified.
• Verify that all printer connectors are securely fastened and that the
printer cable is securely attached.
• Run a print test to verify that all jets are functioning properly. See the
section entitled, “Running a print test” earlier in this chapter.
• Clean the print head (see “Printing problems when starting up due to
dry print head” below.)
Printing problems when starting up
due to dry print head
Remove the ink cartridge from the scanner and using a damp cloth or
swab, dab (do not wipe) the ink jets on the ink cartridge, replace the ink
cartridge and try again.
Not printing • Be sure that printing is enabled in the scanning application.
• Check to be sure that the ink cartridge is secure in the desired print
position.
• Be sure the tape is removed from the print head.

A-61670 December 2011 5-1
5 Maintenance
Contents Cleaning frequency chart ........................................................................... 5-2
Cleaning tools and materials...................................................................... 5-2
Opening the scanner cover........................................................................ 5-2
Cleaning procedures.................................................................................. 5-3
Vacuuming the output tray and input elevator....................................... 5-4
Cleaning the rollers ............................................................................... 5-4
Cleaning the separation roller tires ....................................................... 5-5
Cleaning the feed module tires ............................................................. 5-6
Cleaning the flippable white background strips..................................... 5-6
Cleaning the imaging guides ................................................................ 5-7
Running a transport cleaning sheet ......................................................5-7
Final cleaning steps .............................................................................. 5-7
Replacement procedures .......................................................................... 5-8
Replacing the feed module or feed module tires ................................... 5-8
Replacing the separation roller or separation roller tires..................... 5-12
Replacing the pre-separation pad....................................................... 5-13
Replacing the imaging guides............................................................. 5-14
Replacing the flippable white background strip(s)............................... 5-15
Supplies and consumables ..................................................................... 5-16
This chapter describes the required cleaning and maintenance procedures for
the Kodak i5000 Series Scanners. The frequency of these procedures will vary
with different scanning environments, paper types and image processing
requirements. High volumes of scanning will demand more frequent cleaning
of the scanner and more frequent replacement of consumables. Lower
scanning volumes will allow longer times between these activities. Refer to the
“Cleaning frequency chart” on the next page for cleaning guidelines. However,
you will need to determine what works best for you. Many years of Kodak’s
production scanning experience has proven that properly cleaning and
maintaining your scanner will result in scanning more paper in less time with
less issues. A properly maintained i5000 Series Scanner will provide years of
trouble-free operation.
Scanner consumables (tires, pre-separation pads, etc.) and cleaning supplies
are available from resellers, web merchants and from the Kodak on-line store
(http:/scannerstore.kodak.com). Consumables are sold in kits of various sizes.
The kits contain the proper mix of tires, rollers, and pre-separation pads so you
can easily replace them at the recommended rate. For example, only replacing
the tires and never replacing the separation roller will eventually minimize
scanner performance. Replacing the consumables at the recommended
frequency will ensure the best performance.
NOTE: The illustrations in this section show the i5200/i5600/i5200V/i5600V
Scanner. All adjustments are the same for the i5800 Scanner unless
otherwise noted.
5-2 A-61670 December 2011
Cleaning frequency
chart
A recommended cleaning sequence includes vacuuming the scanner
transport, cleaning the residue from the feed module tires, separation roller
tires and drive rollers and cleaning the imaging guides.
Use the chart below as a guide to how frequently you should clean your
scanner.
Cleaning tools and
materials
Use only these cleaning tools and materials when performing routine
maintenance on your scanner. Use of any other cleaning materials could
damage your scanner.
•Kodak Digital Science Transport Cleaning Sheets
•Kodak Digital Science Roller Cleaning Pads
• Staticide wipes for Kodak Scanners
• A vacuum cleaner with attachments
Optionally:
• Brillianize Detailer wipes
• Lint-free cloth
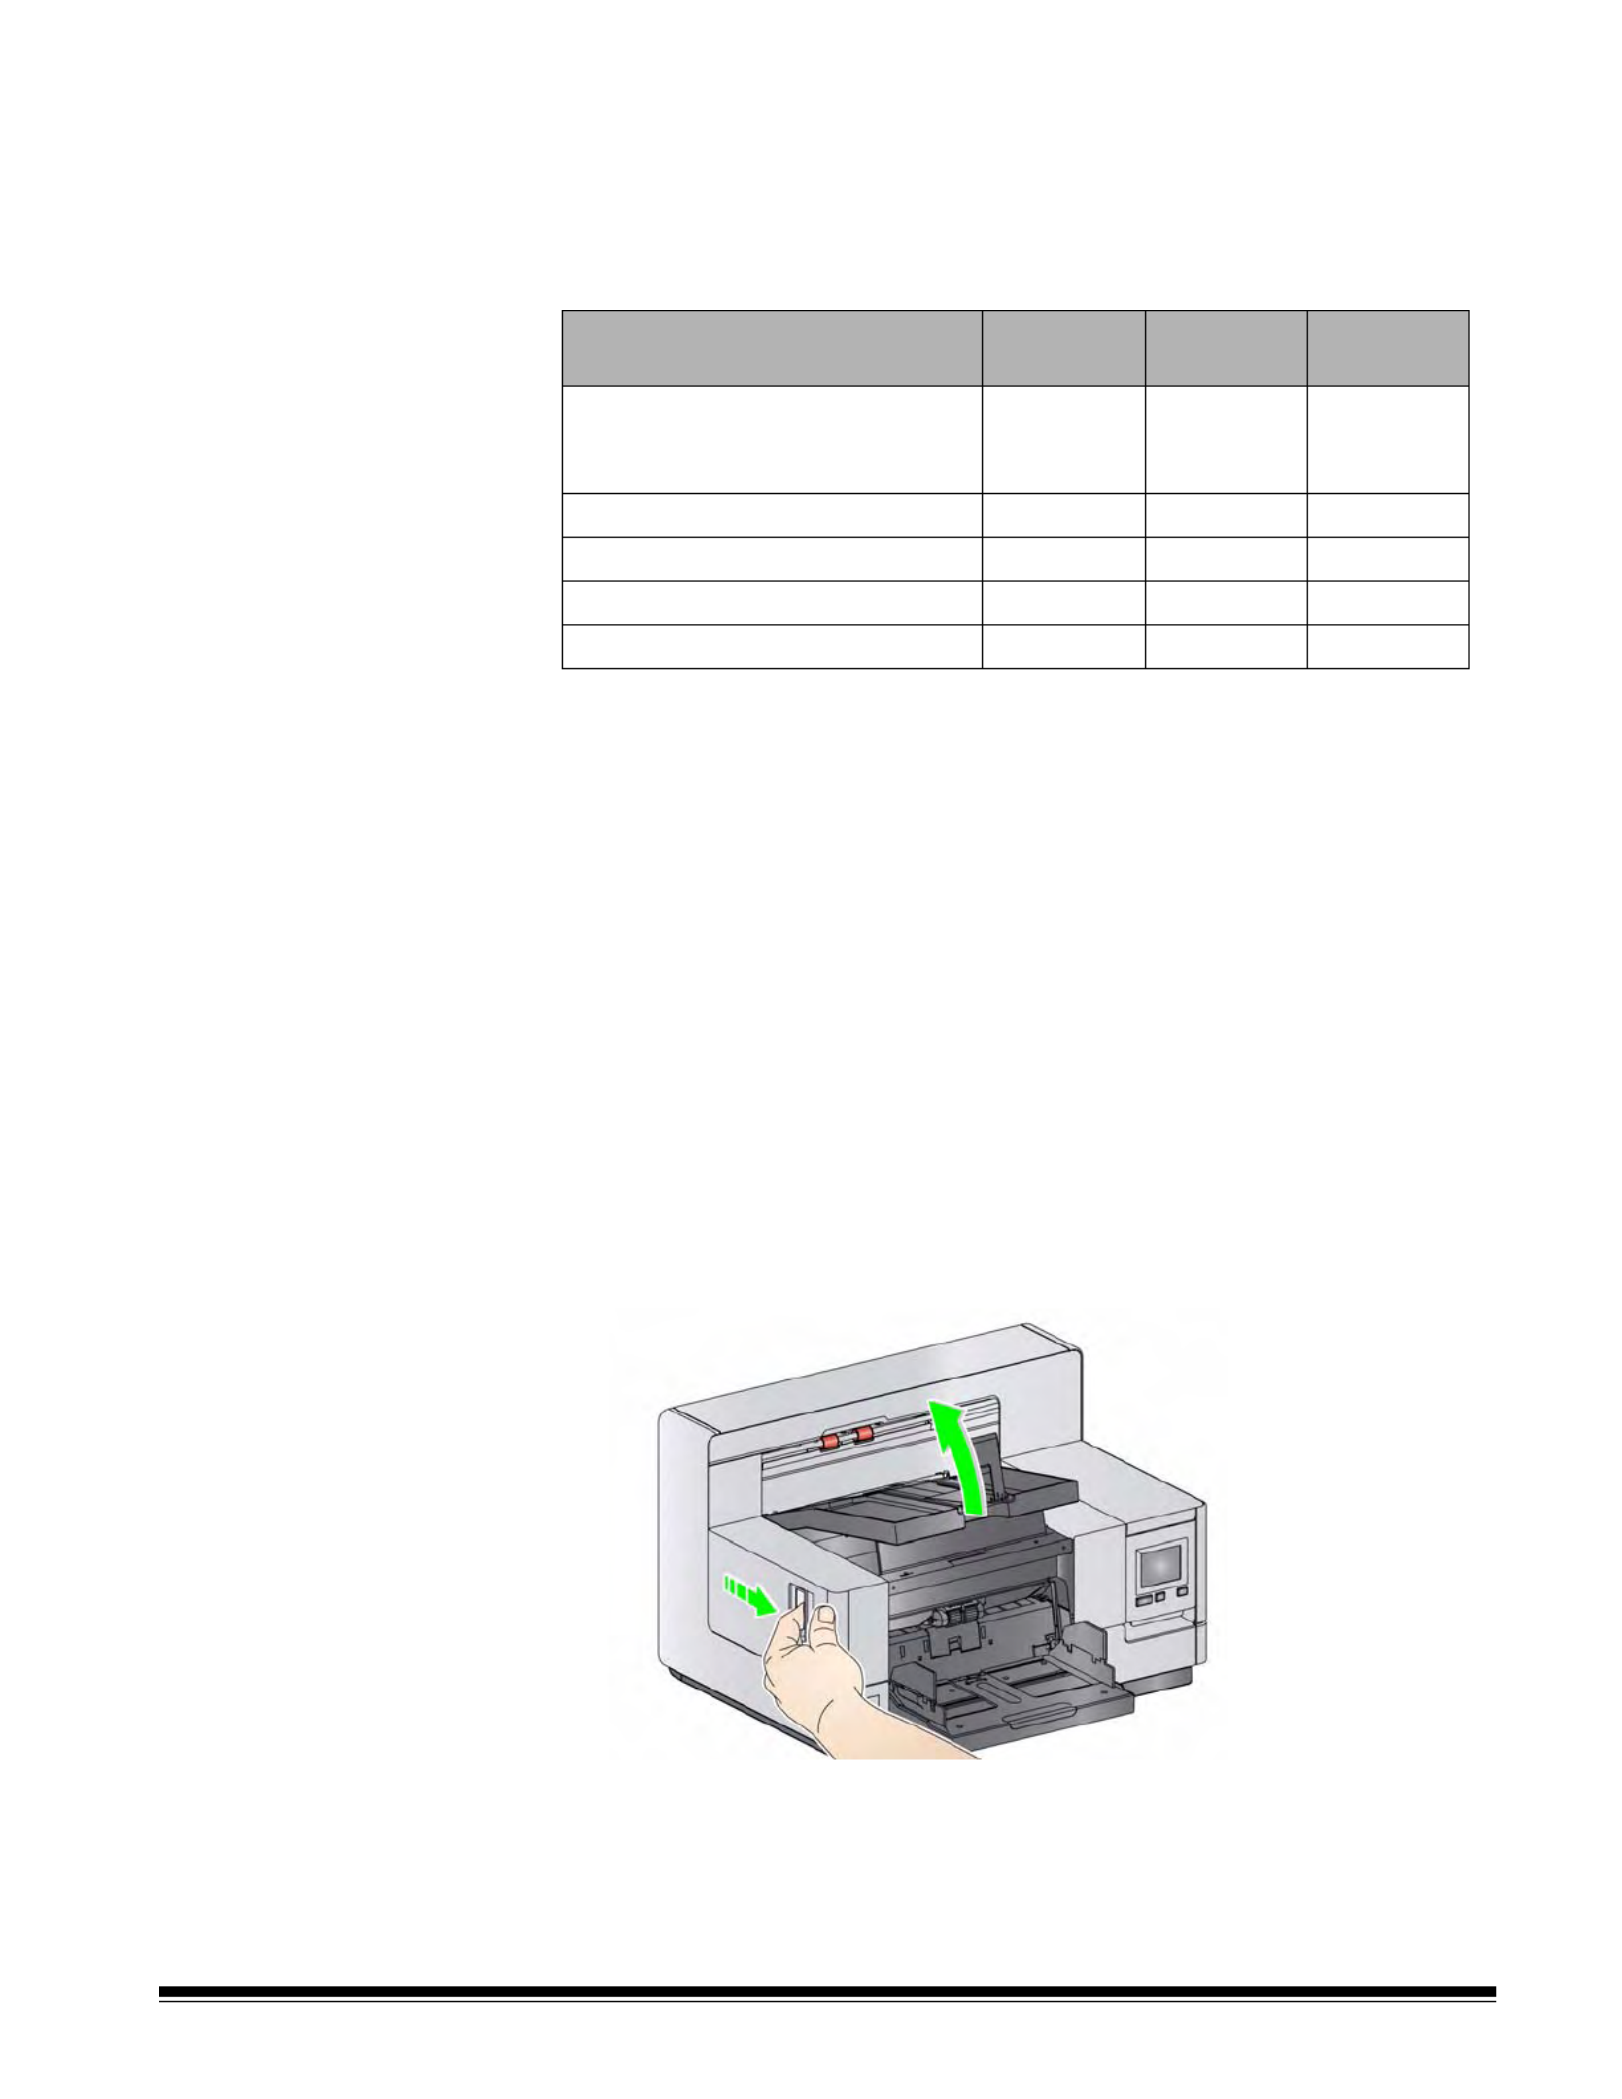
Opening the scanner
cover
1. Remove any documents from the input elevator and output tray.
2. Pull the scanner cover release latch forward. The scanner cover will open
partially. Raise the cover up to fully open the cover for access to the
internal components.
3. When finished cleaning the scanner or replacing a consumable, close the
scanner cover with both hands.
Procedure Start of
day
Middle of
shift
Start of new
shift
Vacuum output tray and input
areas (input elevator and
transport)
x
Clean all rollers x x
Vacuum transport area x x x
Clean imaging guides x x x
Run transport cleaning sheet x x

A-61670 December 2011 5-3
Cleaning procedures Cleaning your scanner and performing preventative maintenance on a regular
basis is required to ensure the best possible image quality.
Some document types generate more paper dust and debris and may require
more frequent cleaning.
Before cleaning your scanner or replacing consumables, review the following
information:
• Some debris from the rubber tires on the feed module and separation roller
is normal. Tire debris does not always mean that the tires are worn or
damaged. After cleaning, inspect the tires for wear, replace if needed and
replace the separation roller or feed module if necessary.
• When cleaning rollers/tires, allow the rollers/tires to dry completely before
scanning.
• Use only the recommended cleaning supplies. Using unapproved cleaning
fluids or solvents may damage the rubber tires.
• Do not use cleaners in confined areas, use with adequate ventilation.
• Do not use cleaners on hot surfaces. Allow surfaces to cool to ambient
temperature before use.
• Do not use canned/compressed air. Use of compressed air may cause
dust to be forced into the scanner’s imaging system and lodge in an area
that causes image quality issues and cannot be cleaned without removing
the camera.
• Do not use flammable compressed aerosols on or around the scanner.
• In addition to the recommended cleaning supplies, you may use a vacuum
cleaner to remove debris from the scanner.
• Staticide wipes contain isopropanol which can cause eye irritation and dry
skin. Wash your hands with soap and water after performing maintenance
procedures. Refer to the Material Data Safety Sheet (MSDS) for more
information. The MSDS is available on the Kodak web site at
www.kodak.com/go/MSDS.
NOTE: To access the MSDS, you will need to provide the catalog
number or keyword of the supply. See “Supplies and
consumables” later in this chapter for catalog numbers.
• The roller cleaning pad contains sodium lauryl ether sulfate and sodium
silicate which can cause eye irritation. Refer to the MSDS for more
information.

5-4 A-61670 December 2011
Vacuuming the output tray
and input elevator
1. Power down the scanner.
2. Remove the output tray.
3. Thoroughly vacuum the output tray area and the input elevator area.
Cleaning the rollers Cleaning the rollers includes all of the rollers in the transport area, the
separation roller tires and the feed module tires.
1. Open the scanner cover.
2. Manually rotate and wipe the rollers with a roller cleaning pad.
3. Dry the rollers with a lint-free cloth.

A-61670 December 2011 5-5
Cleaning the separation
roller tires
4. Pull the separation roller cover forward and remove the separation roller.
NOTE: The separation roller cover is spring-loaded. Hold the separation
roller cover back until you remove the separation roller, then
gently lower the separation roller cover back in place.
5. Manually rotate and wipe the separation roller tires with a roller cleaning
pad. For best results wipe parallel to the ribs in order to remove any
residue between the ribs.
6. Inspect the tires. If the tires show signs of wear or damage, replace the
tires. See “Replacement procedures” later in this chapter.
7. Reinstall the separation roller by aligning the slots on the separation roller
with the holders.

5-6 A-61670 December 2011
Cleaning the feed module
tires
8. Clean the feed module tires by manually rotating and wiping the feed
module tires with a roller cleaning pad. For best results wipe parallel to the
ribs in order to remove any residue between the ribs. You do not need to
remove the feed module to clean the tires.
9. Inspect the tires. If the tires show signs of wear or damage, replace the
feed module tires. See “Replacement procedures” later in this chapter.
Cleaning the flippable
white background strips
10. Wipe the upper and lower background strips with a Staticide wipe or a
Brillianize Detailer wipe.
11. Wipe the upper and lower background strips again with an almost-dry
Staticide wipe or a clean lint-free cloth to remove any streaks.
Produkt Specifikationer
| Mærke: | Kodak |
| Kategori: | Scanner |
| Model: | i5200V |
Har du brug for hjælp?
Hvis du har brug for hjælp til Kodak i5200V stil et spørgsmål nedenfor, og andre brugere vil svare dig
Scanner Kodak Manualer

6 Oktober 2024
12 September 2024
31 August 2024
30 August 2024
10 August 2024
8 August 2024
7 August 2024
5 August 2024
5 August 2024
5 August 2024
Scanner Manualer
- Scanner SilverCrest
- Scanner Canon
- Scanner Panasonic
- Scanner Lenco
- Scanner Braun
- Scanner Lexmark
- Scanner Epson
- Scanner Technaxx
- Scanner HP
- Scanner Easypix
- Scanner Nikon
- Scanner Brother
- Scanner Nedis
- Scanner Dymo
- Scanner Hama
- Scanner Trust
- Scanner Honeywell
- Scanner Uniden
- Scanner Medion
- Scanner König
- Scanner Targus
- Scanner Maginon
- Scanner Zebra
- Scanner Rollei
- Scanner Fujitsu
- Scanner Voltcraft
- Scanner Ricoh
- Scanner Konica-Minolta
- Scanner Avision
- Scanner GlobalTronics
- Scanner Reflecta
- Scanner Cobra
- Scanner Sagem
- Scanner Albrecht
- Scanner Veho
- Scanner Newland
- Scanner DocketPORT
- Scanner ION
- Scanner Xerox
- Scanner AVerMedia
- Scanner Renkforce
- Scanner Antec
- Scanner Martin
- Scanner Genius
- Scanner Panduit
- Scanner Eurolite
- Scanner Plustek
- Scanner Blackmagic Design
- Scanner Kogan
- Scanner Visioneer
- Scanner Steren
- Scanner Neat
- Scanner Elmo
- Scanner Agfa
- Scanner AgfaPhoto
- Scanner Tevion
- Scanner Kensington
- Scanner Minolta
- Scanner Dnt
- Scanner Hella
- Scanner Ipevo
- Scanner Jobo
- Scanner Zolid
- Scanner Traveler
- Scanner Mustek
- Scanner RadioShack
- Scanner ICarsoft
- Scanner Vupoint Solutions
- Scanner Kenko
- Scanner Jay-tech
- Scanner Yupiteru
- Scanner DTRONIC
- Scanner Ross-Tech
- Scanner DENSO
- Scanner Perfect Choice
- Scanner IRIS
- Scanner Soundsation
- Scanner CDVI
- Scanner Scan Dimension
- Scanner Dyka
- Scanner Matter And Form
- Scanner Pacific Image
- Scanner Doxie
- Scanner CZUR
- Scanner Cartrend
- Scanner 3DMAKERPRO
- Scanner Ambir
- Scanner Creality
- Scanner Microtek
Nyeste Scanner Manualer

30 Marts 2025

29 Marts 2025

28 Januar 2025
24 Januar 2025
16 Januar 2025
12 Januar 2025
11 Januar 2025
30 December 2025
29 December 2024

14 December 2024